Works - DRGW Wide-Vision Caboose #01500 [Works_Cabooses]
 : Rio Grande 01500
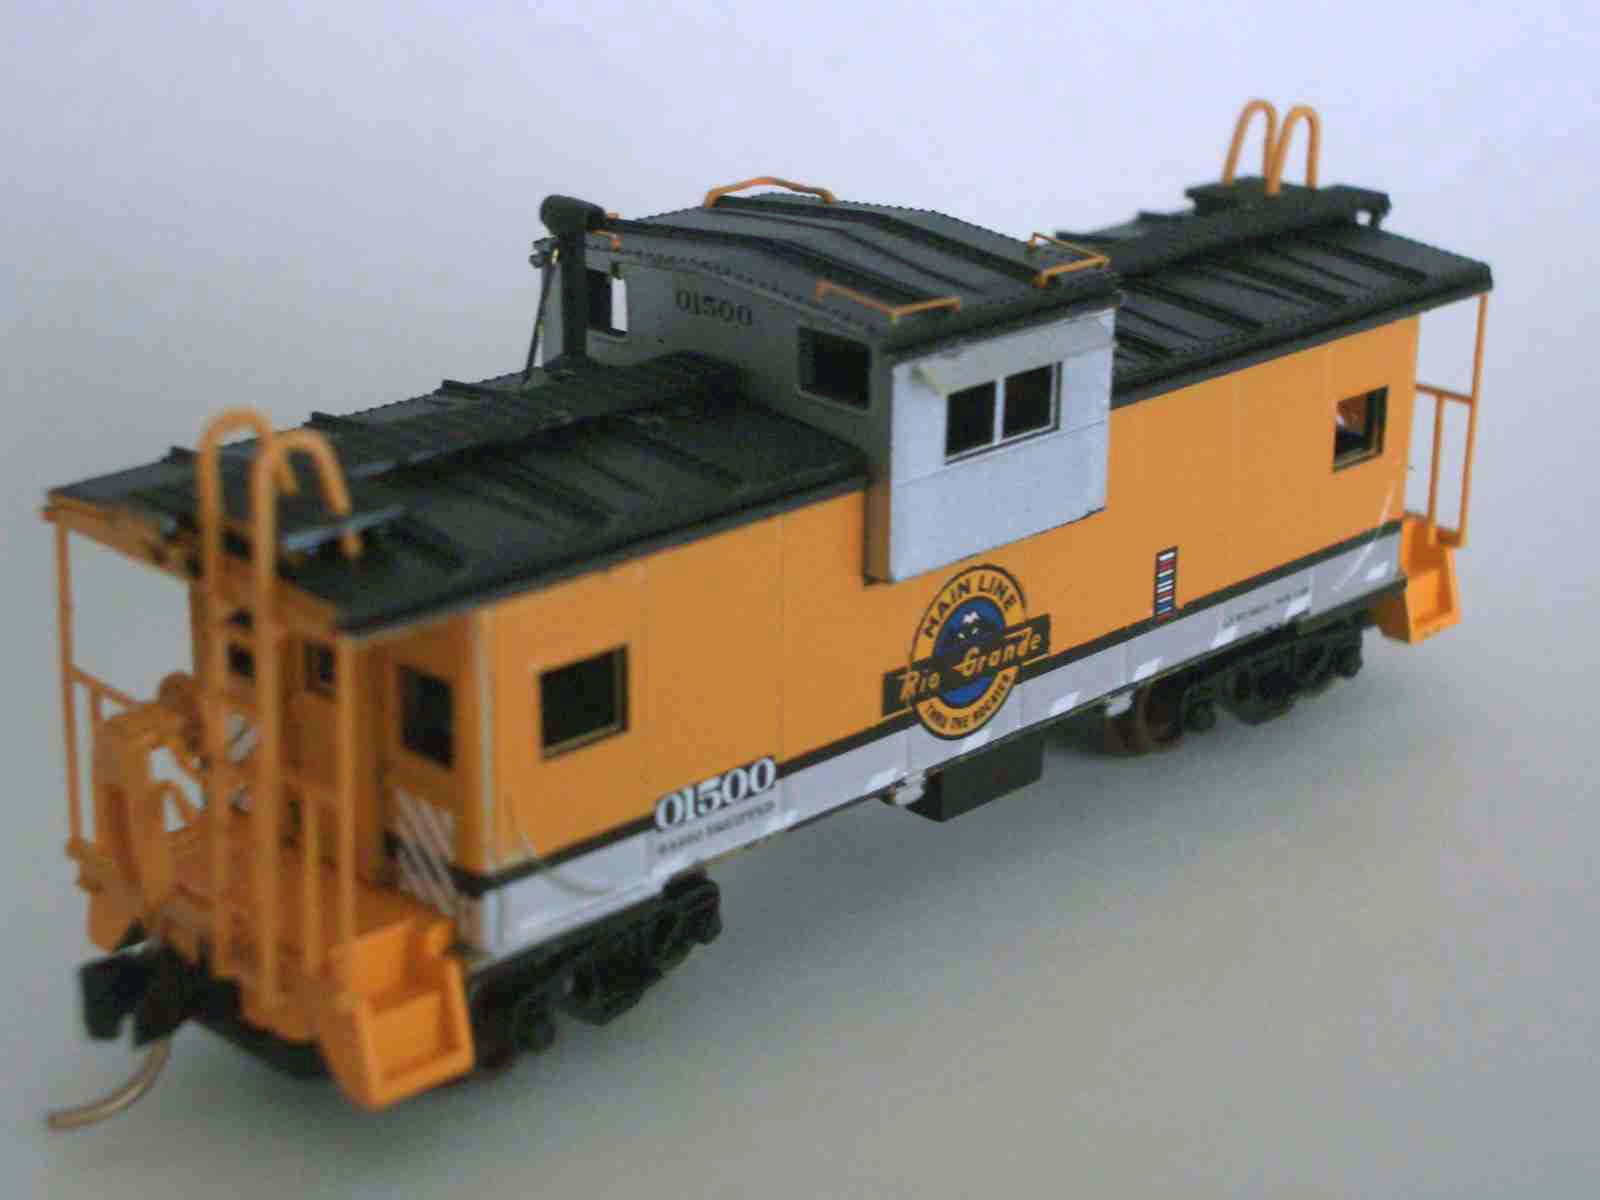
Atlas Wide-Vision Caboose is a good model. But the window arrangement is a little different from the Rio Grande prototype.
Here I "moved" the windows to make more accurate.
I used Atlas decorated caboose #30279 to omit painting and decal-ing. I also used Atlas roof walk and ladders, TRAINWORX caboose detailing parts #3560 for window sun-shade and grab-irons.
I trimmed off the little window and patched the hole. trimmed window is transplanted to the other side.
I masked to paint only yellow part and sprayed TAMIYA TS-56 "BRILLIANT ORANGE".
 : trimming off the window and,
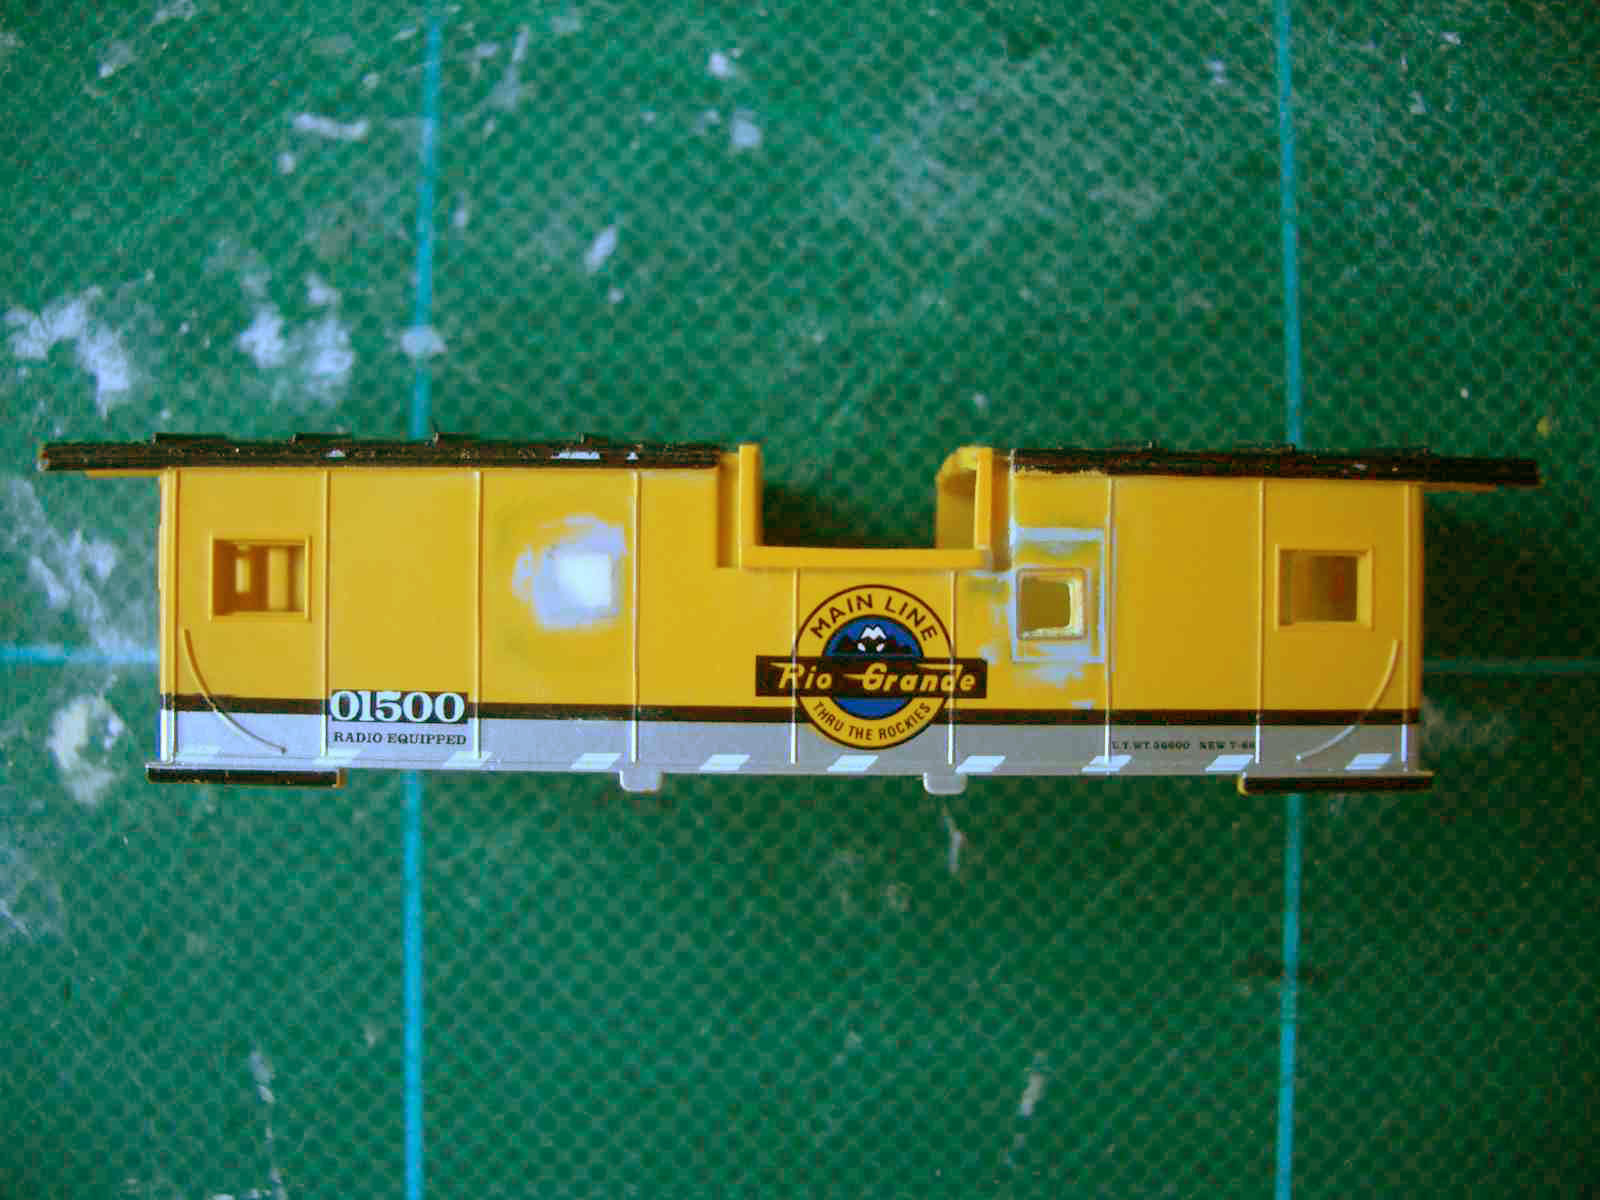 : transplant to the other side
Works - DRGW Welded Caboose #01480, 01481 and 01490 [Works_Cabooses]
 : Rio Grande 01481
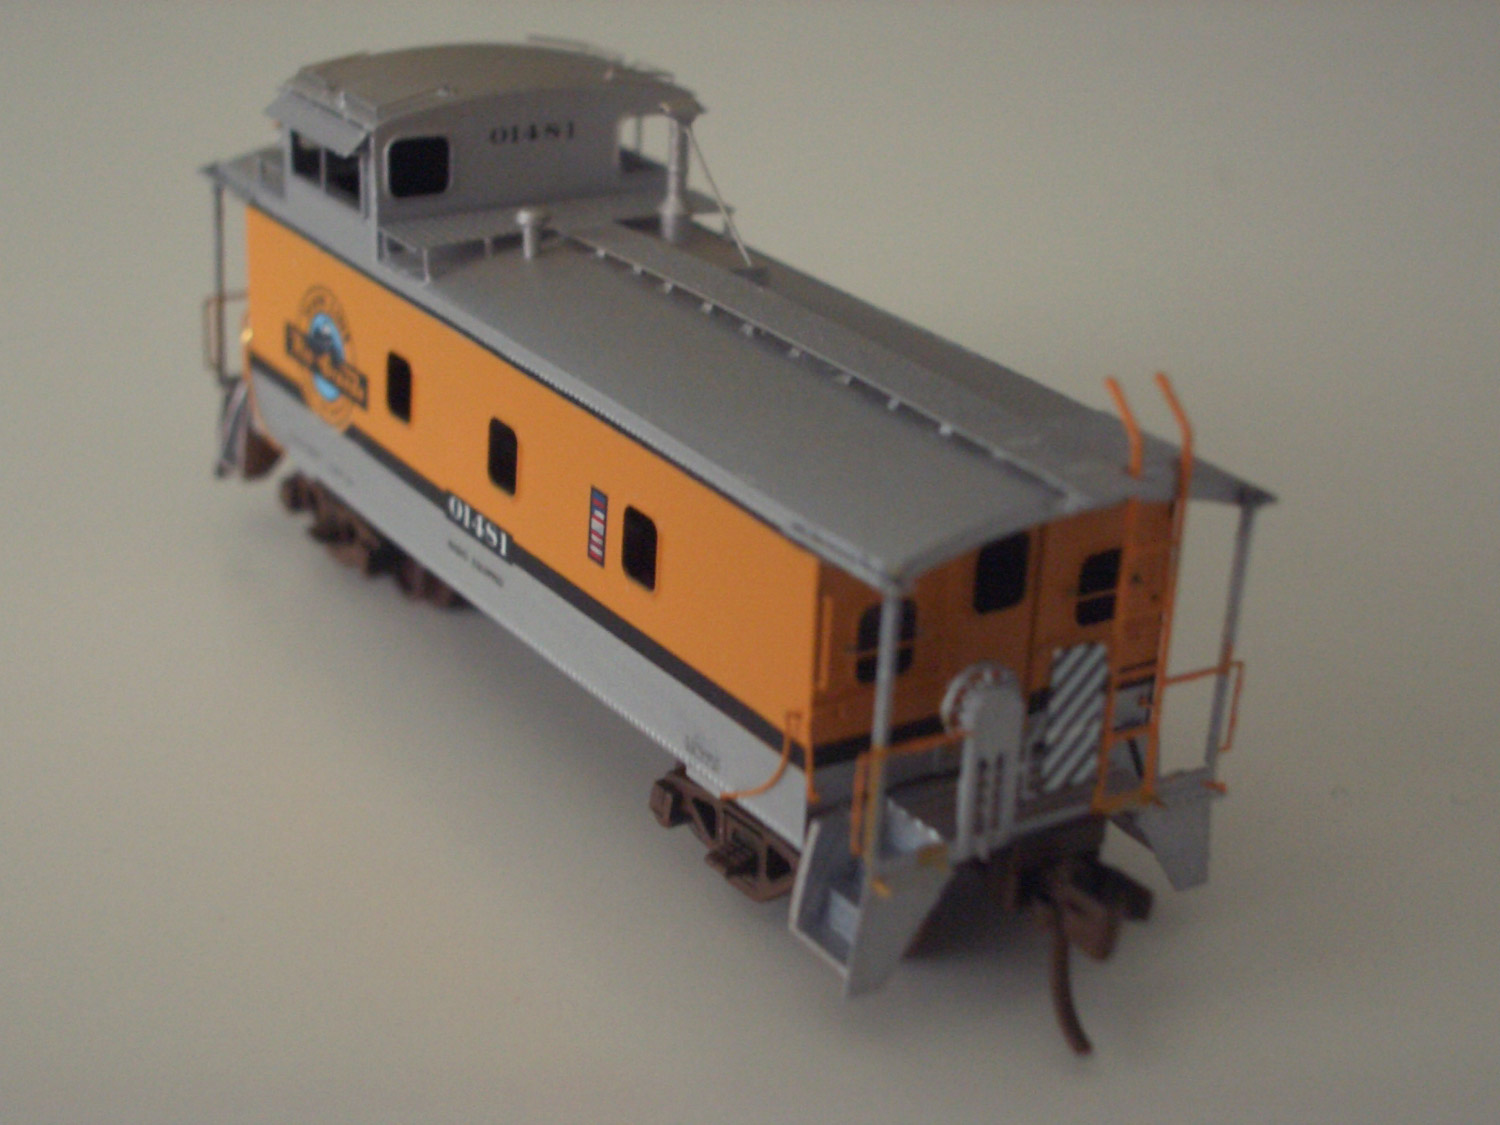
After Overland Models canceled offering the Rio Grande caboose, I tried making it from the TRAINWORX's laminate brass sides. It was a well designed kit to treat with. Here I show the result.
I used the article by Pat Sanders appeared in the jul/aug 07 issue of "N SCALE RAILROADING" as a textbook.
Additional to the method mentioned in the article, I changed the underbody of the caboose with Micro-Trains parts.
The parts I used are;
TRAINWORX Rio Grande welded caboose laminate brass sides with details #01470-01490
TRAINWORX decal #60-200
Atlas undecorated cupola caboose #3560
Micro-Trains Underbody Subframe #499 70 906
Micro-Trains Smokestacks #499 57 905
Micro-Trains AJAX Brake Wheels #499 05 901
Micro-Trains Body Mount Couplers #1015-1-B
Pat put the photo of my model on his page;
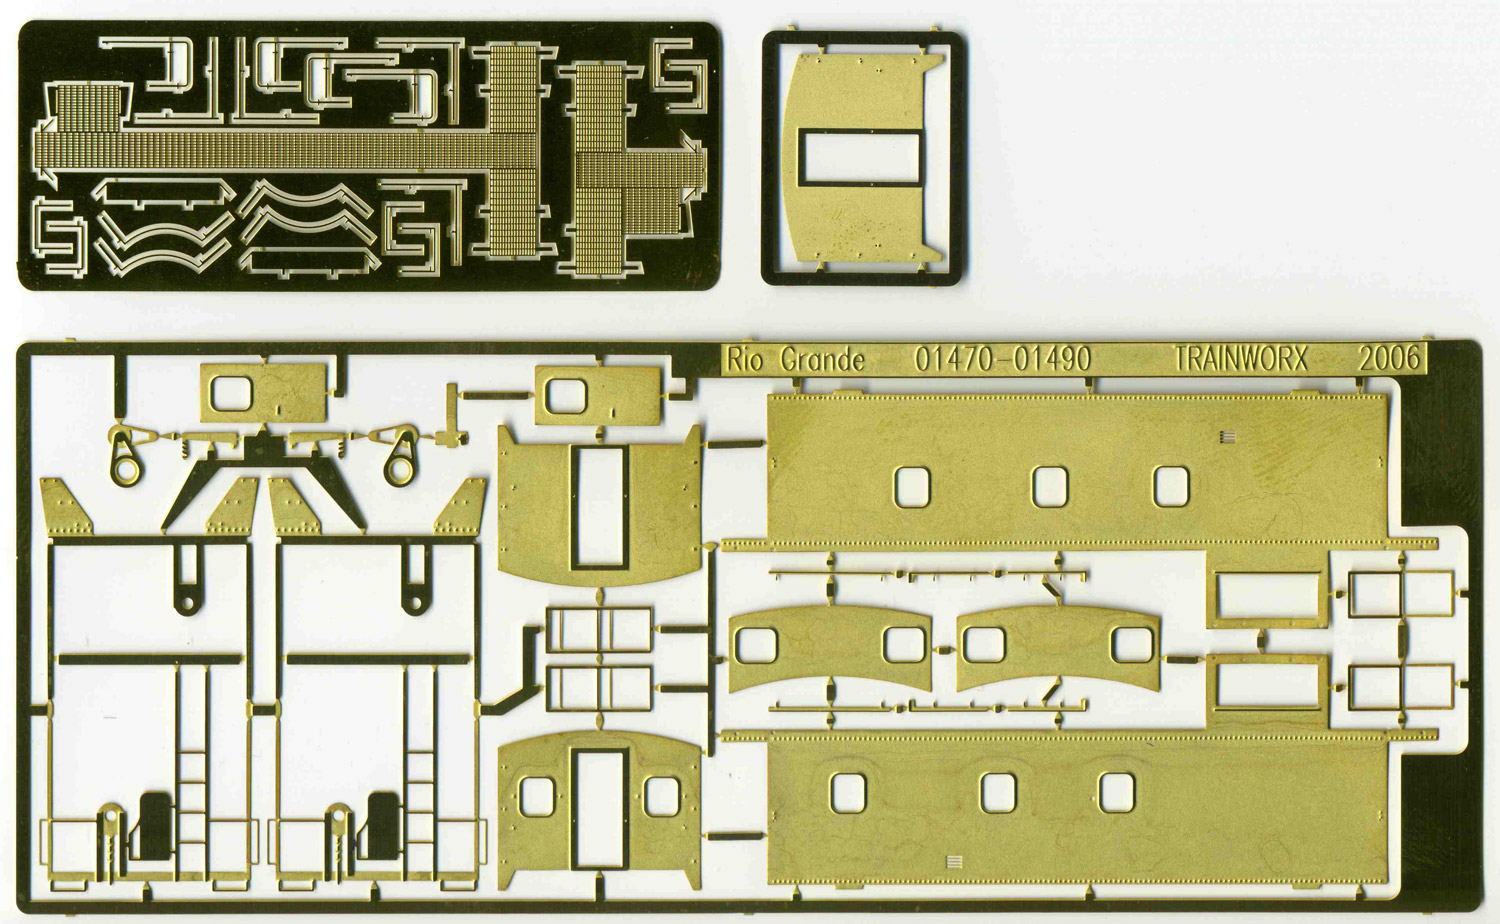 : TRAINWORX sides and detail parts
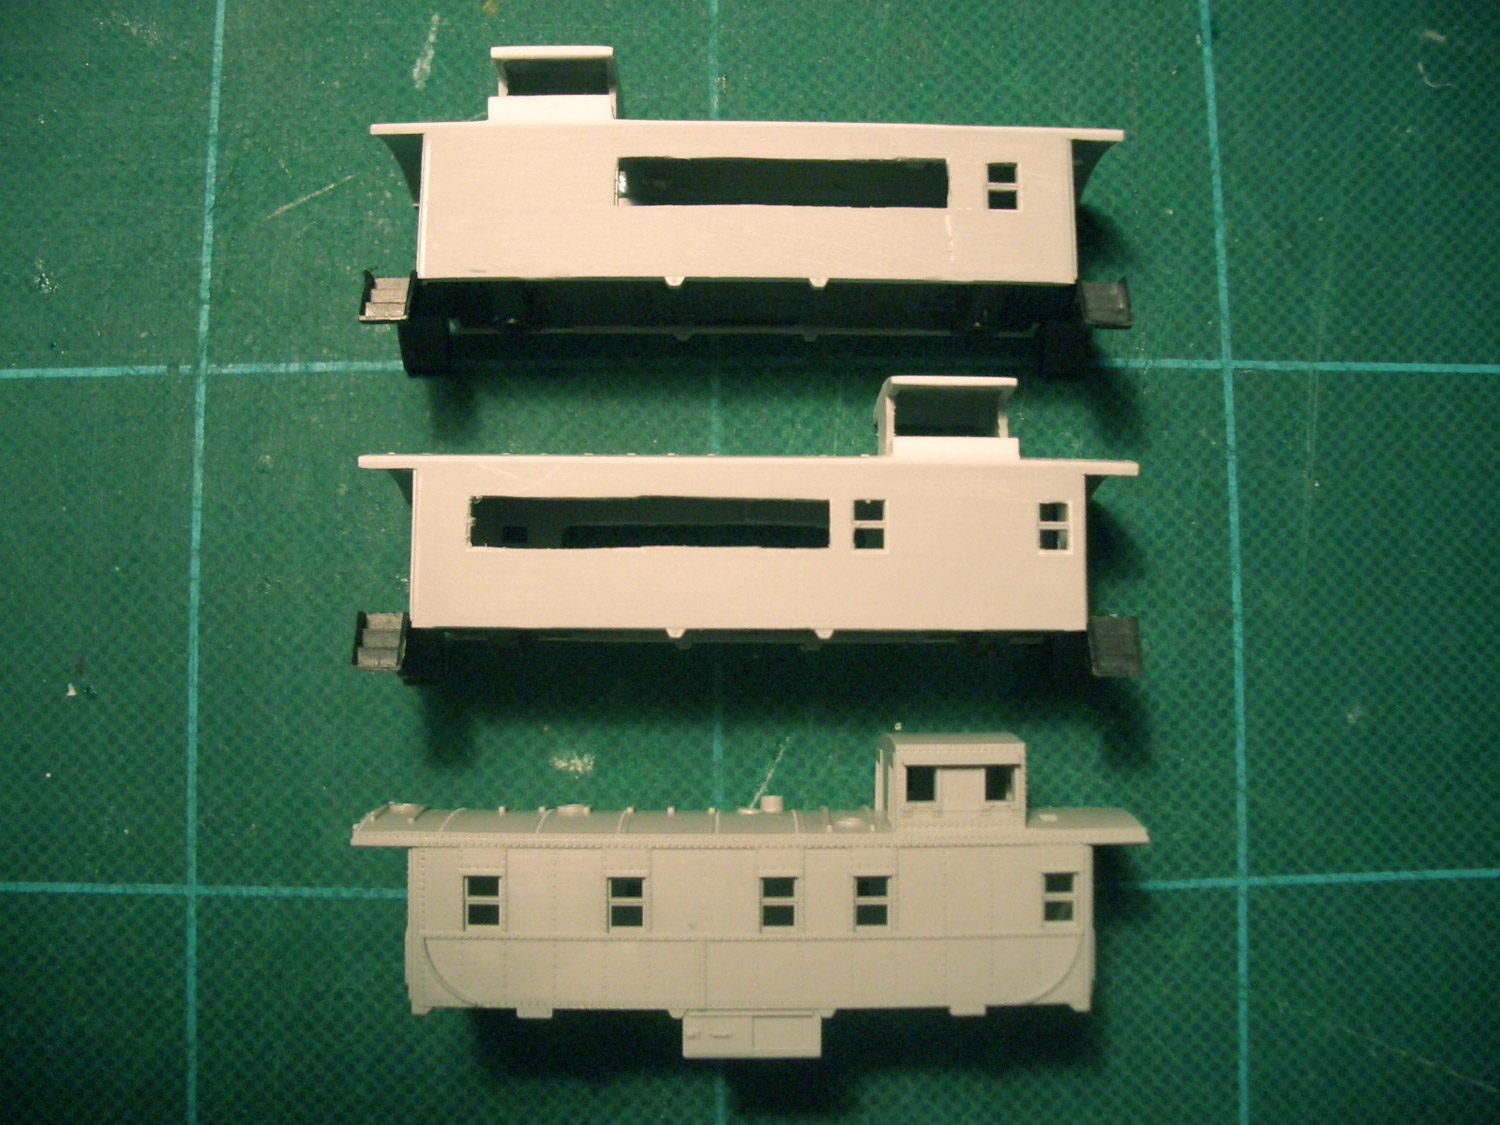 : Stripped body shell(top: result, below: original)
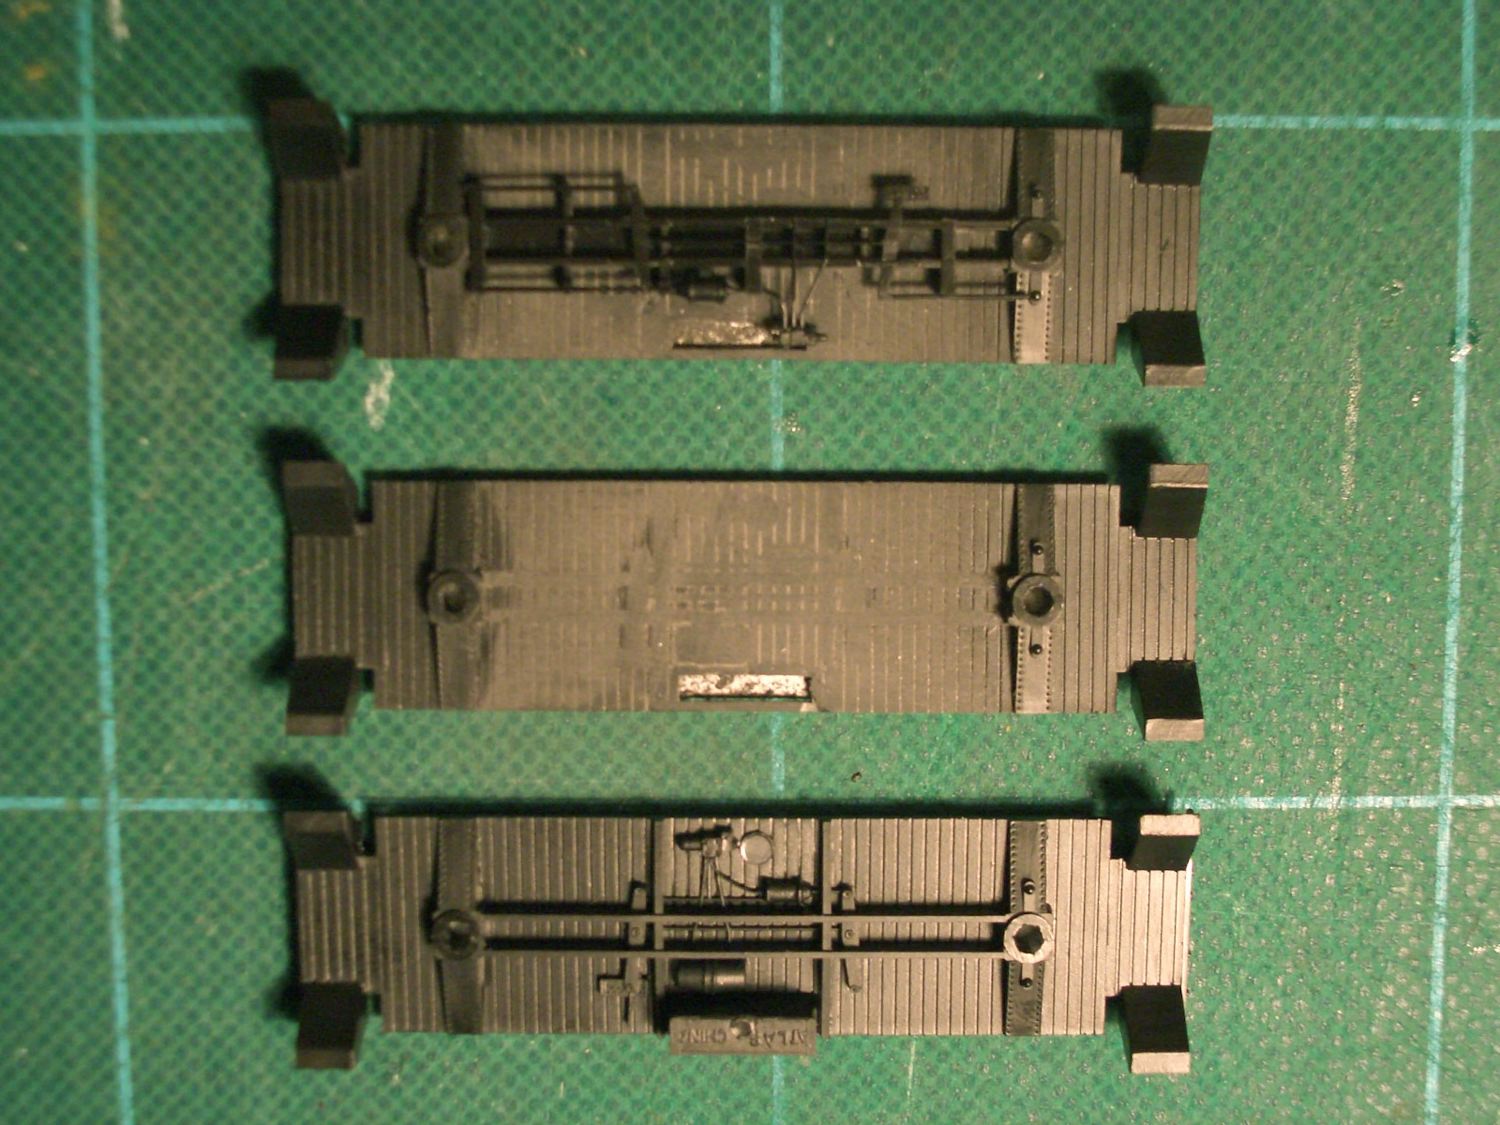 : Reformed underbody(top: result, below: original)
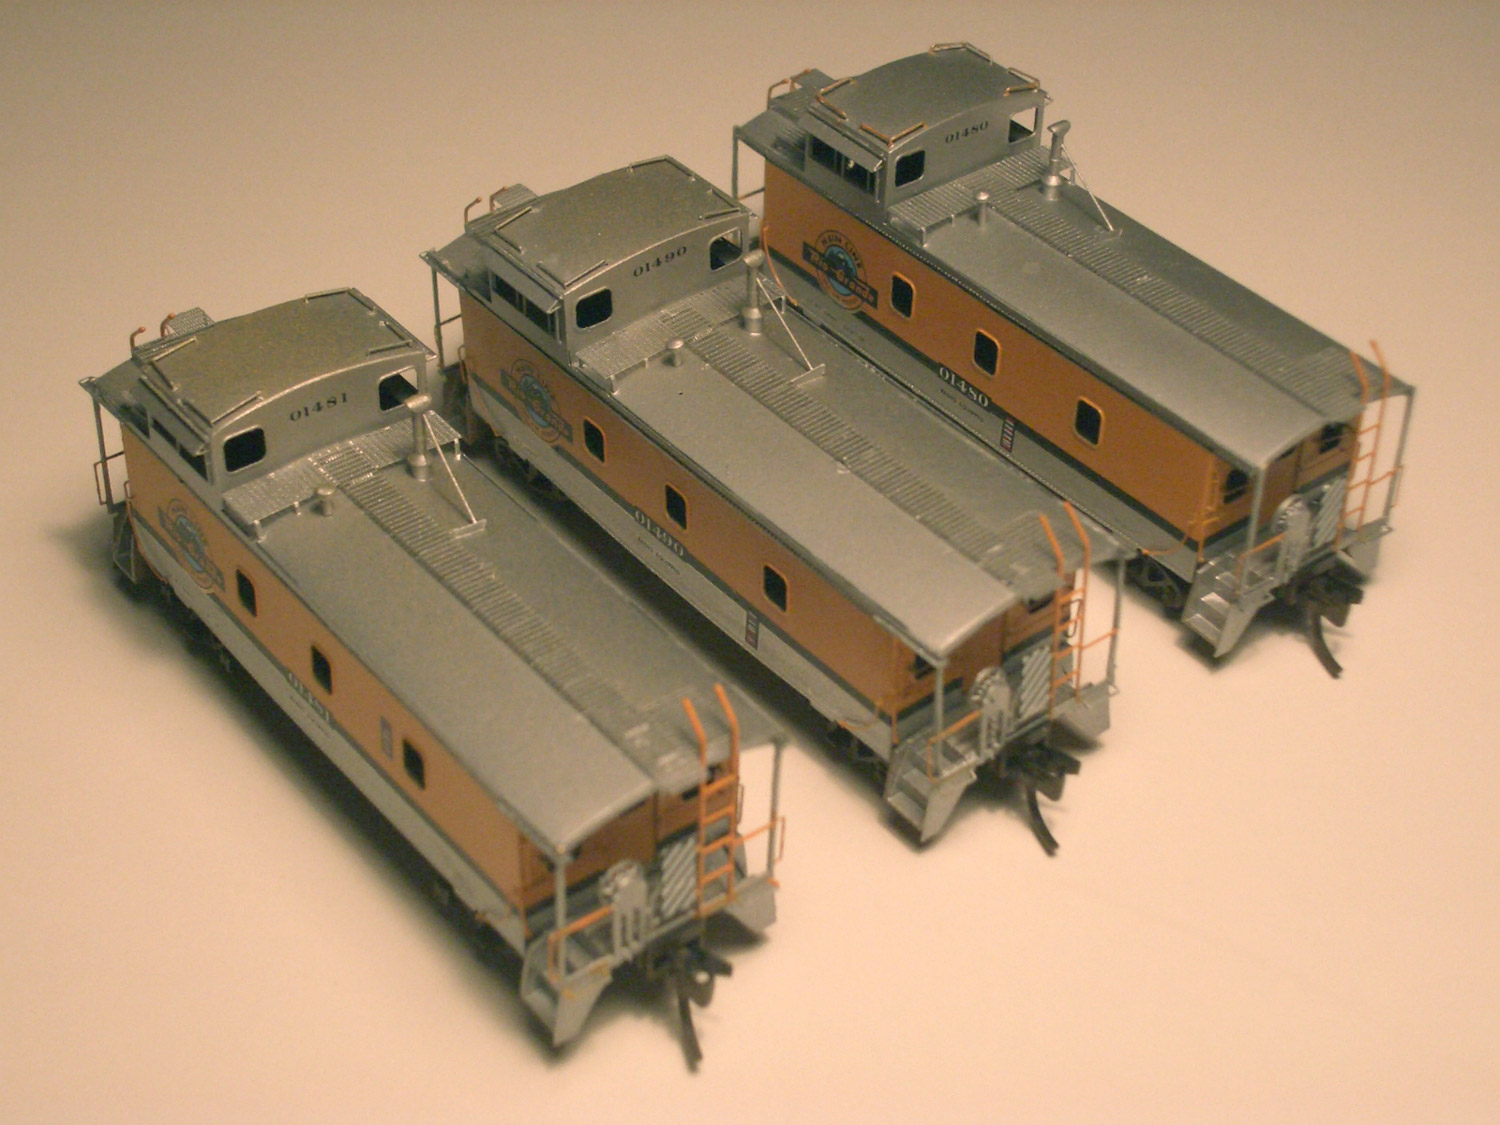 : Rio Grande 01480, 01481 and 01490
Works - Great Northern Railway Caboose X187, part 1 [Works_Cabooses]
 : GN X187
This is the caboose I created to bring back the scene: Great Northern Railway caboose, X187.
GN X187 was one of four combines converted to cabooses. The others were X182, 183, and 186. X187 was originally a second class coach #3707 built by American Car & Foundry in 1913.
In 1951, by then the coach-sleeper was converted to a combine #579.
In 1966, the car was renumbered as X187 and assigned to caboose service, carrying the slogan “SAFETY TODAY EVERY DAY”.
In 1976, Burlington Northern Railroad renumbered X183 to BN #11273, X187 to BN #11478, while X186 kept the original number according to “Friends of Burlington Northern Railroad” web page.
In 1978, BN #11478 (ex-GN X187) was retired and now preserved at Fort Peck, MT.
The combine/caboose was 61’5” inside and 70’5” long over the buffers. It had 28 seats, a lavatory on the passenger end and a 30’ inside long baggage compartment.
Some prototype photos are found in books and on web pages. Morning Sun GN Color Guide has a photo of X187. Photo of X186 was found at “Passenger Car Photo Index” web page. Photos of preserved BN #11478 (ex-GN X187) are found at “Great Northern Empire” and “Passenger Car Photo Index” web pages.
In my prototype photo, we can barely see relatively the number and a slogan. The condensed number of the particular car demonstrates this car as X187 because X186 has more spaced number. Also is that the photos of both sides of the car was available for X187. Accordingly, I decided to model the particular car.
revised, Nov. 17, 2021
* BN caboose list on web;
* X186 photo found at “Passenger Car Photo Index” web page;
* 2002 photos of X187 found at “Great Northern Empire” web page;
* 1975 photos of X187 at Railroad Picture Archives site;
大きな地図で見る: street view of BN 11478 (ex-GN X187) preserved at Fort Peck, MT.
 : GN X187
2013-03-15 09:00
コメント(2)
Works - Great Northern Railway Caboose X187, part 2 [Works_Cabooses]
 : fig. 1, drawing process
I’m trying to create Great Northern Railway caboose X187 for my “bringin’ back the scene” project.
We can find pictures of GN caboose X187 in books and web pages. But I couldn’t find any drawings. The only information I got is that it was 70’5” long over the buffers according to “Great Northern Empire” web page. So, I tried to draw the plan from the photo.
I used the photo of brother combine GN #585 also preserved at Fort Peck, MT, because the photo was one of the clearest among photos I found.
the photo I used to deduce the plan;
I retraced the method of perspective drawing to deduce the opening arrangement of the car. Figure above shows the way I tried. Figure below shows the deduced prototype plan (This time, I planned to use MTL passenger car bodies. So, I referred to MTL’s model for elevations; windows seem rather tall and letter board is a little narrow).
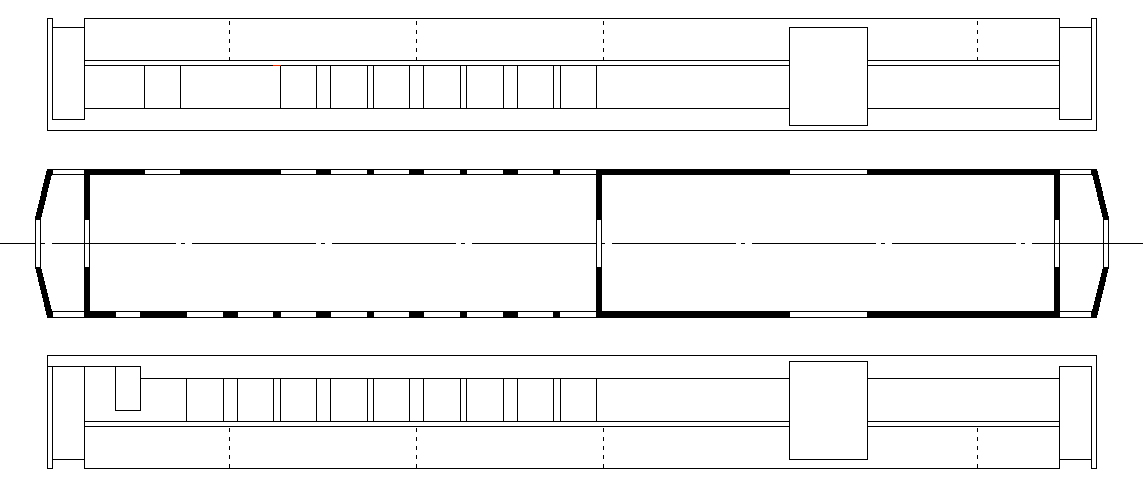 : fig. 2, deduced prototype plan
Next, I scanned the MTL body and decided the plan where to cut and join. Figure below shows the kitbashing plan. Red lined squares show the filling, while the green lined squares show the new opening.
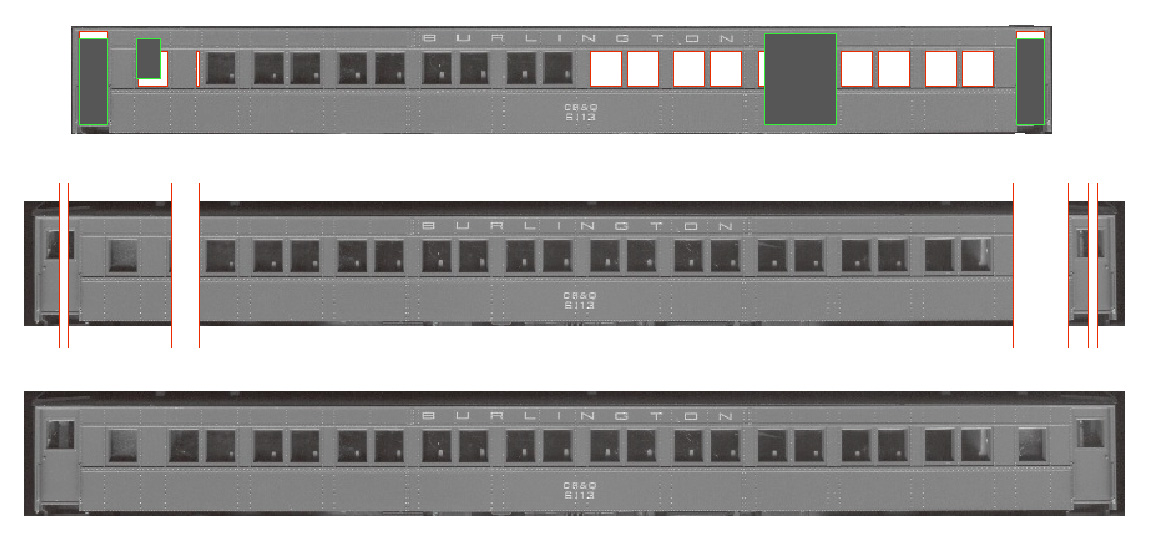 : fig. 3, kitbashing plan
2013-03-22 09:00
コメント(0)
Works - Great Northern Railway Caboose X187, part 3 [Works_Cabooses]
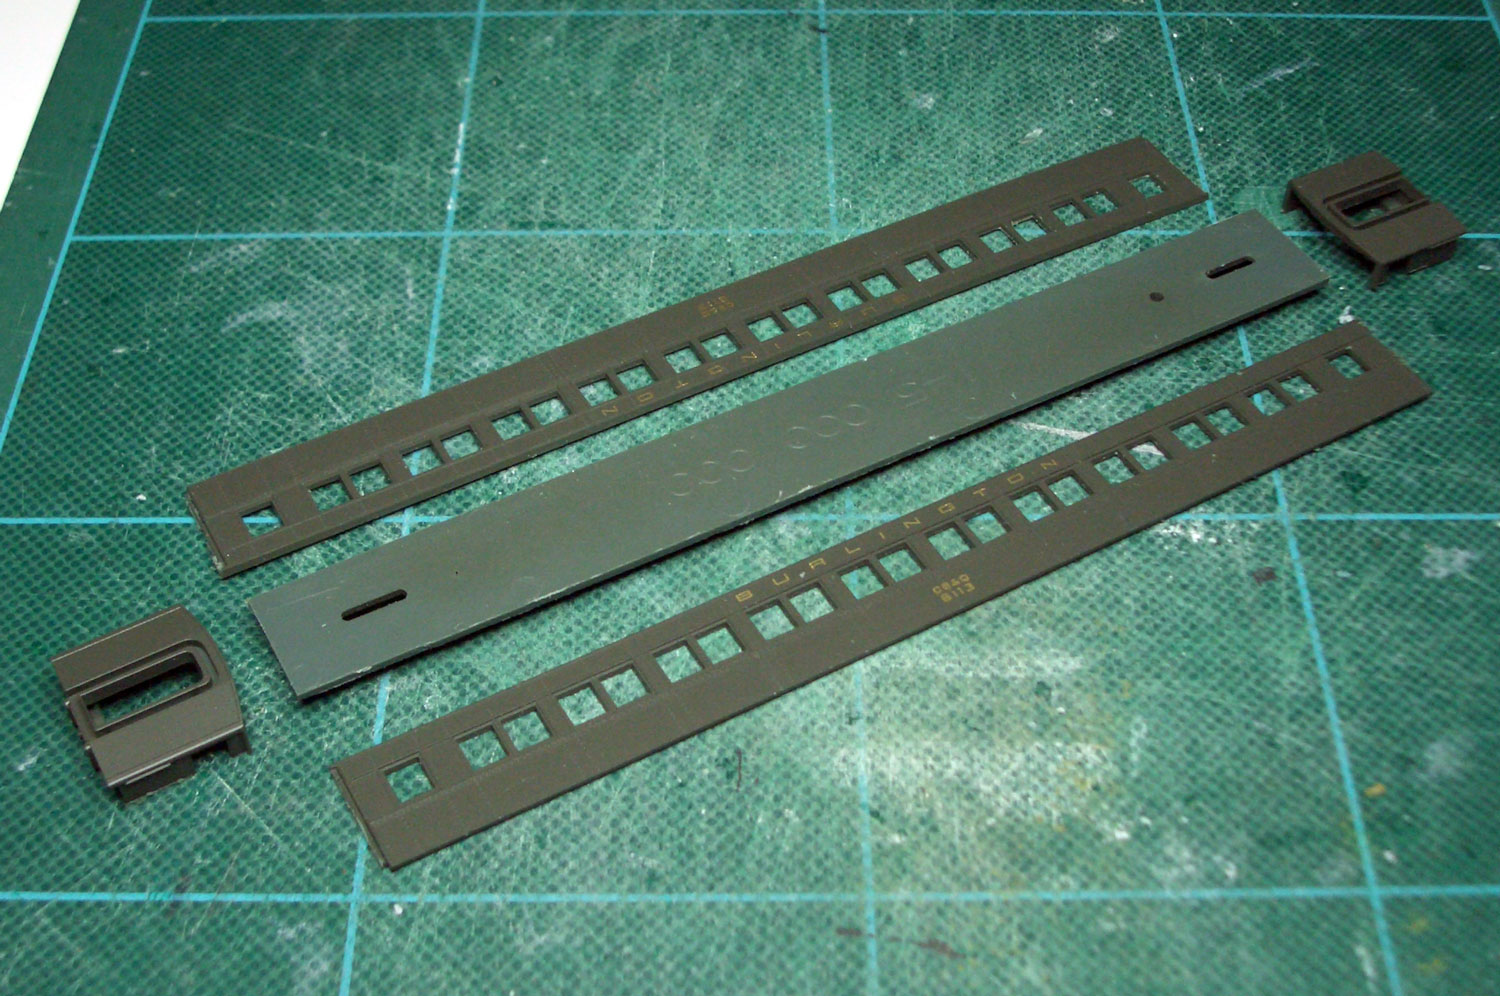 : MTL car cut to parts
I’m trying to create Great Northern Railway caboose X187 for my “bringin’ back the scene” project.
I cut the MTL Heavyweight Paired Window Coach Car body to flat sides for the ease of work. I filled and opened the windows according to my plan shown before. Narrow window and baggage doors came from MTL Parlor Car. I shove the gutter to make letter board taller. This make the elevation a little more accurate to the prototype.
I added slim brass flat bar to represent the gutter. Some thin styrene sheets were used to represent the siding. I applied some rivets using Archer rivet decal. I kept the straight handrails represented on the sides of doors of the model. I used BLMA parts #93, Rear Fan Grab Iron for curved handrails.
I re-assembled the sides with shortened floor to make the car body. I had to add thin styrene sheet to the side of the floor to regenerate the thickness of the saw I used. Modified partition wall, seats, window glazing and the weight from MTL were re-installed to this car body.
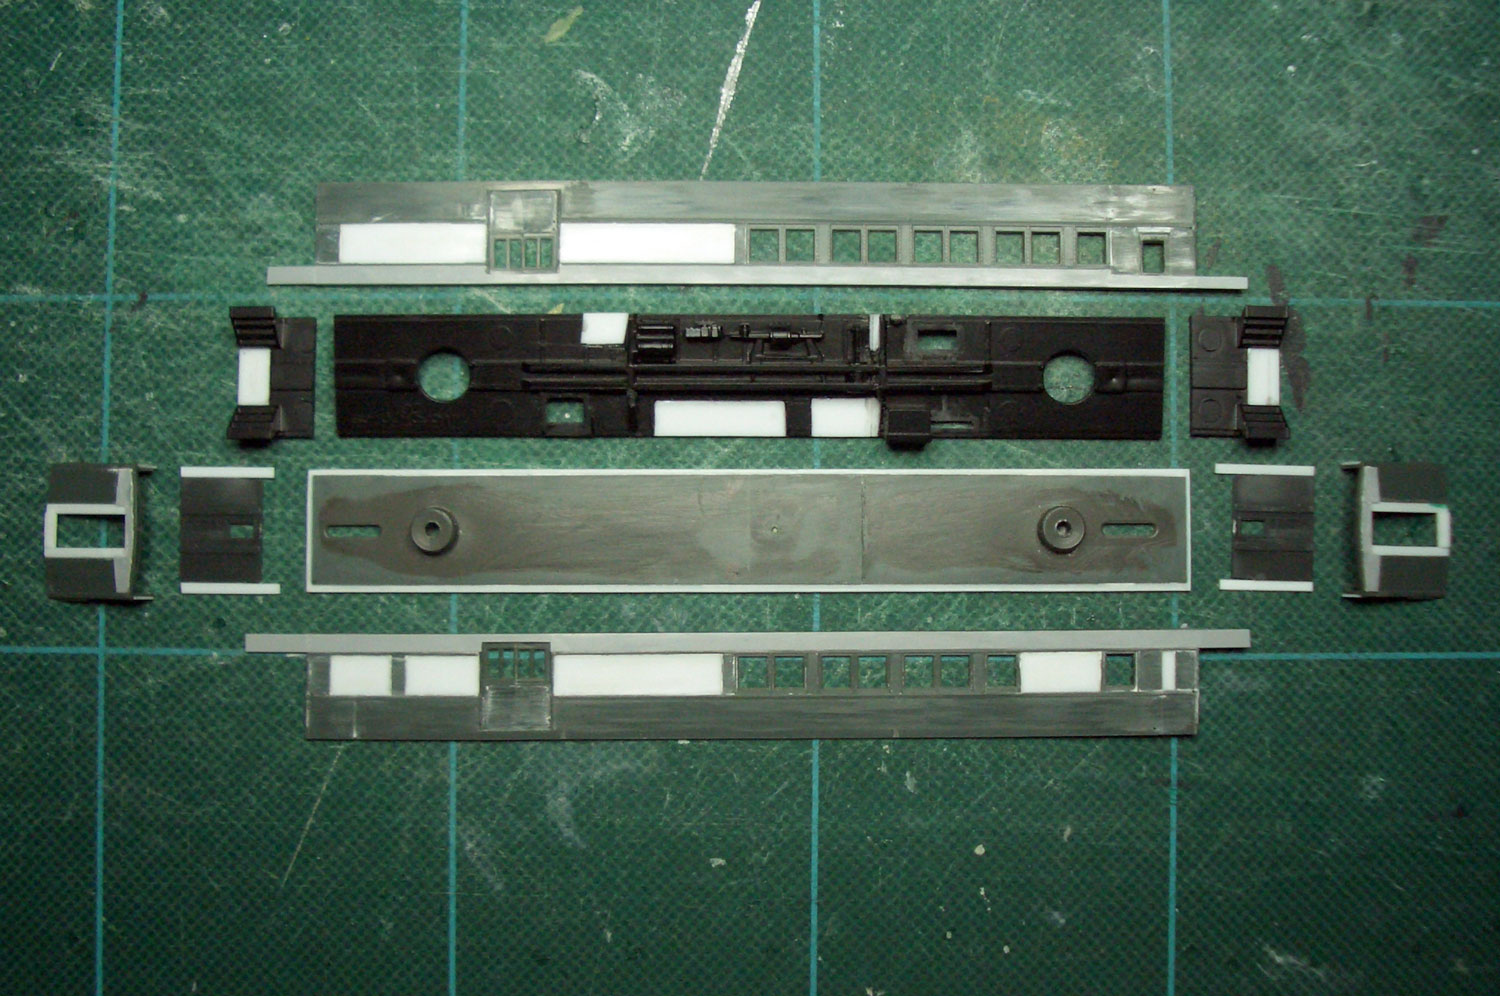 : car sides ready to re-assemble
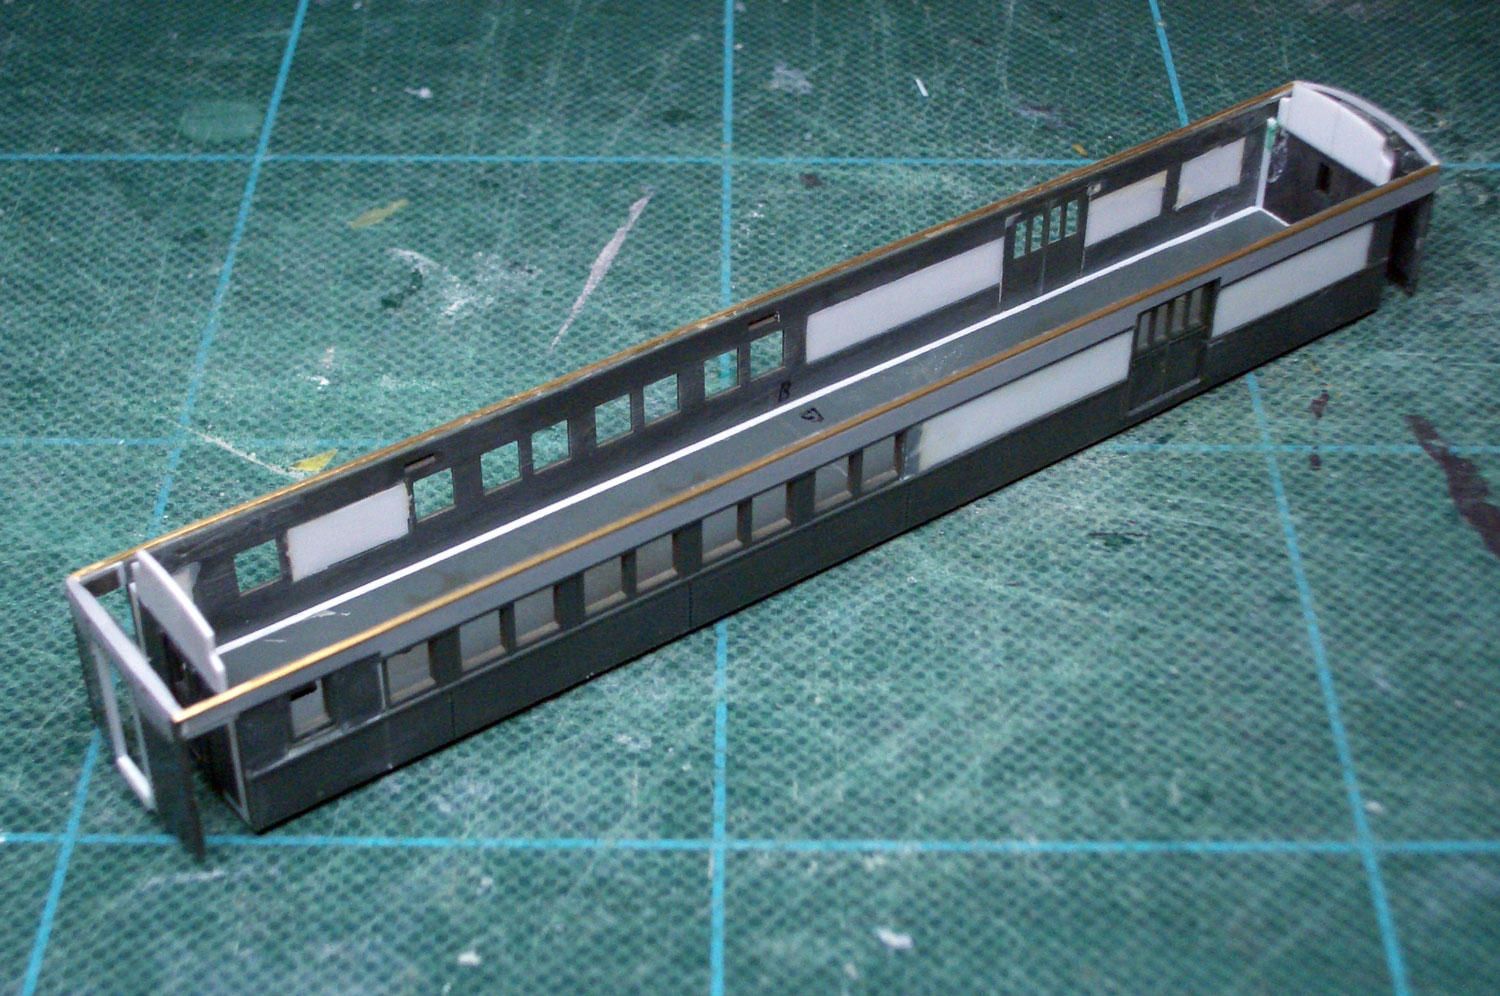 : re-assembled car body
2013-03-29 09:00
コメント(0)
Works - Great Northern Railway Caboose X187, part 4 [Works_Cabooses]
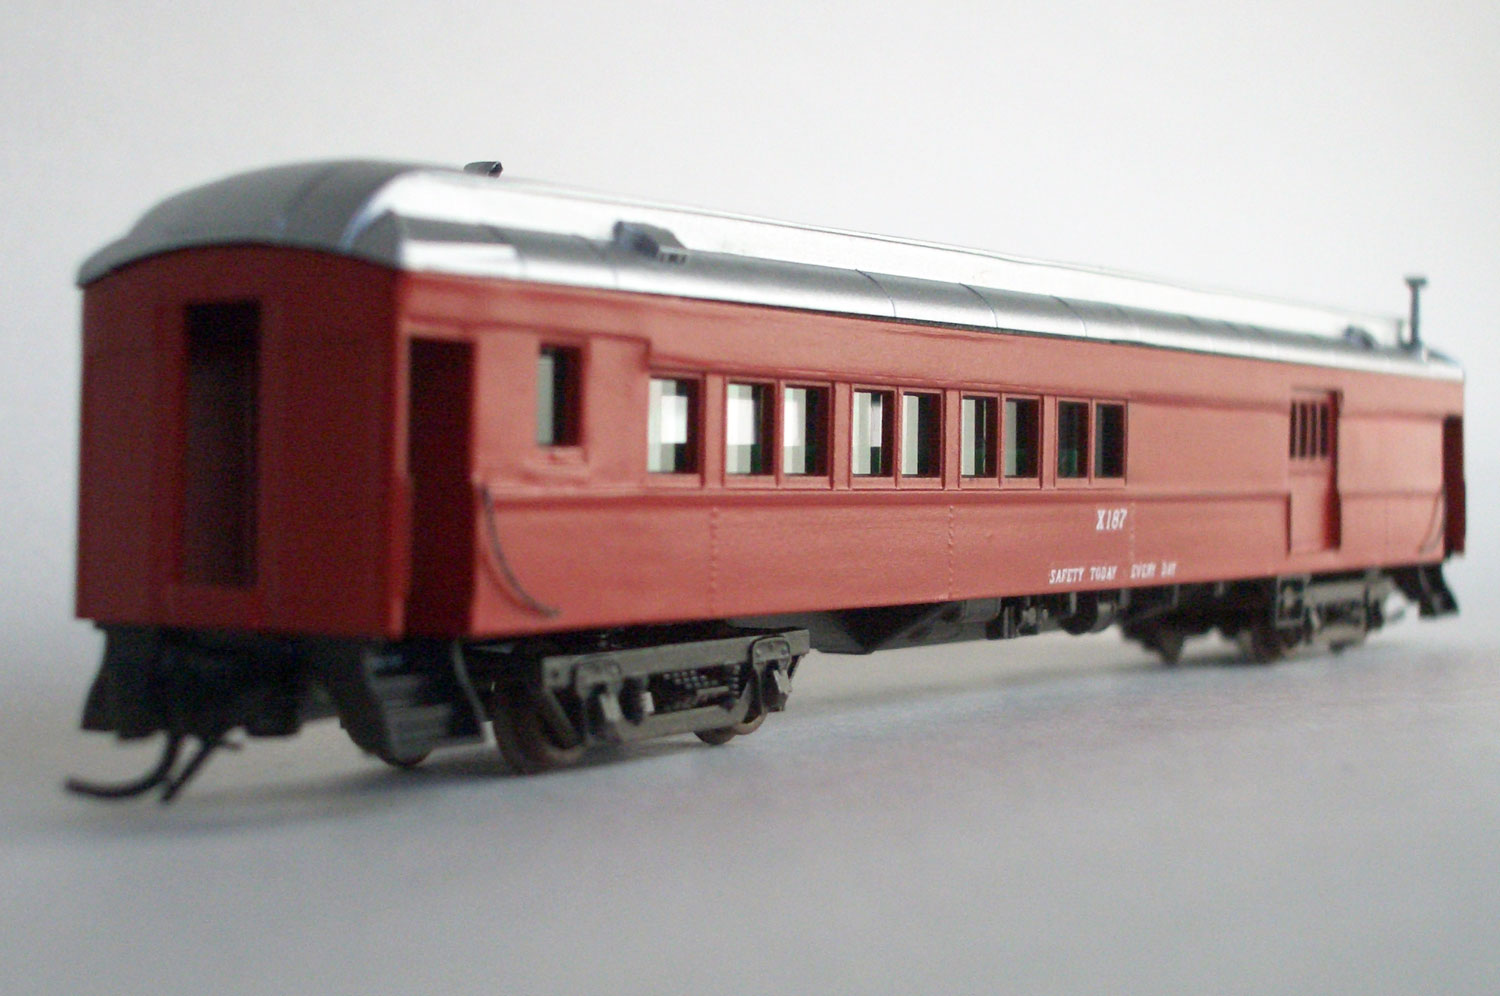
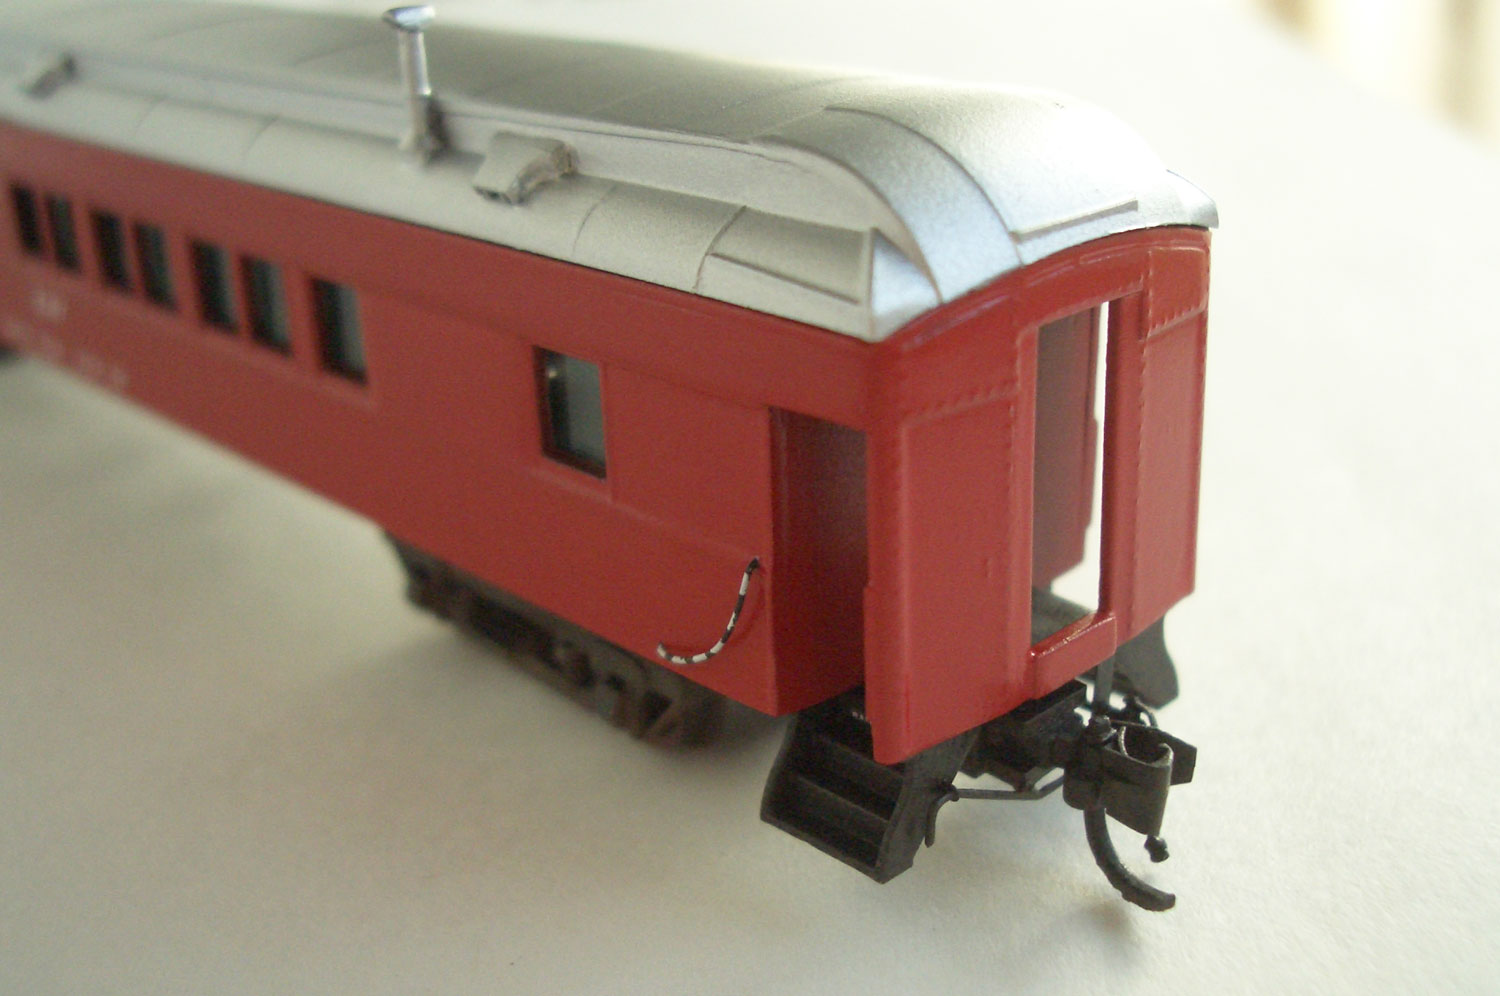
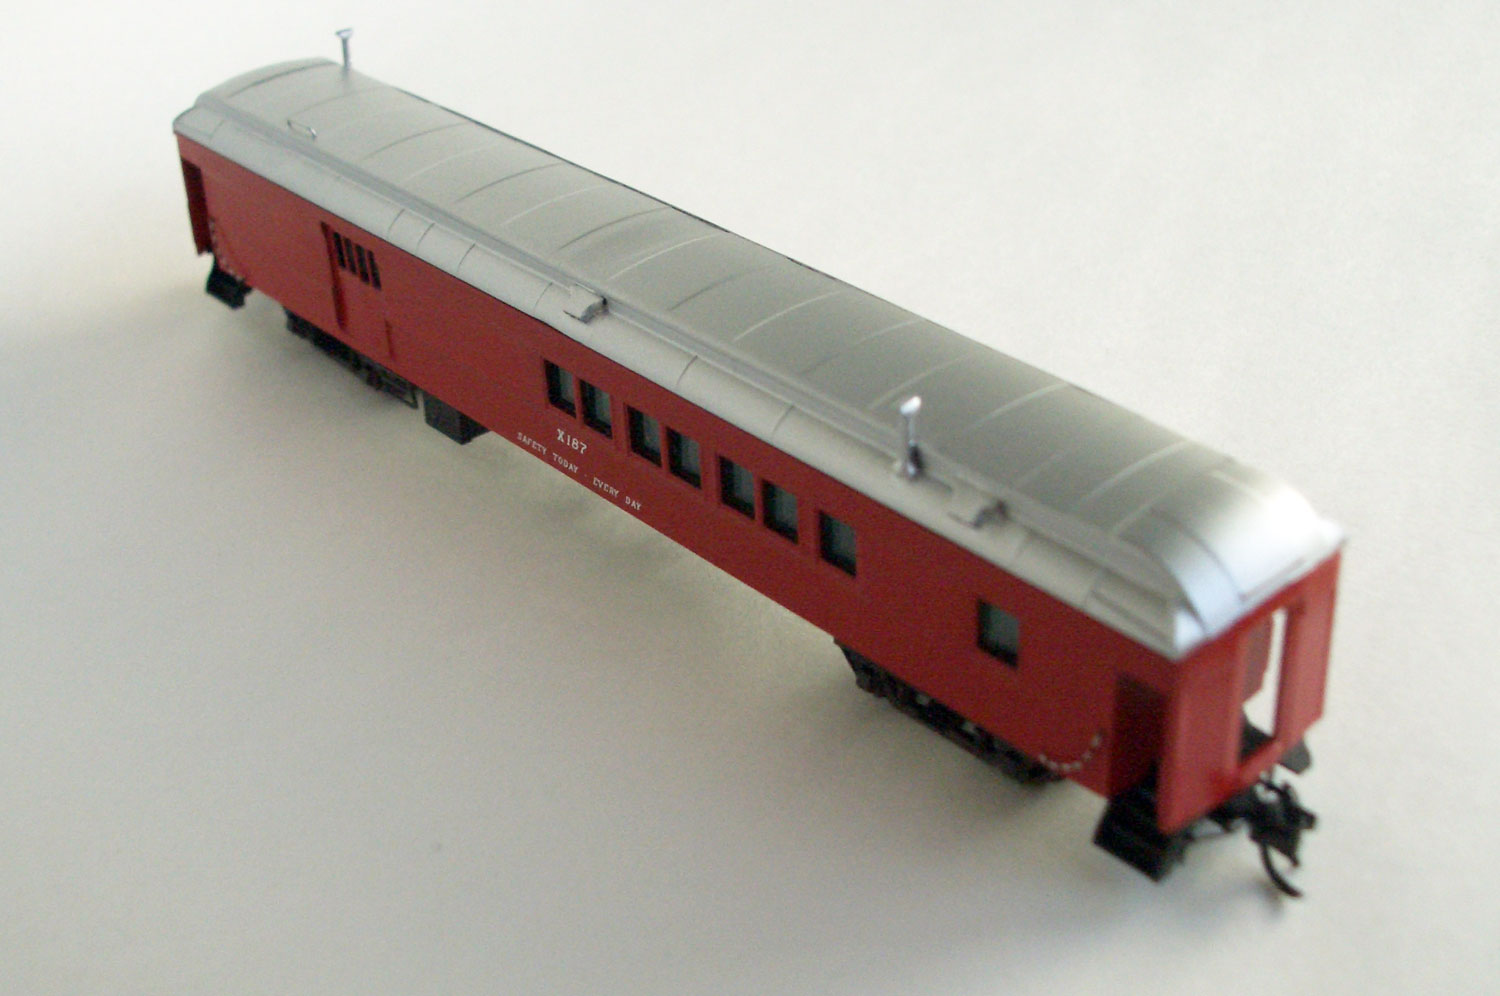 : finished model
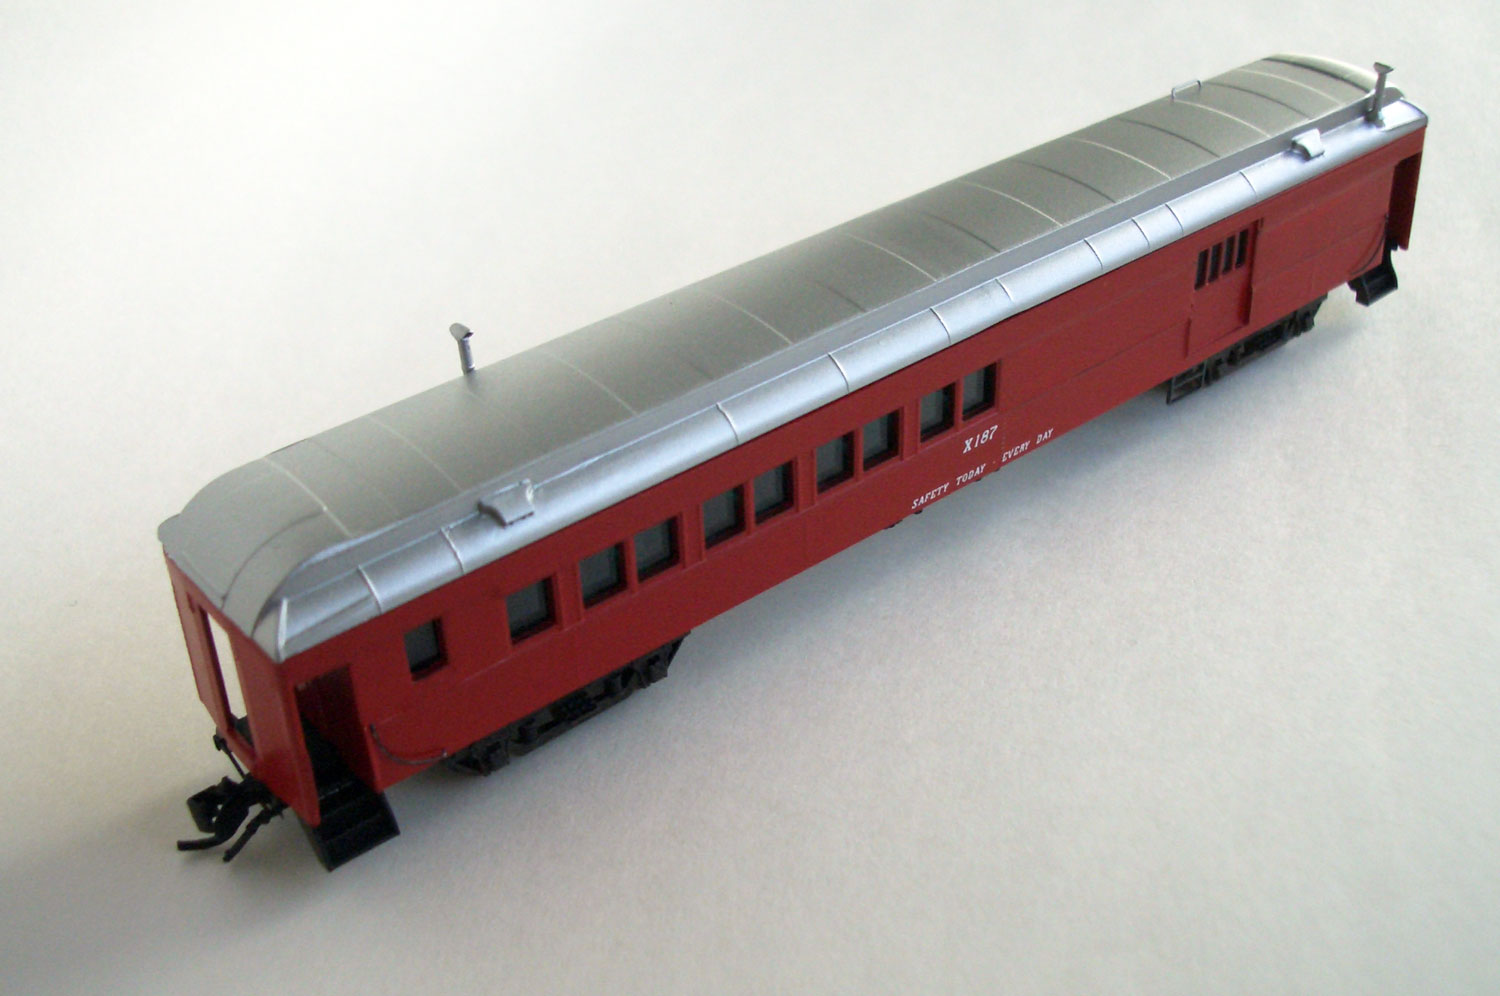 : finished model
I’m trying to create Great Northern Railway caboose X187 for my “bringin’ back the scene” project.
The floor was also shortened to fit the car body. The prototype car doesn’t have doors at boarding deck. So, I had to shave the deck floor precisely to represent the open deck. This ruins the original body mount coupler base. I saved the base and re-applied to the new deck floor.
I cut some underfloor equipment represented on the MTL model referring to the prototype photos. Baggage door stirrups came from MTL Railway Post Office Car. Train line air hoses are BLMA products. Brass rod cut lever is held by BLMA pin for the locomotive cut lever. Tracks came from Athearn 50’ Express Reefer. I cut the track-mounted couplers off and added end frames to them.
I also shortened the roof. I added thin styrene to represent the edge of the clerestory roof lost during the work. I shove the ventilators off the model and added modified Garland ventilator parts produced by Tomix. Smokestacks are MTL parts #1077.
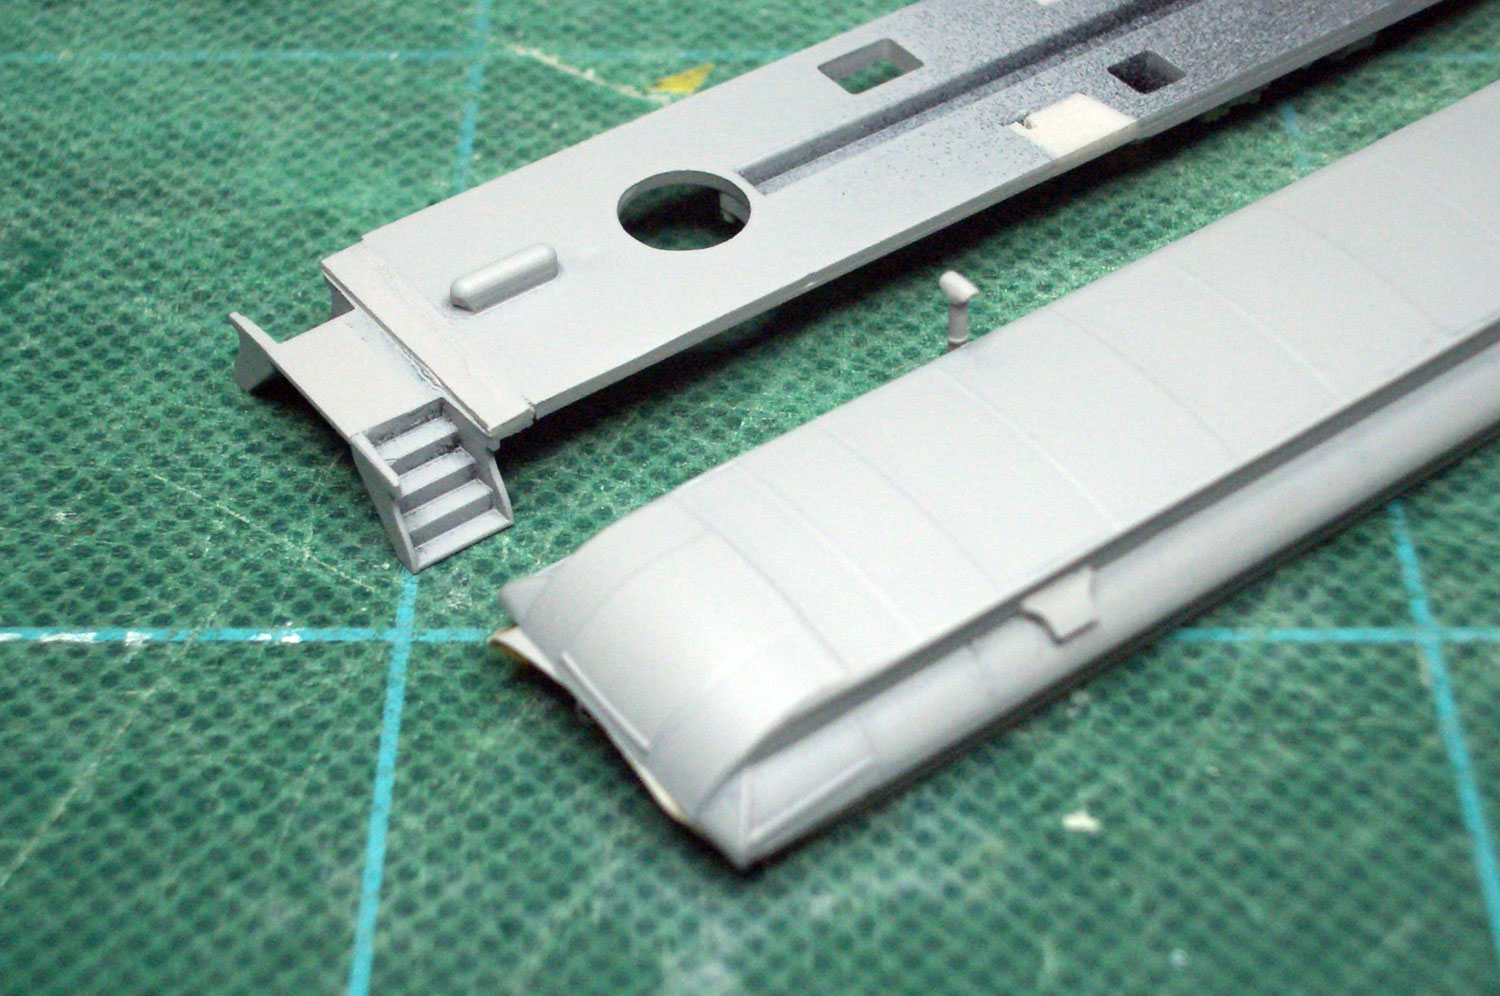 : renovated boarding deck and roof
I spray painted the car body red, roof with silver and underframe with black. I used Microscale decal #60-757 for the letterings. It took about 3 months to complete the work; slow hand.
 : finished model
2013-04-05 09:00
コメント(2)
arx_Ph.D. さん

Here represented are my model railroad enthusiasm generated from the photos I took during my childhood at Knoxville, Tennessee, or from the photos I took during my recent trips.
I'm a retired professor of design, meanwhile a part-time associate at the architectural design office in Osaka, Japan where I live with my wife.


