Making Cisco Automotive Service, part 1 [Works_Cisco Townsite]
 : model drawings for Cisco Automotive Service
I’m trying to duplicate the whole town of Cisco, Utah in N scale. Here, I represent the making of Cisco Automotive Service.
Modeling using a 3D printer became major in N scale because of the product’s relatively limited size. 3D Printing would be adequate for modeling industrial products such as railroad equipment because of its precise performance.
Indeed, cinder blocks, doors, windows, and other components are precisely manufactured at factories, but the architecture itself is a unique piece constructed at the site by hand. Thus, I decided to make my Cisco Automotive Service model by hand using styrene and wood.
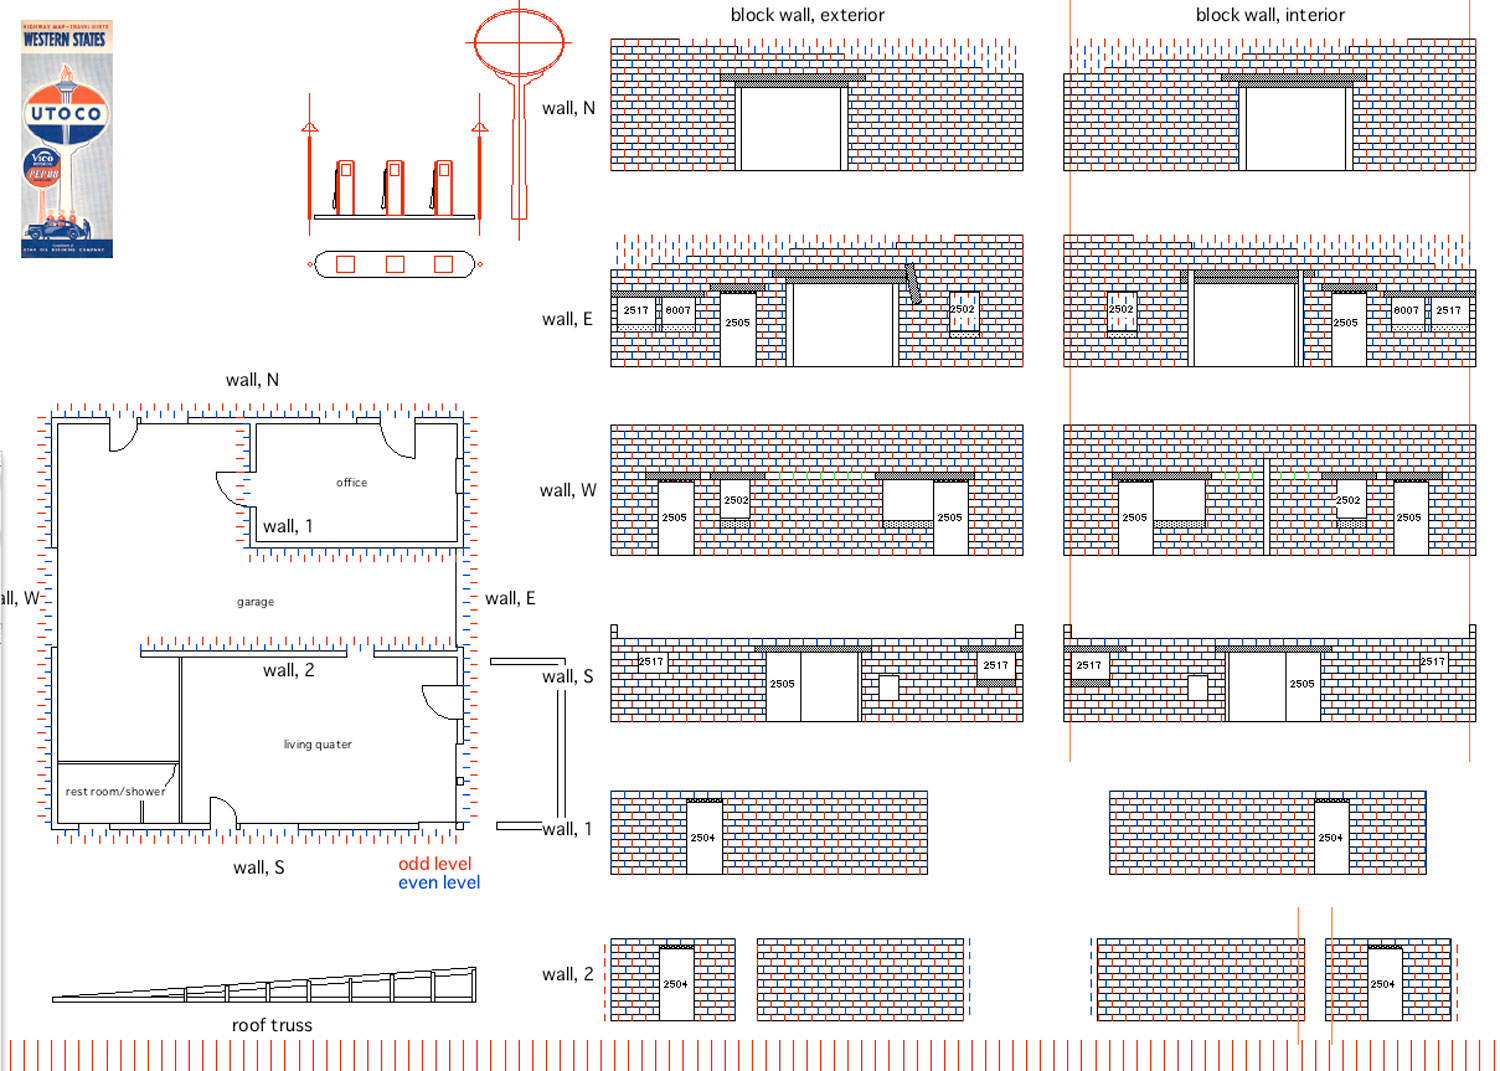
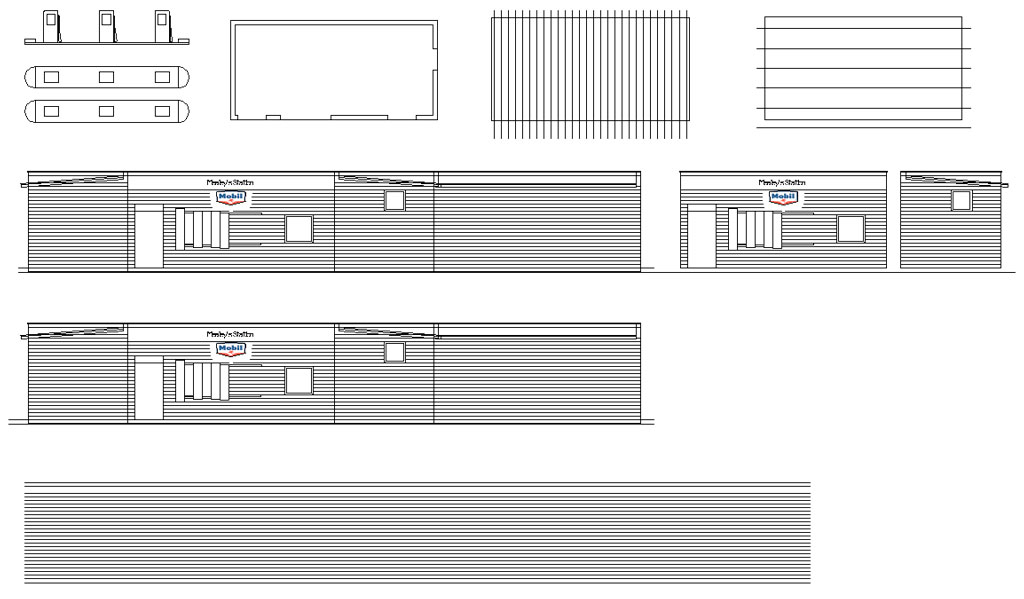
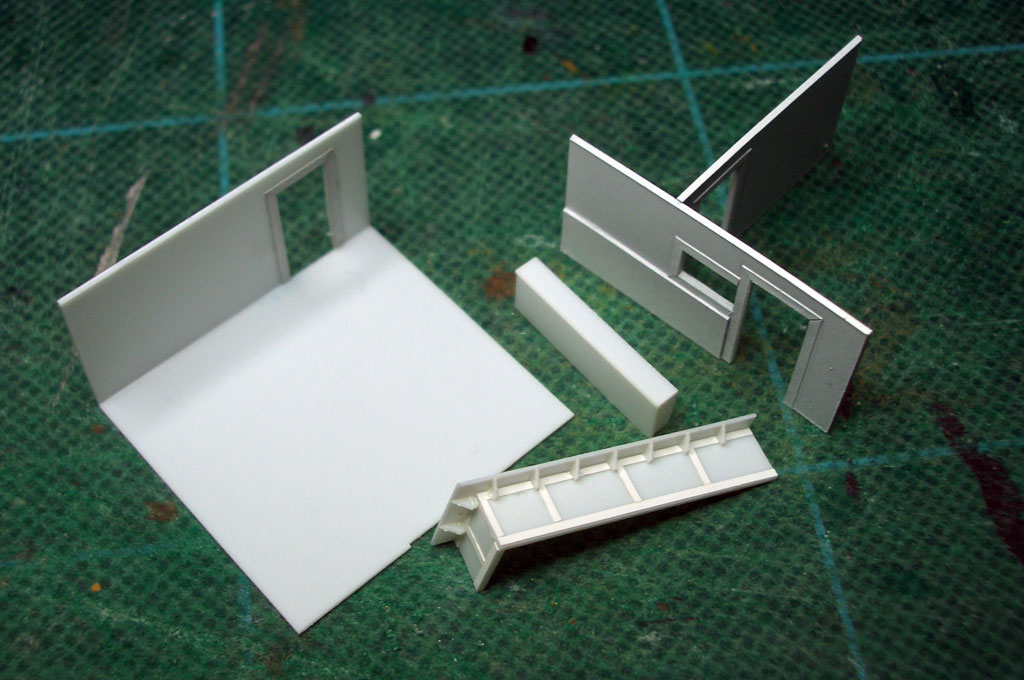
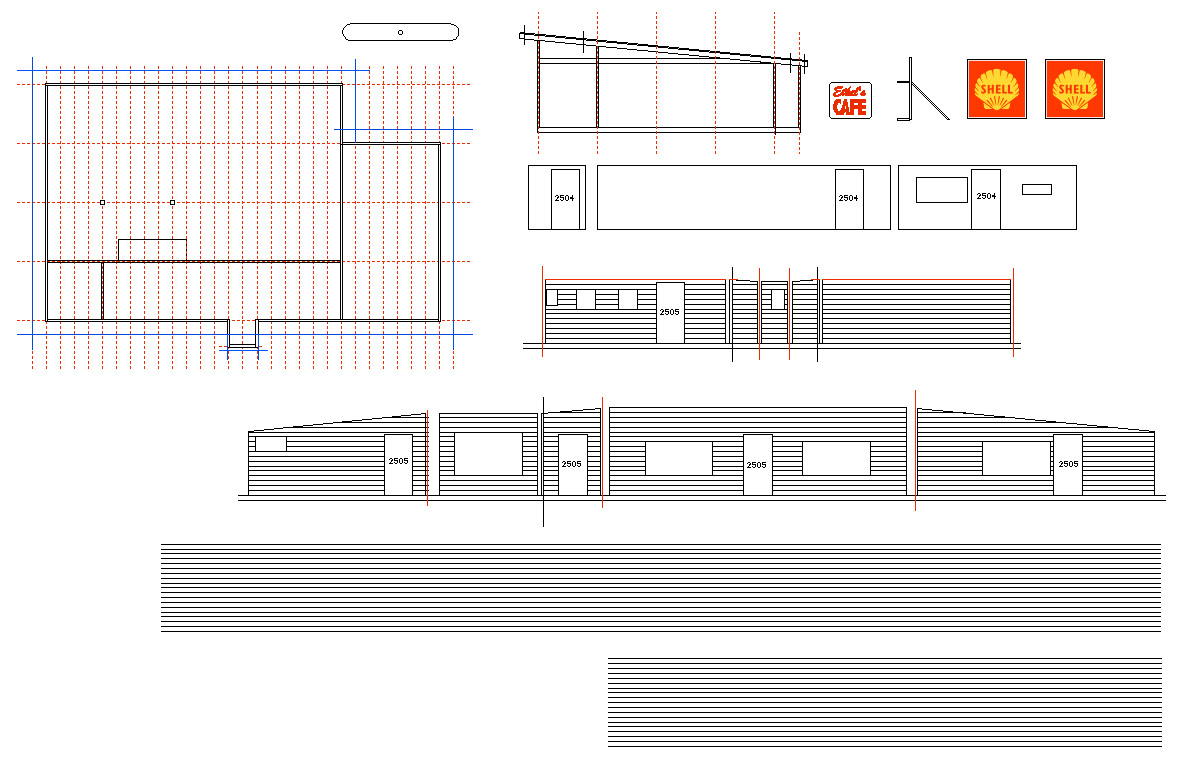
Of course, I used available model parts like doors. I adjusted some prototype openings to fit and drew plans for the model structure. The result is shown above.
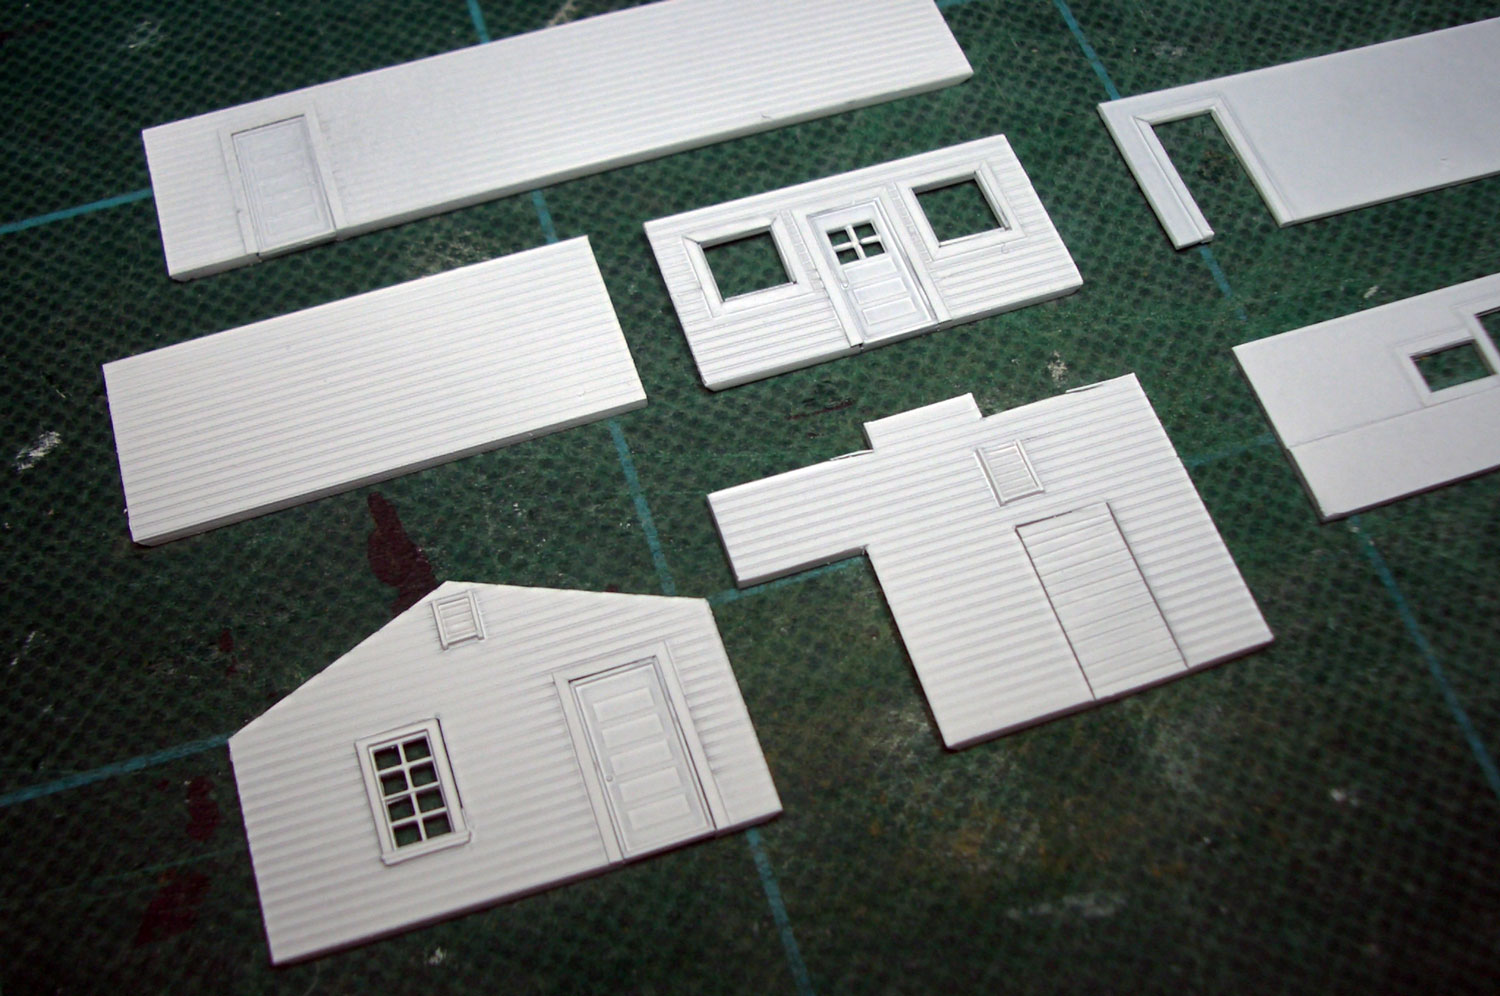
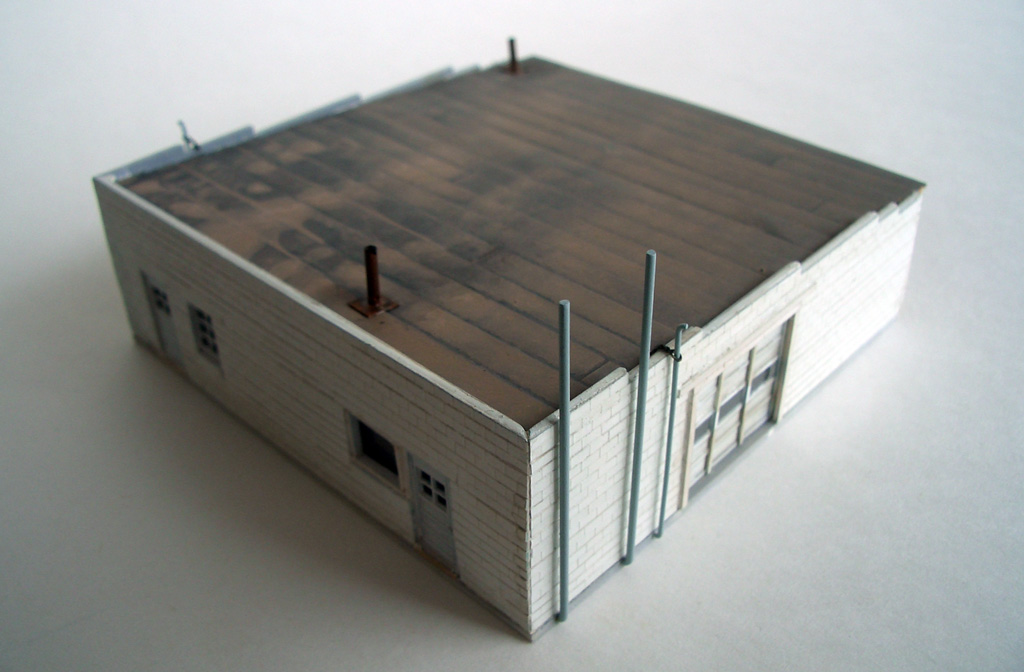
 : cinder block wall
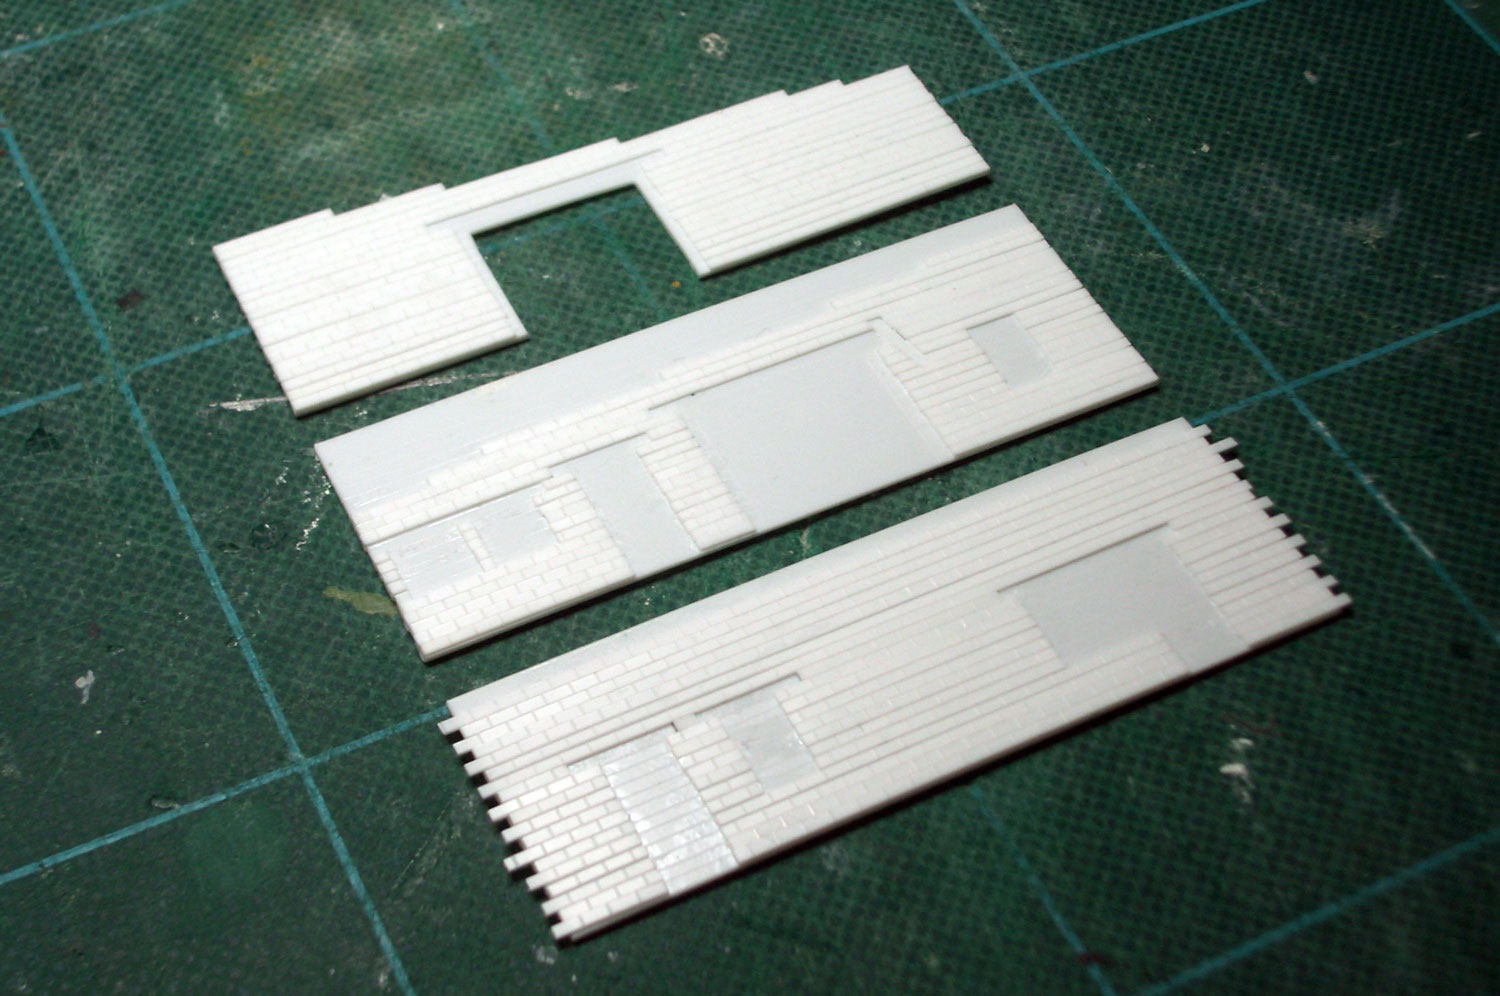
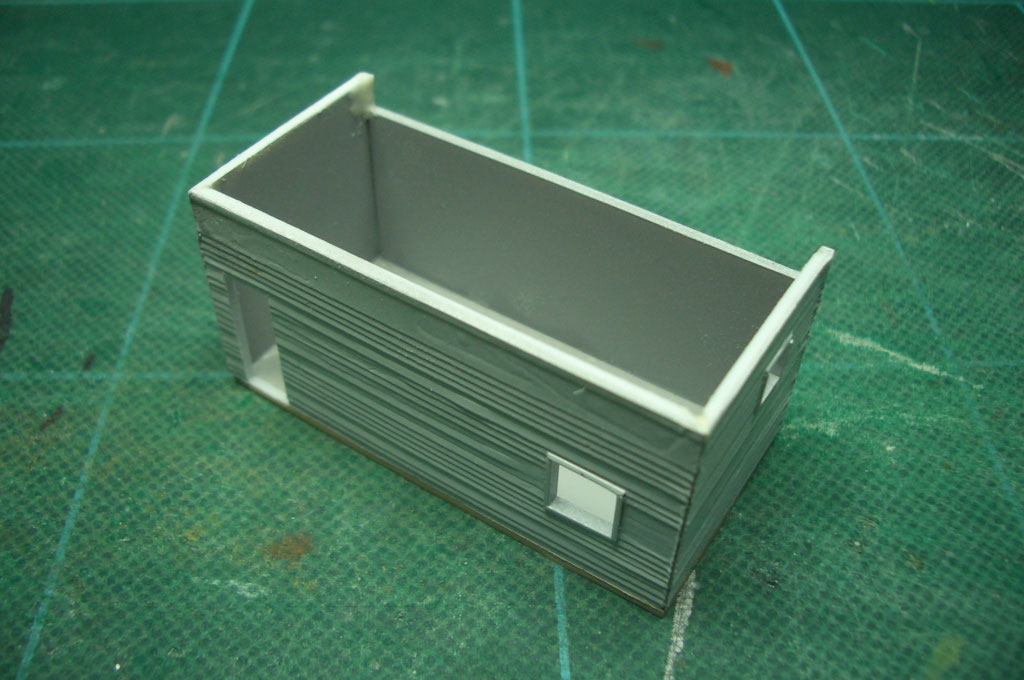
Cisco Automotive Service is made of cinder blocks. So I laid a series of blocks made of styrene level by level. My modeling ability causes unevennesses and roughnesses. But they produce the massiveness and texture of the cinder block wall.
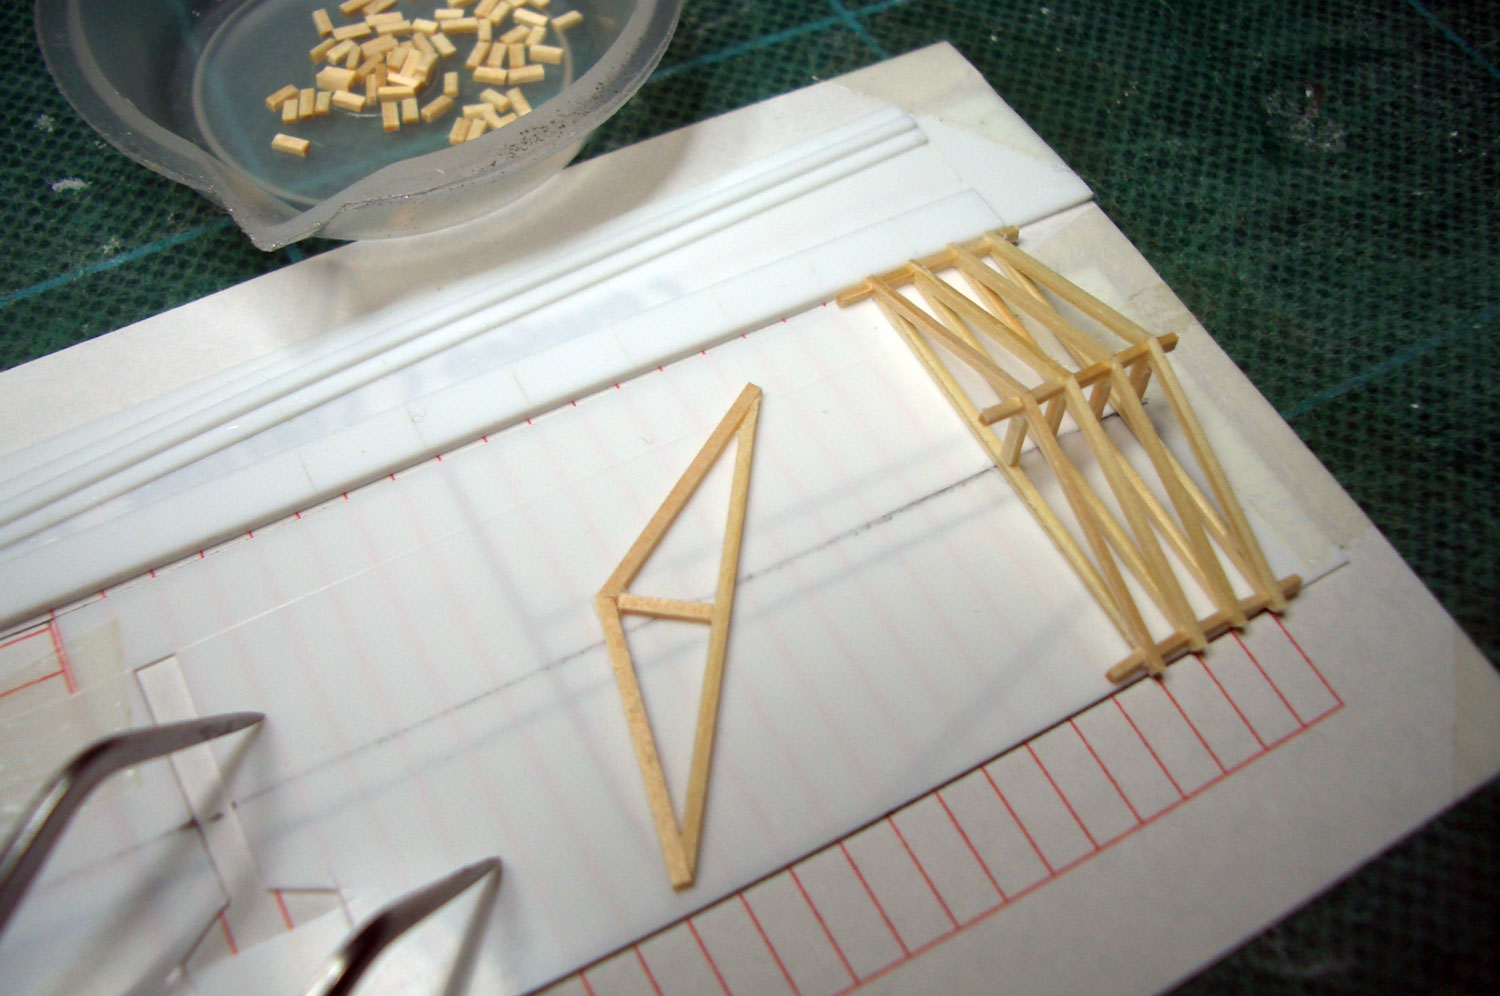
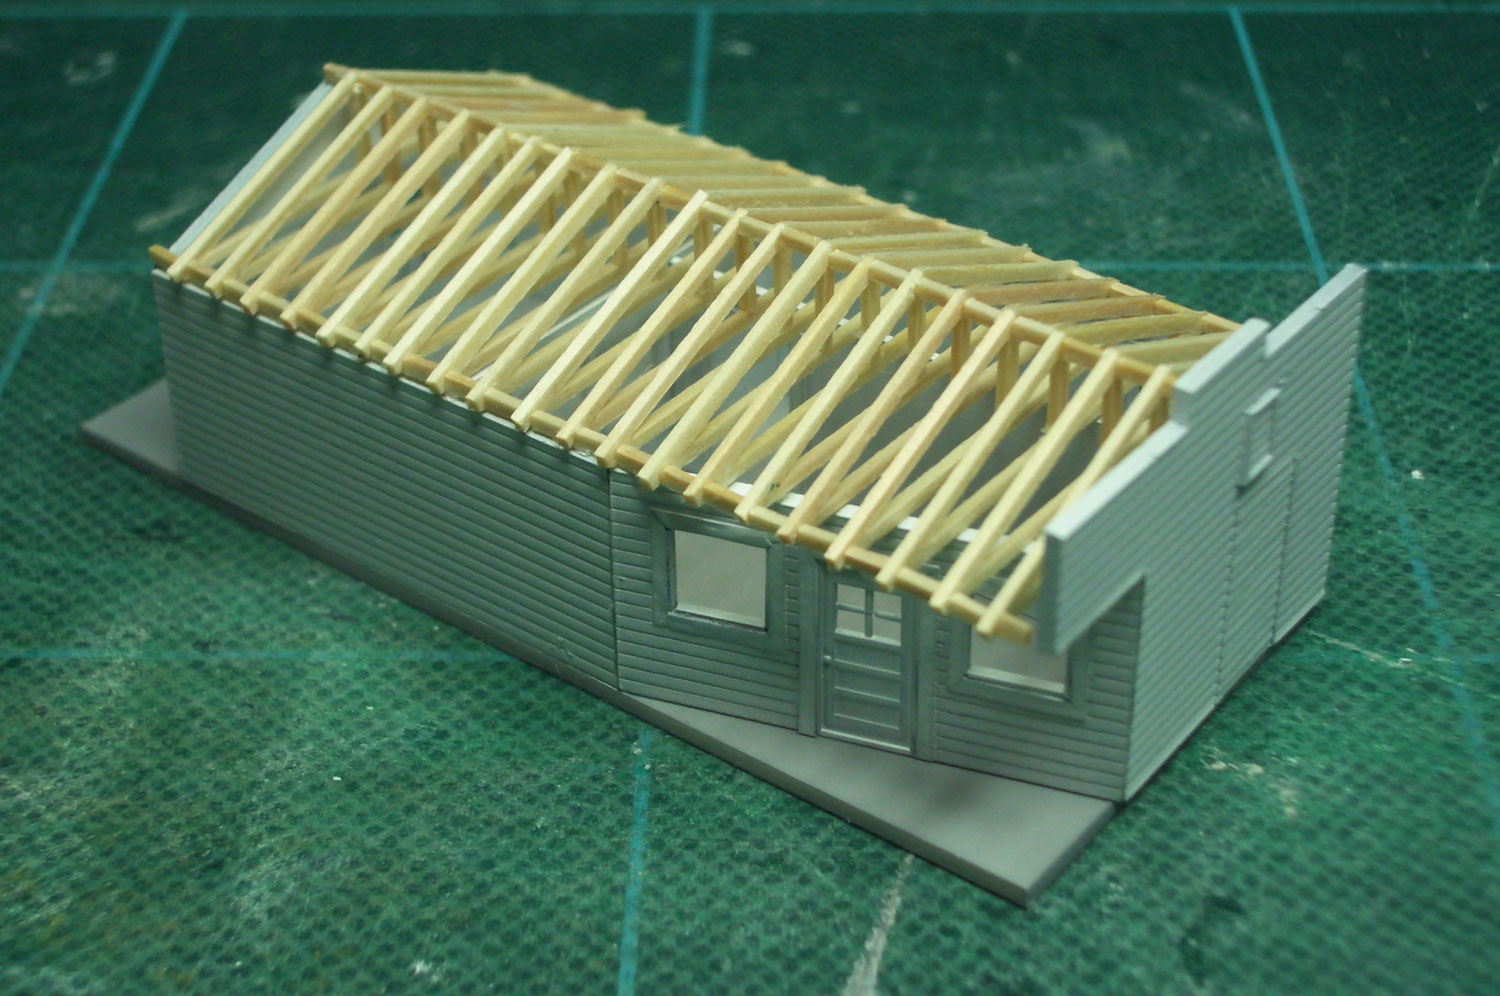
 : roof trusses
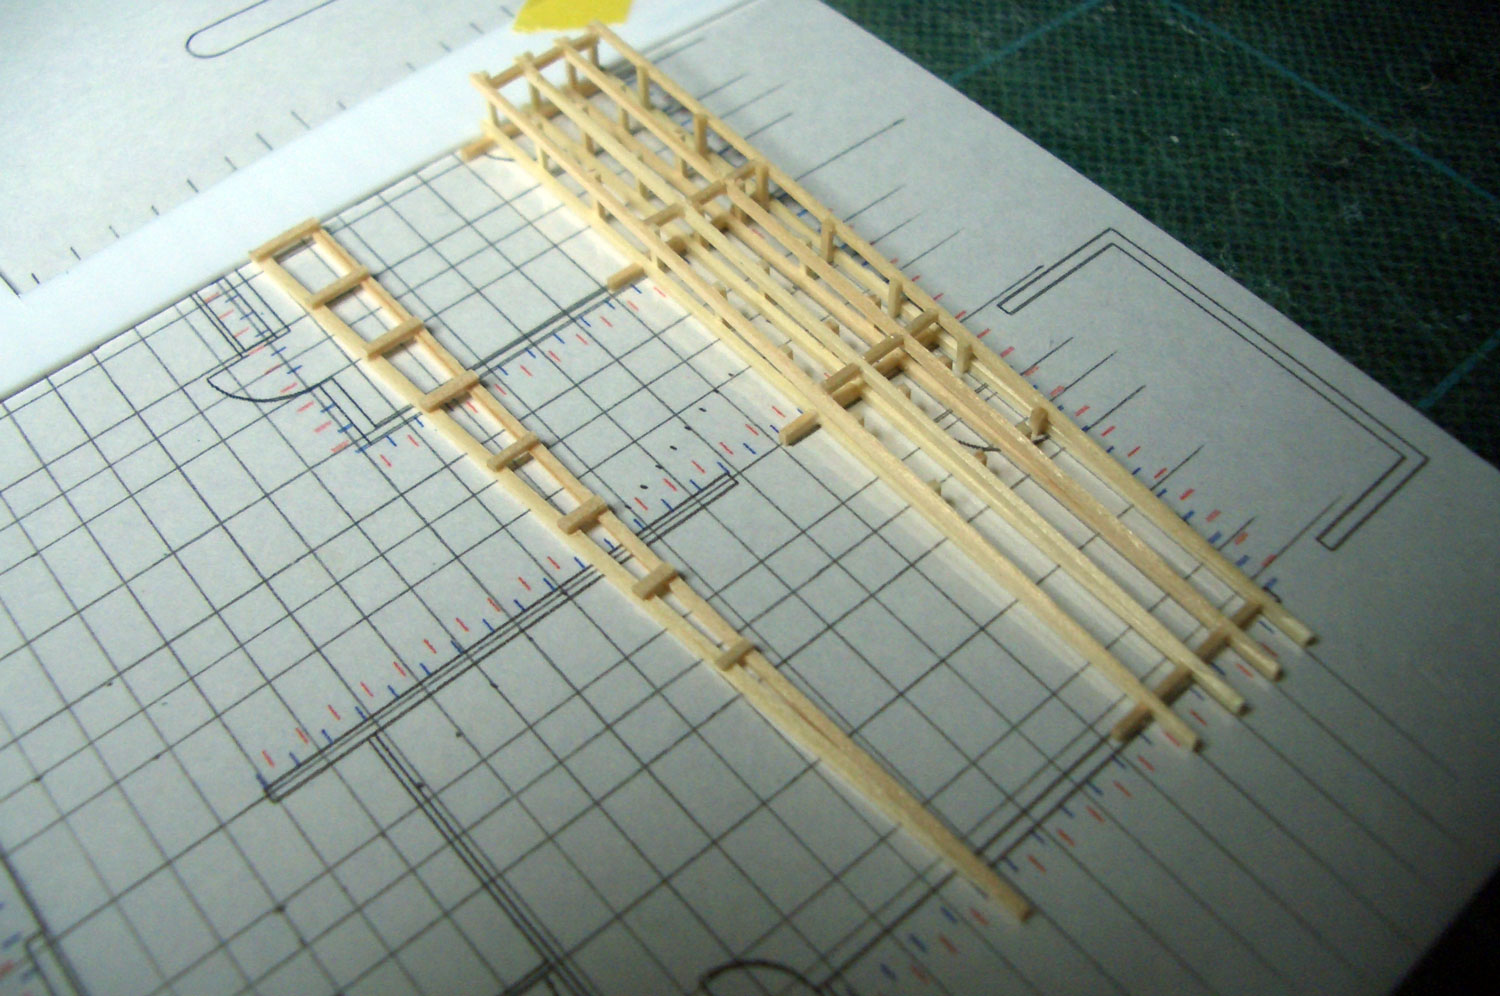
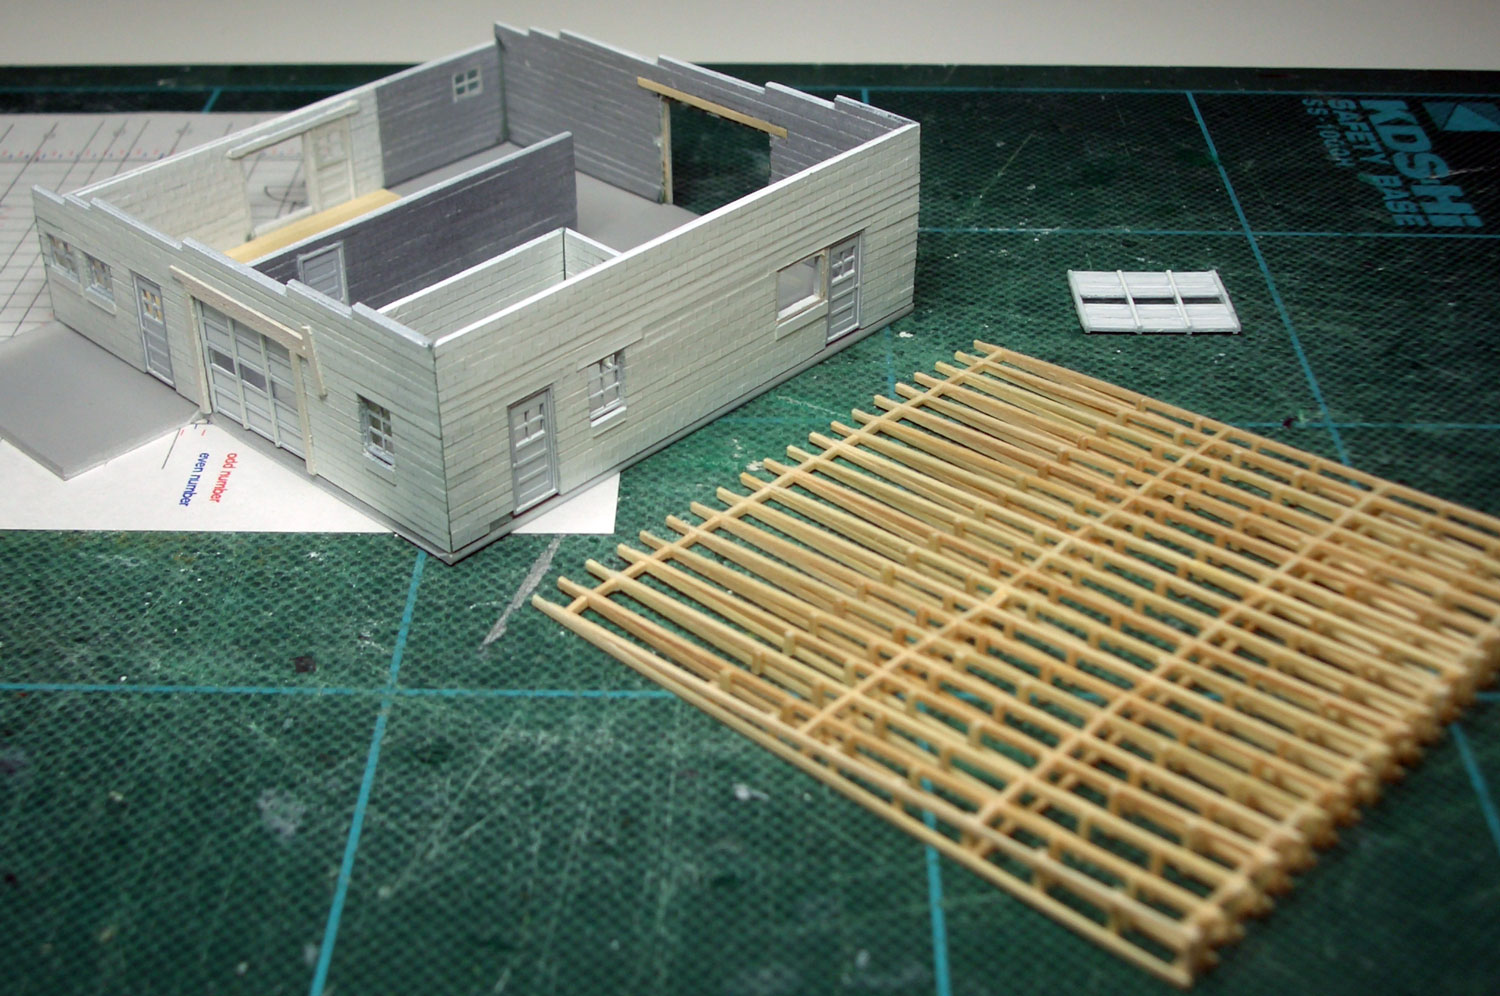
Beams and roof trusses are made of wood, alike the prototype. The tar paper roof is made of sandpaper. Doors and windows are Tichy and Grandt Line products. Some window parts are cut to fit. The numbers in the drawing above show the numbers of parts I used.
revised、Feb. 4, 2015
revised、Apr. 27, 2023
 : halfway to completion
 : gas pump and sign ready to paint
2013-05-10 09:00
コメント(2)
Making Cisco Automotive Service, part 2 [Works_Cisco Townsite]
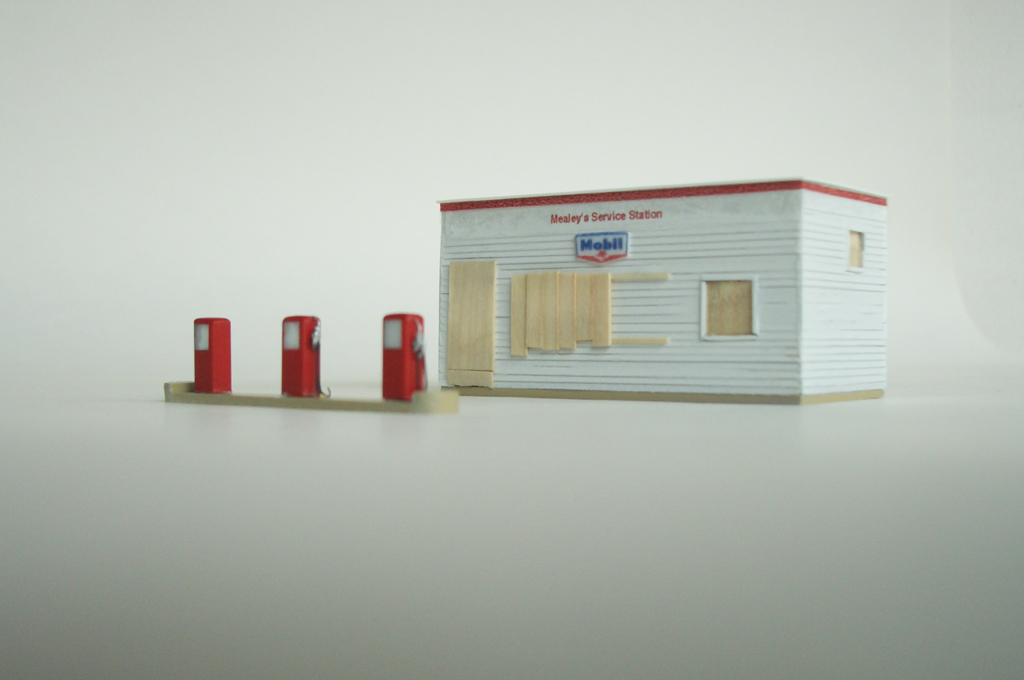
 : North elevation facing the highway
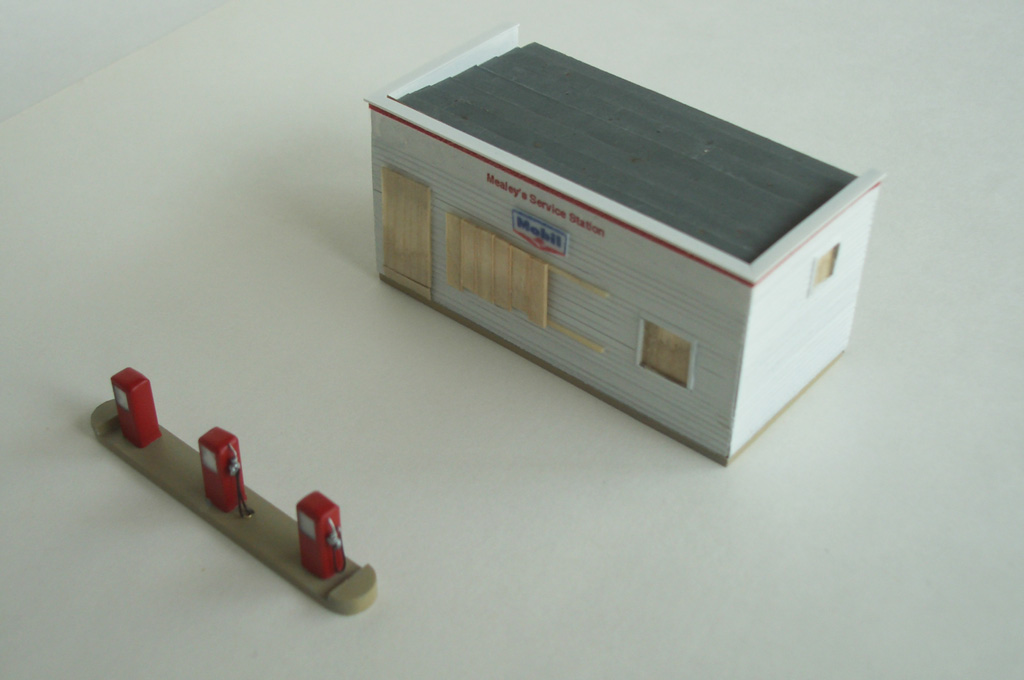
I’m trying to duplicate the whole town of Cisco, Utah in N scale. Here, I represent the making of Cisco Automotive Service.
I first painted walls dark green to prevent optical transmission. Next, I painted gray to represent the cinder block. Finally, the exterior and living quarter interior walls became white because I had no information about the prototype color. After painting, I filled the block joints up with modeling compound.
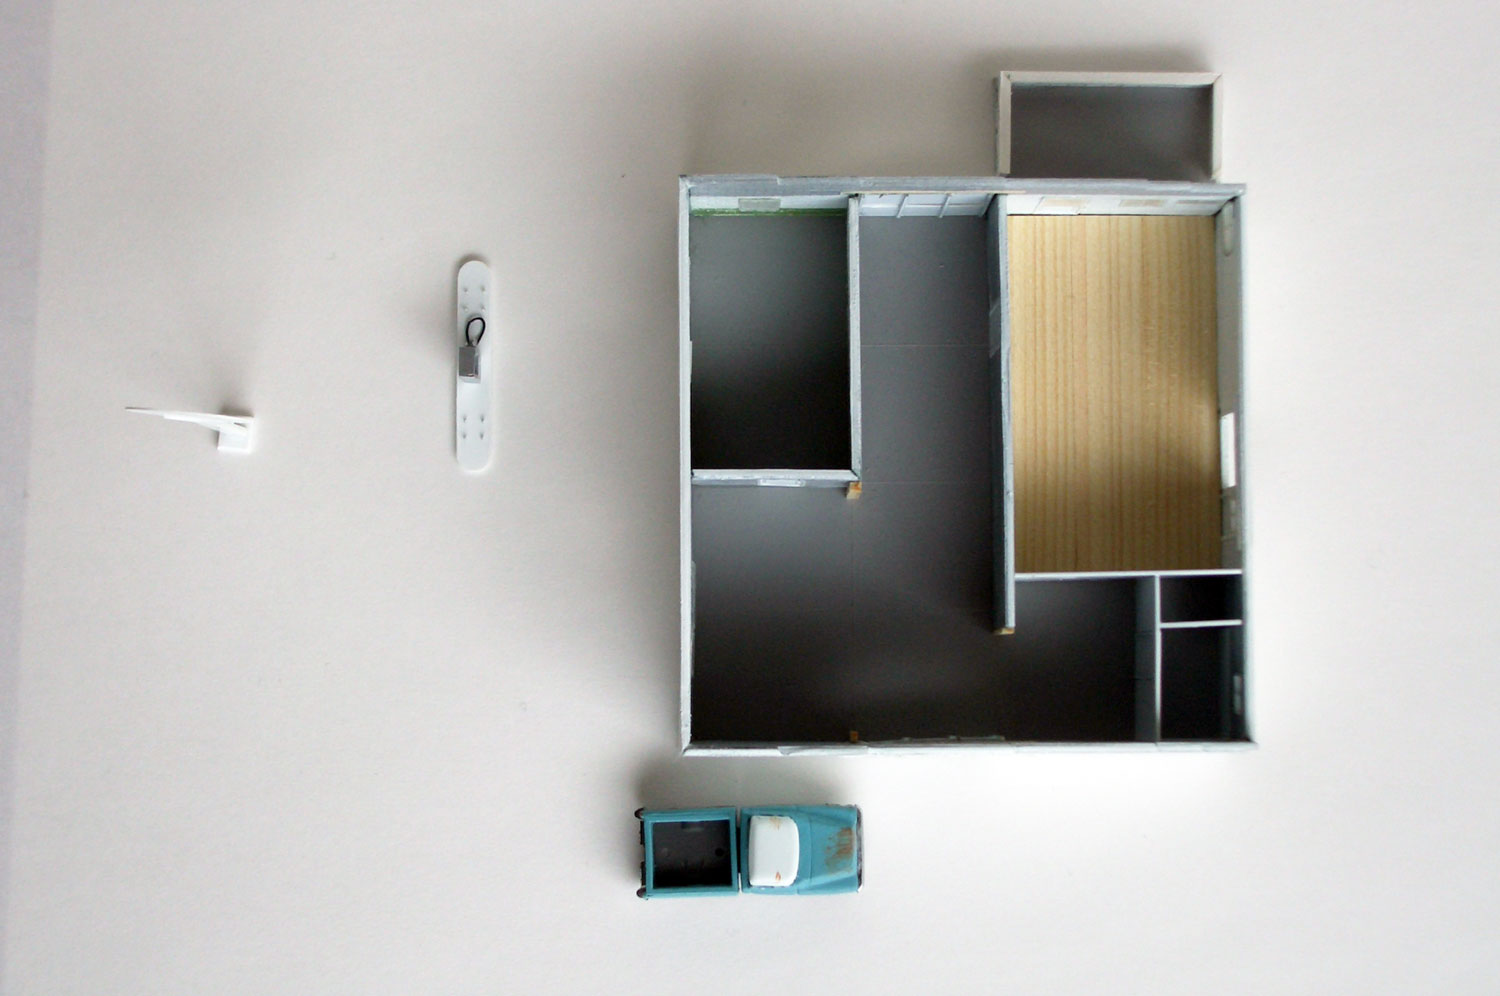
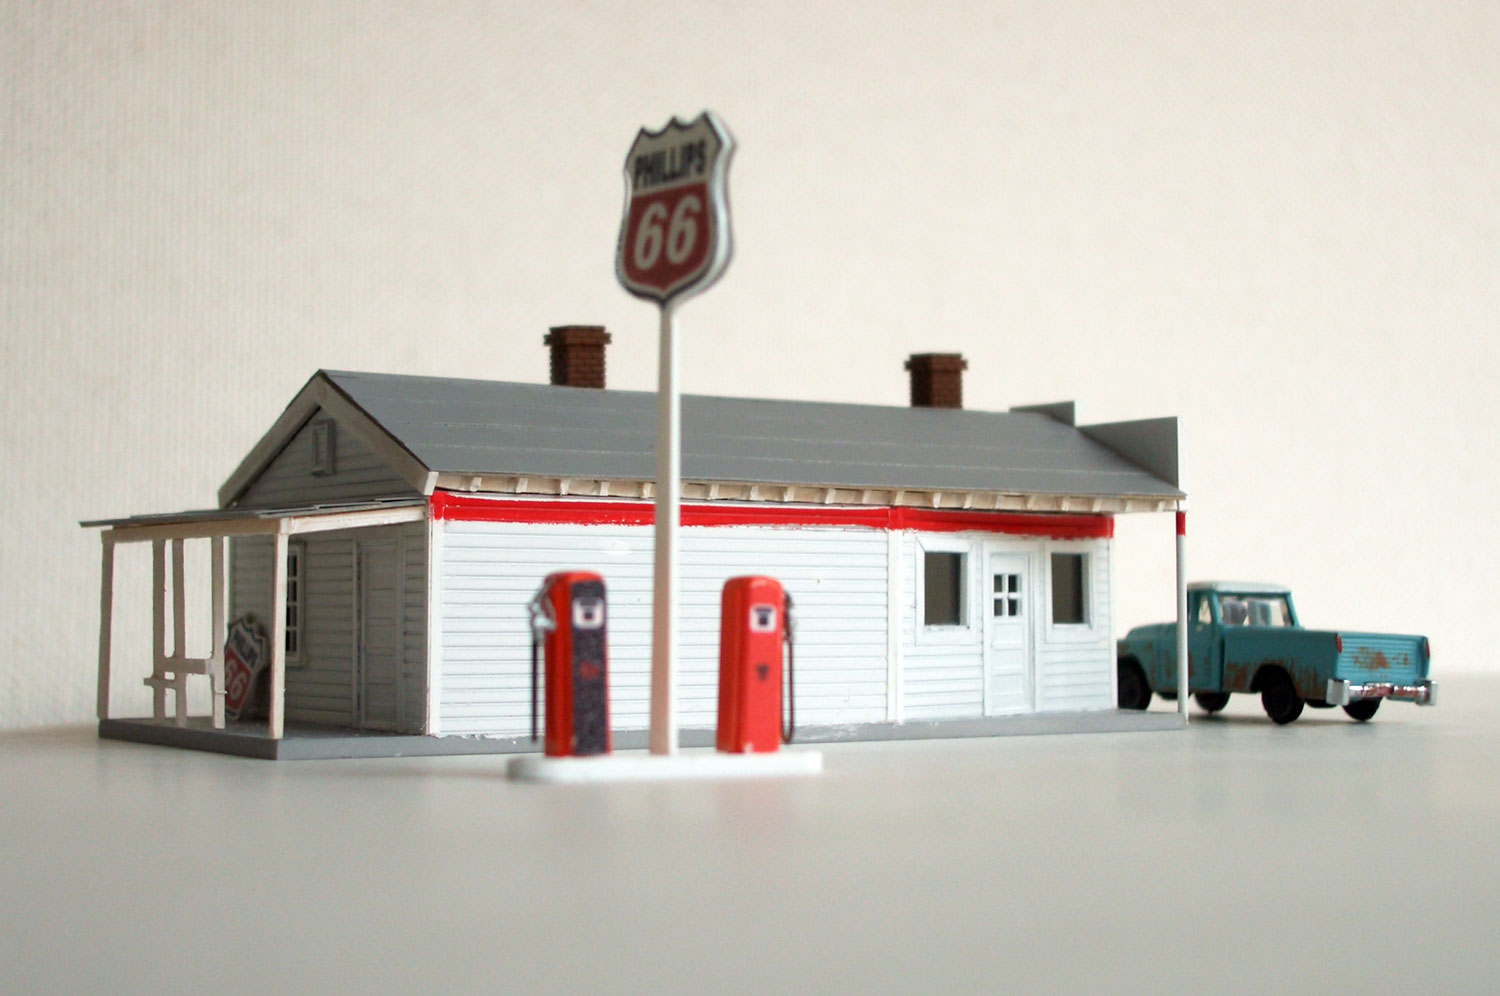
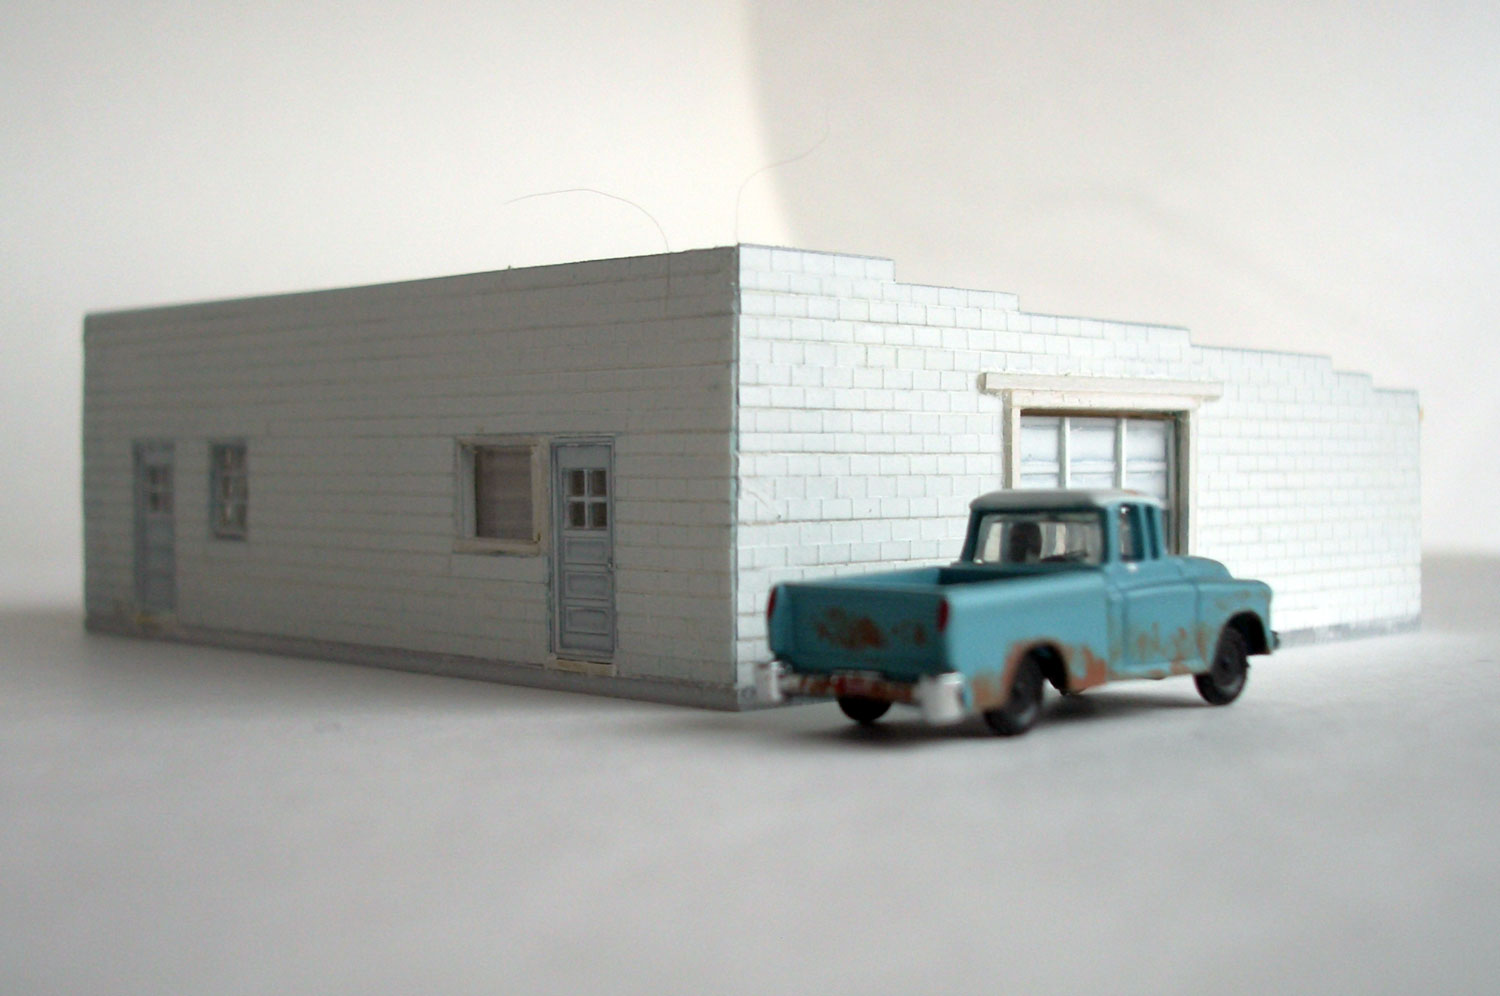 : looking from Northwest
The advertisement for Cisco Automotive Service on Sep. 29, 1955 Times Independent states it selling UTOCO. Thus, I added the UTOCO sign. Tokheim 1250 Gas pump, shown in the photo found on the Flickr site, will be also decorated in Standard scheme[1].
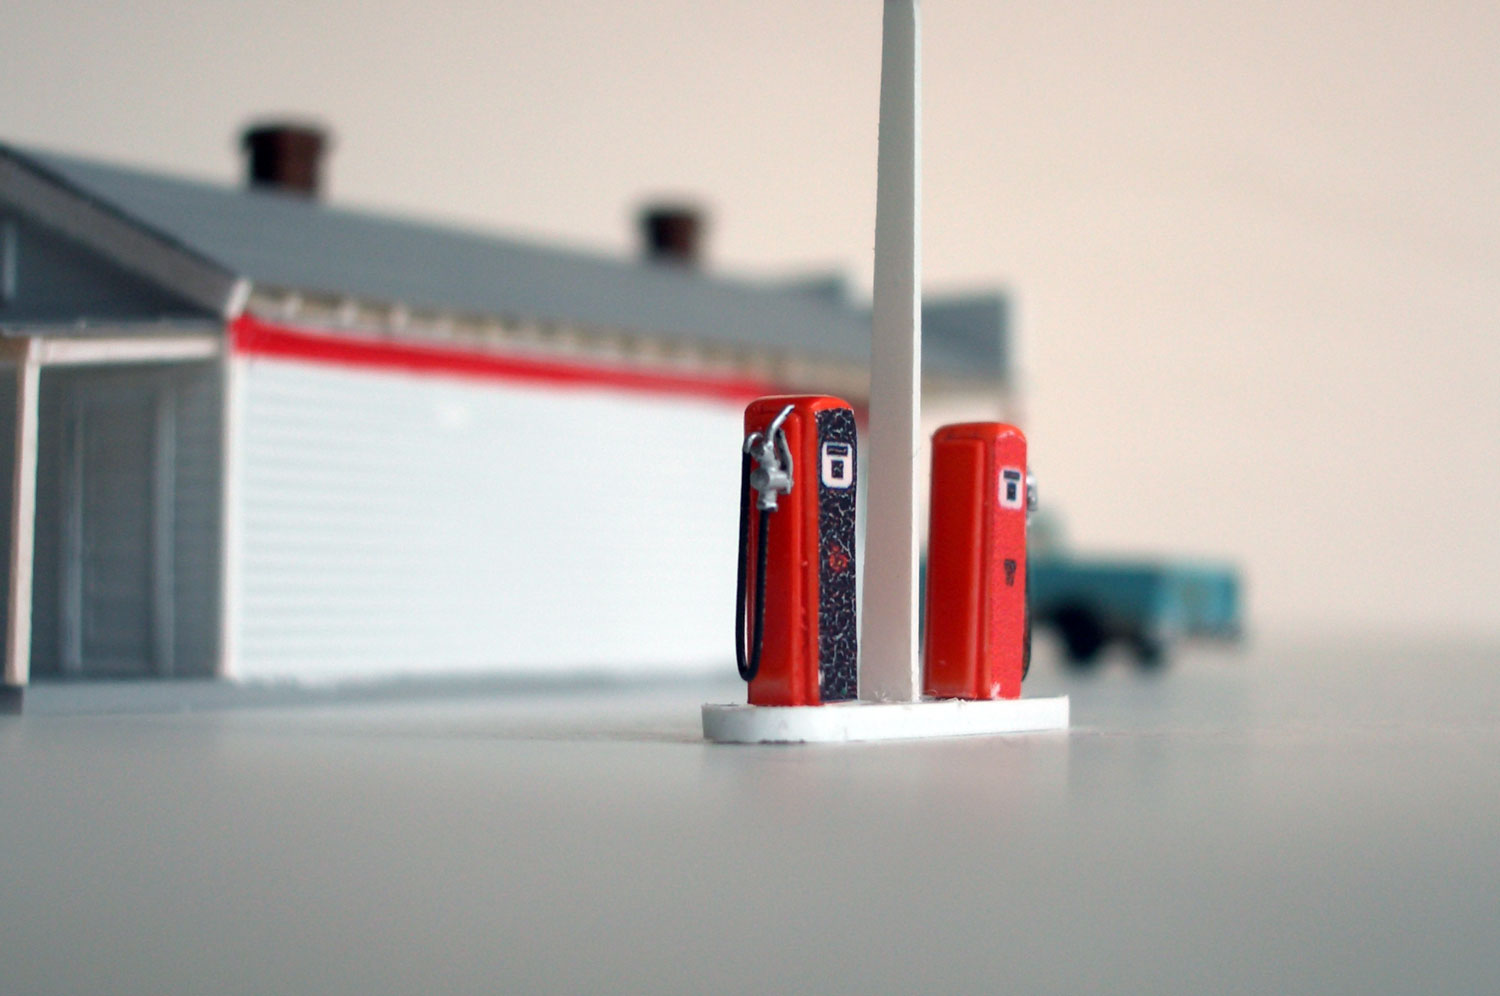
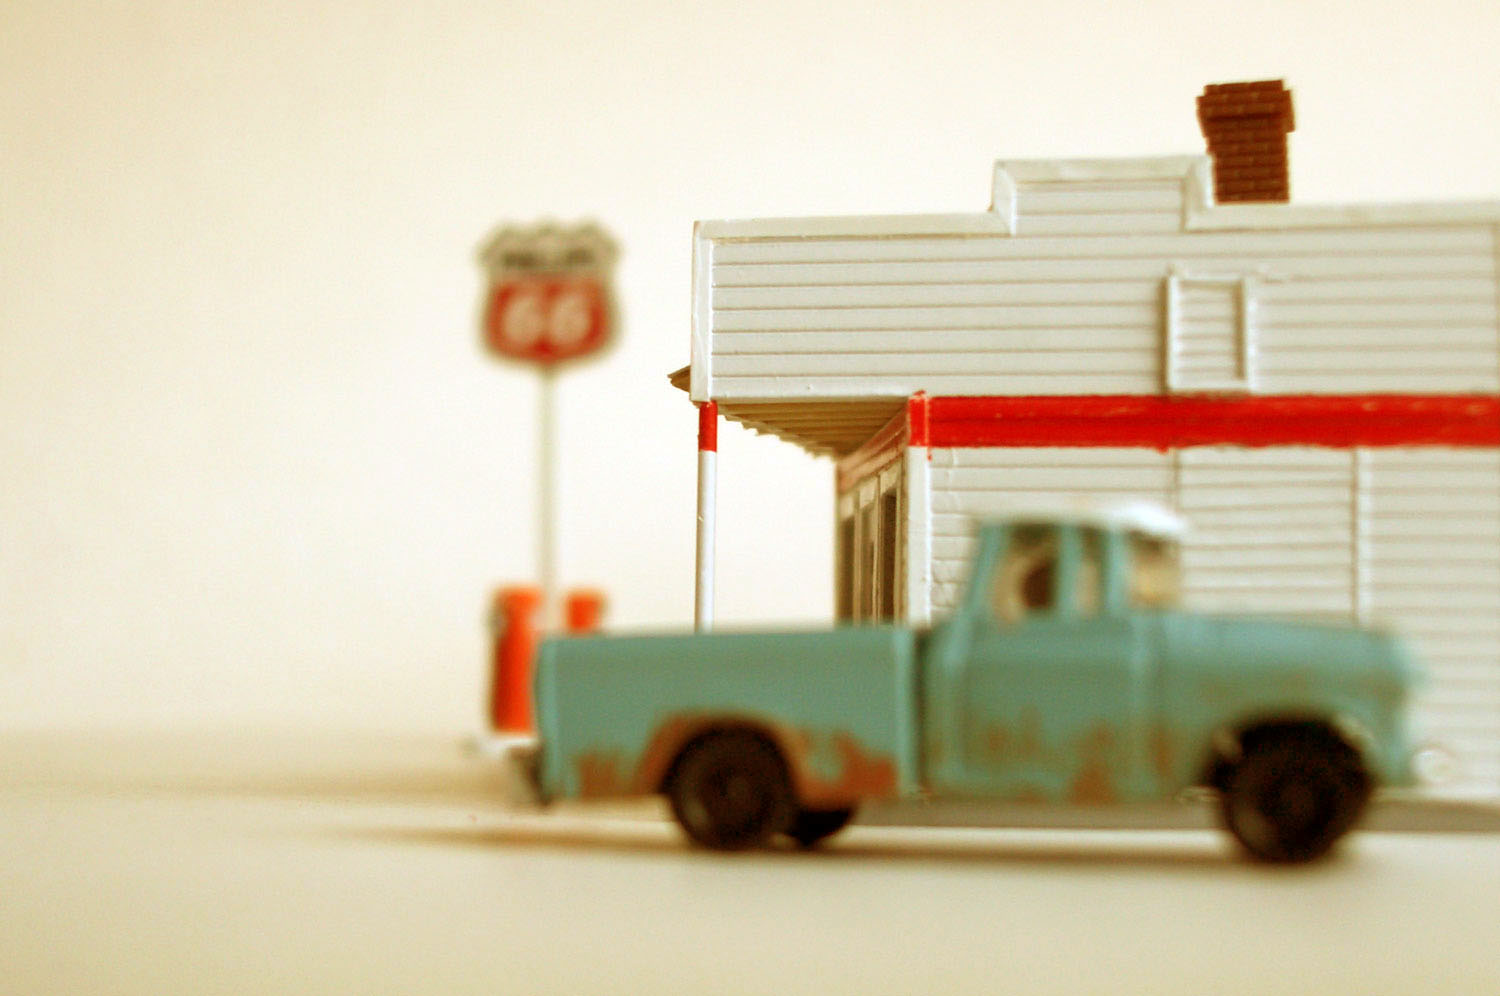
 : garage, pump and the sign
 : lonesome Tokheim pump
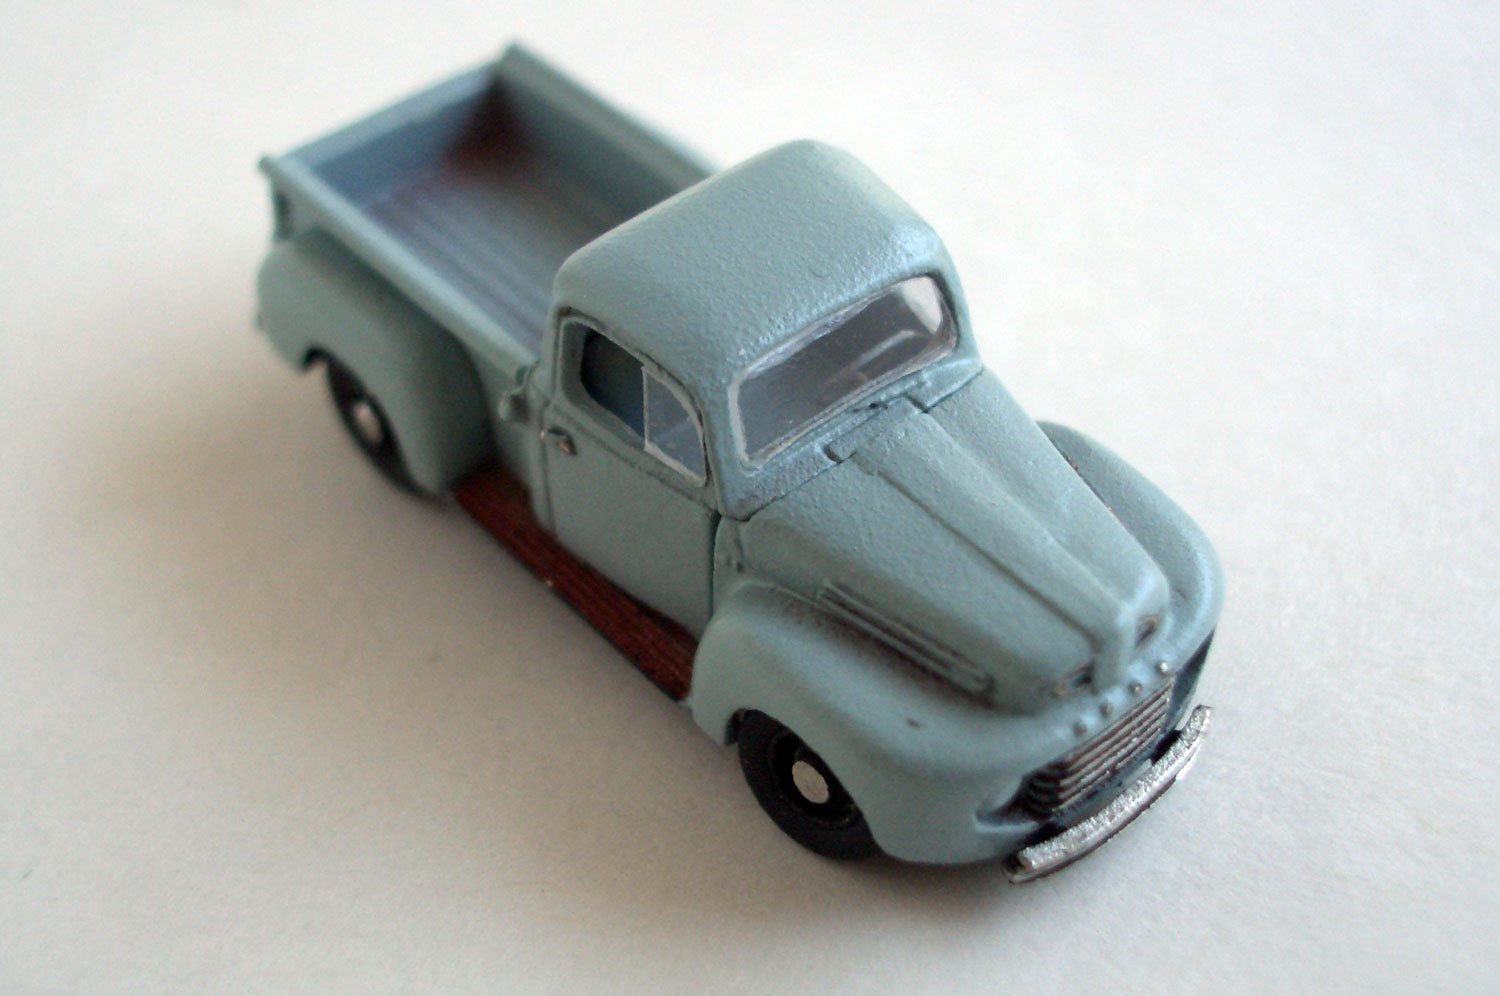
Roof and roof trusses are kept removable for future lighting, interior works, and weathering. Co-starring pickup truck in the pictures is a Woodland Scenics product.
50's photo of similar UTOCO gas station at Willard, Utah;
[1] photo of the gas pump;
revised、Feb. 4, 2015
revised、Sep. 19, 2019
revised、Apr. 27, 2023
2013-05-17 09:00
コメント(0)
Making Duke's Service, part 1 [Works_Cisco Townsite]
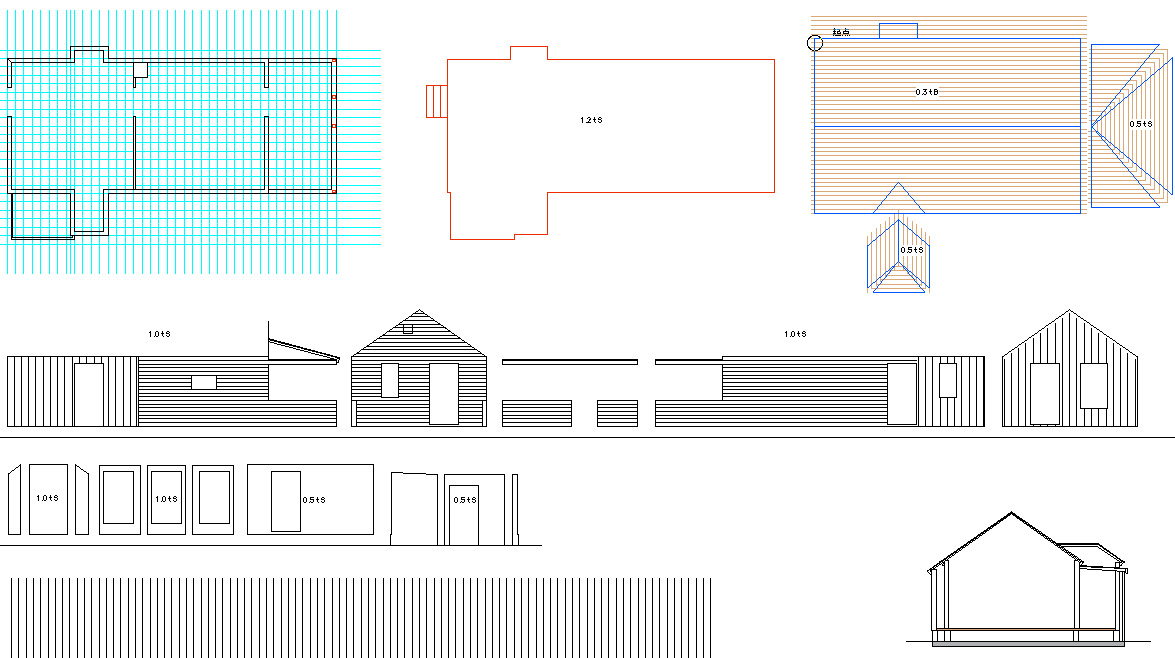
 : model drawings for Duke's Service
I’m trying to duplicate the whole town of Cisco, Utah in N scale. Here, I represent the making of Duke's Service.
Duke's Service is made of wood; horizontal siding wall and shingle roof covered with sheet. I used Evergreen styrene sheet #4037 for the wall. I also used 0.1mm Tamiya Plastic Paper for architraves. Doors and windows are Tichy and Grandt Line products. I drew model plans to adjust some prototype openings to fit. Result is shown above. Numbers in the drawings above shows the numbers of parts I used.
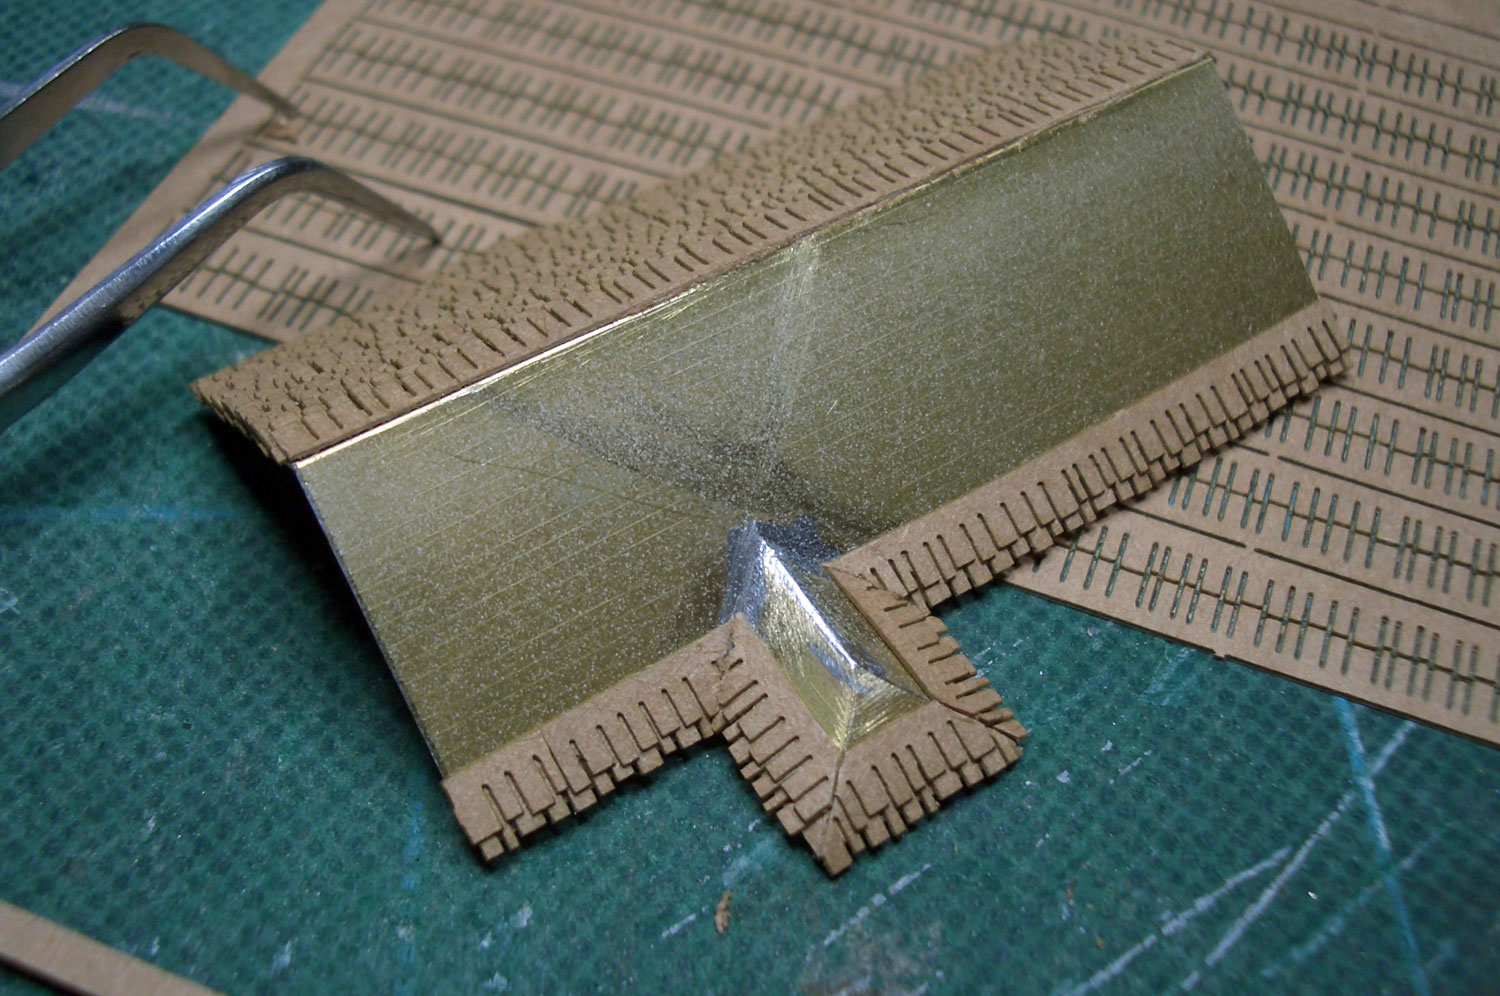
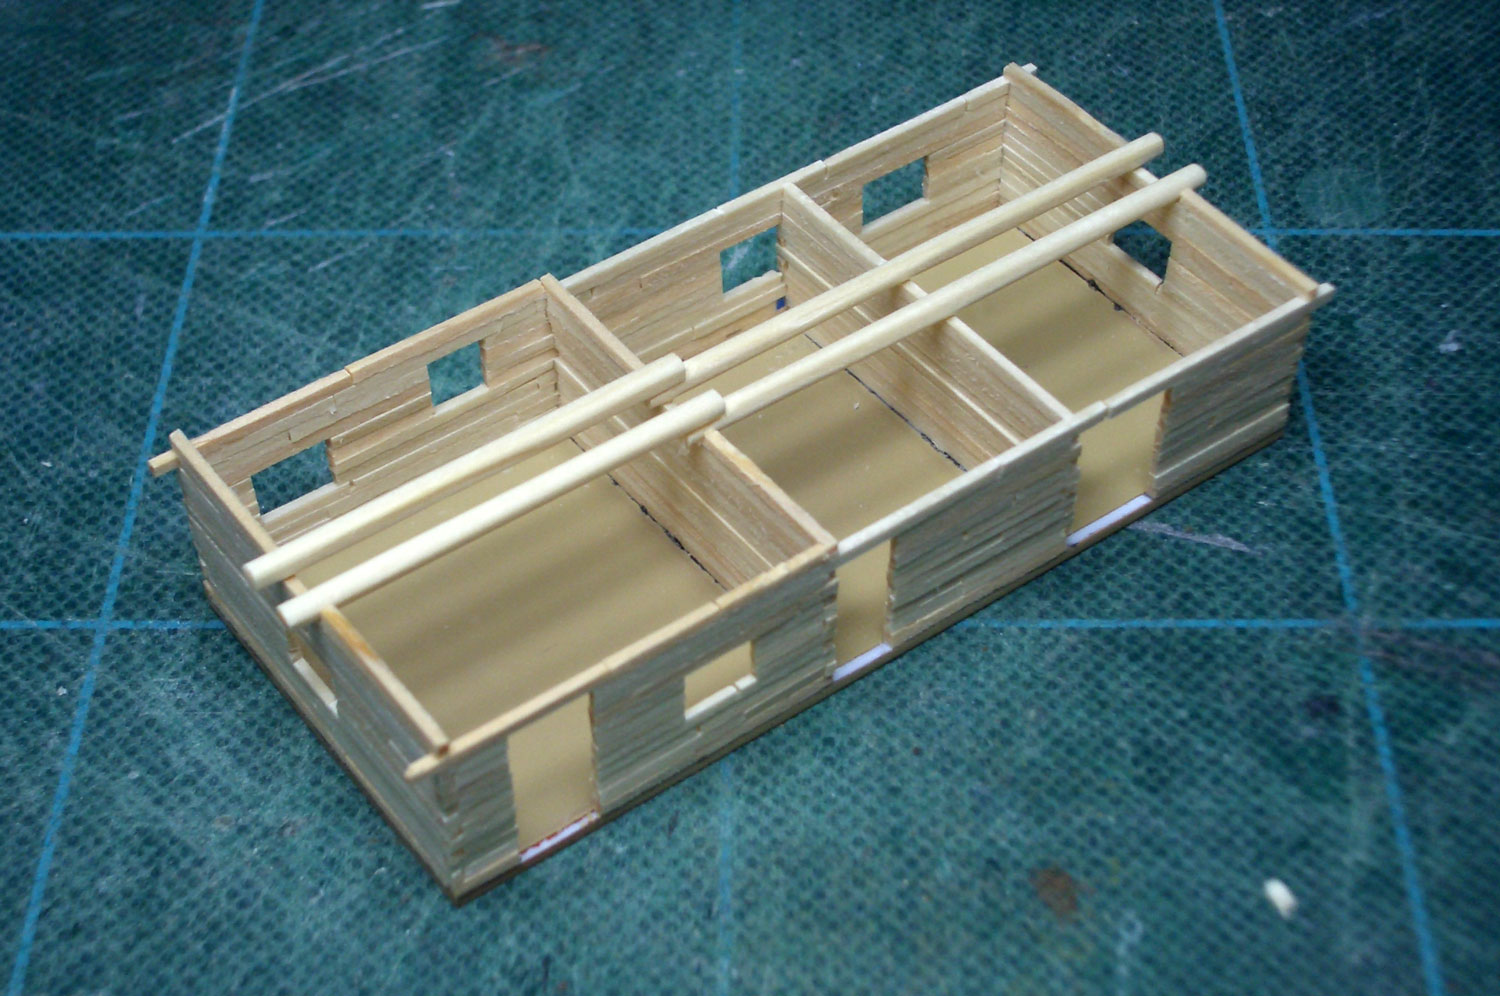
 : wood siding walls
I wanted to make eave of the roof as thin as possible to avoid toy-like appearance. but thin materials like styrene, wood and paper apt to warp. To avoid warping, I used 0.3mm brass plate for the roof. The weight of the brass plate also steadies the distortion of the handmade wood roof trusses. I applied Tamiya Plastic Paper on the brass plate to represent the sheet.
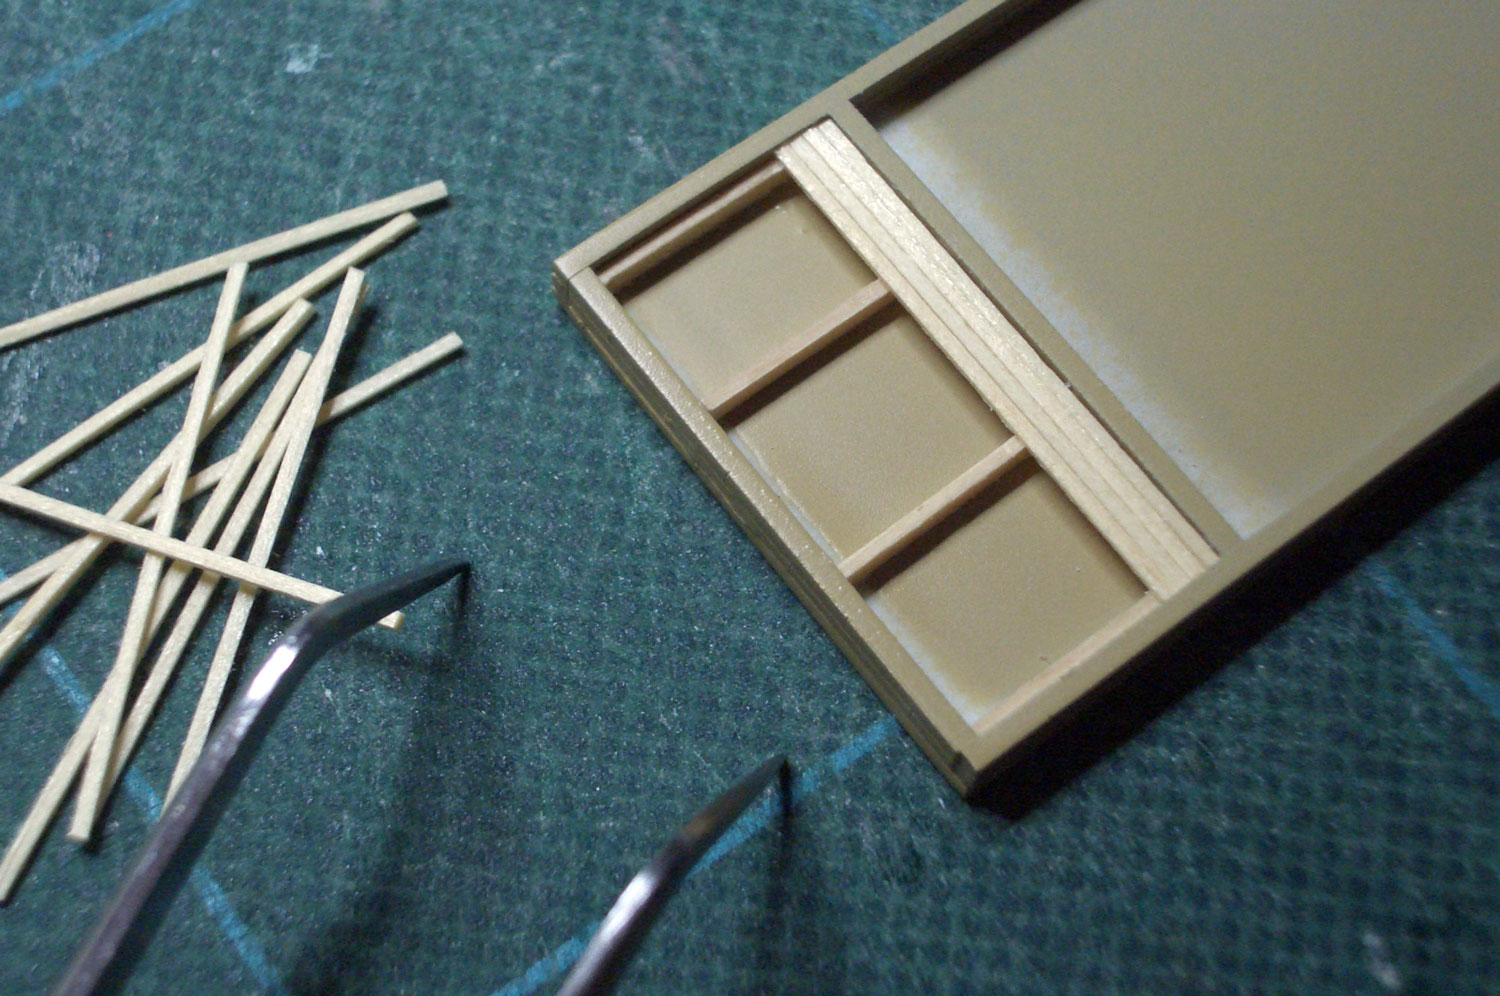
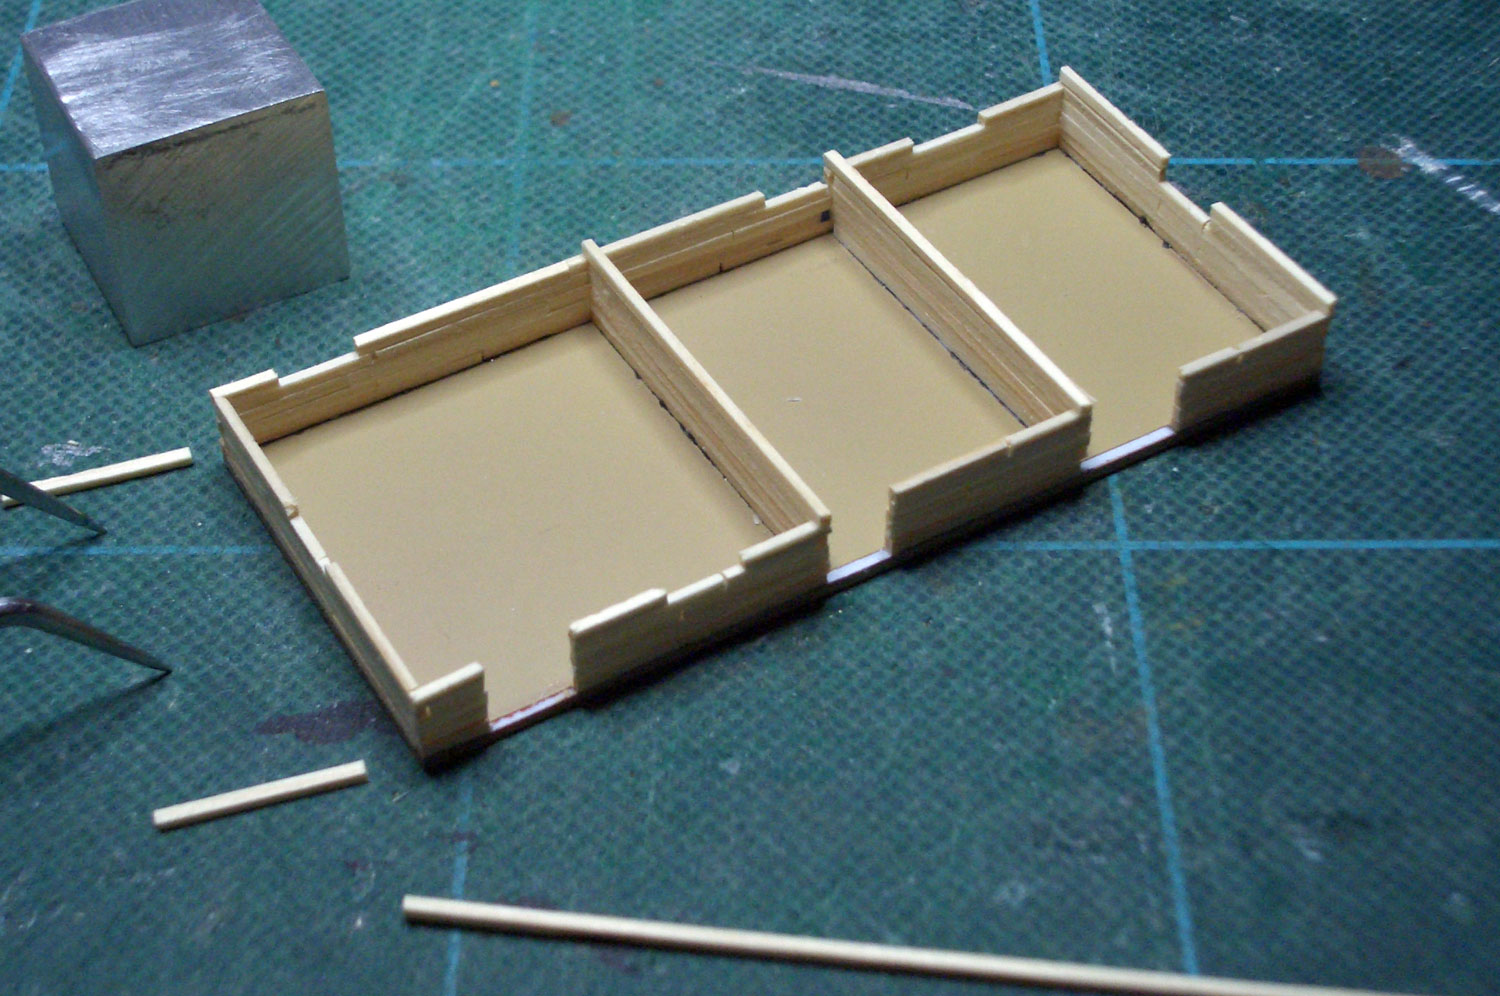
 : roof trusses
Some pictures barely shows L-shaped counter inside the structure*. But I couldn’t find out the interior layout. So, the interior of the model was left vacant.
* Picture showing the counter;
 : half way to completion
 : pumps ready to paint
2013-05-31 09:00
コメント(0)
Making Duke's Service, part 2 [Works_Cisco Townsite]
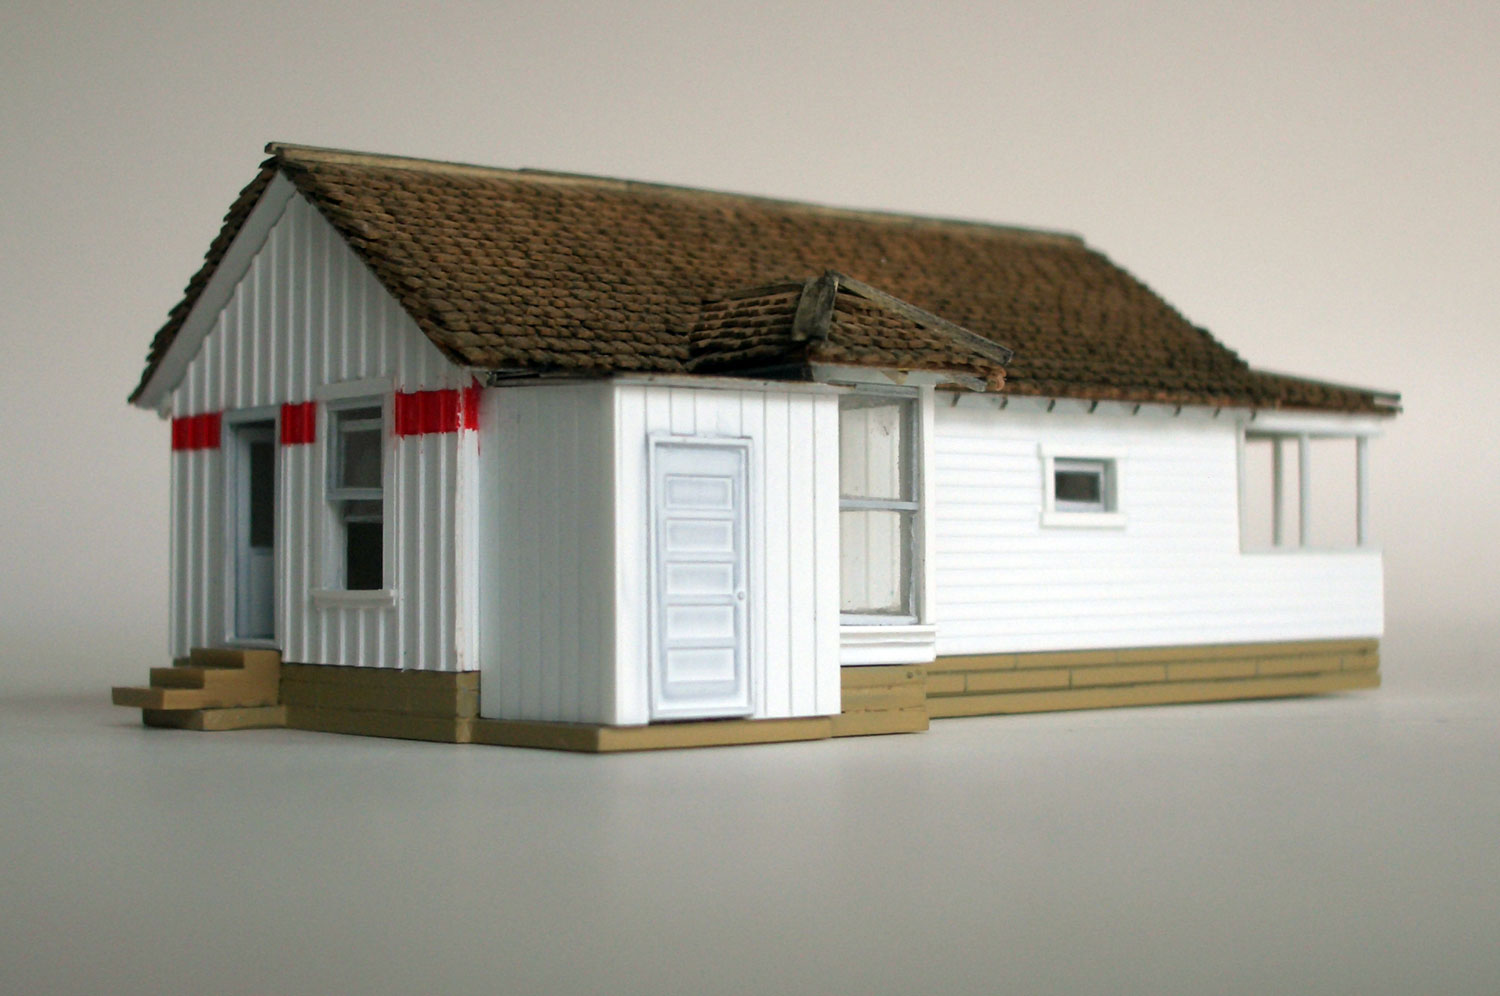
 : looking from Northwest
I’m trying to duplicate the whole town of Cisco, Utah in N scale. Here, I represent the making of Duke's Service.
I first painted walls dark green to prevent optical transmission. Next, I painted the wall white. Finally, I painted the red band and added light weathering with compound.
 : looking from Northeast
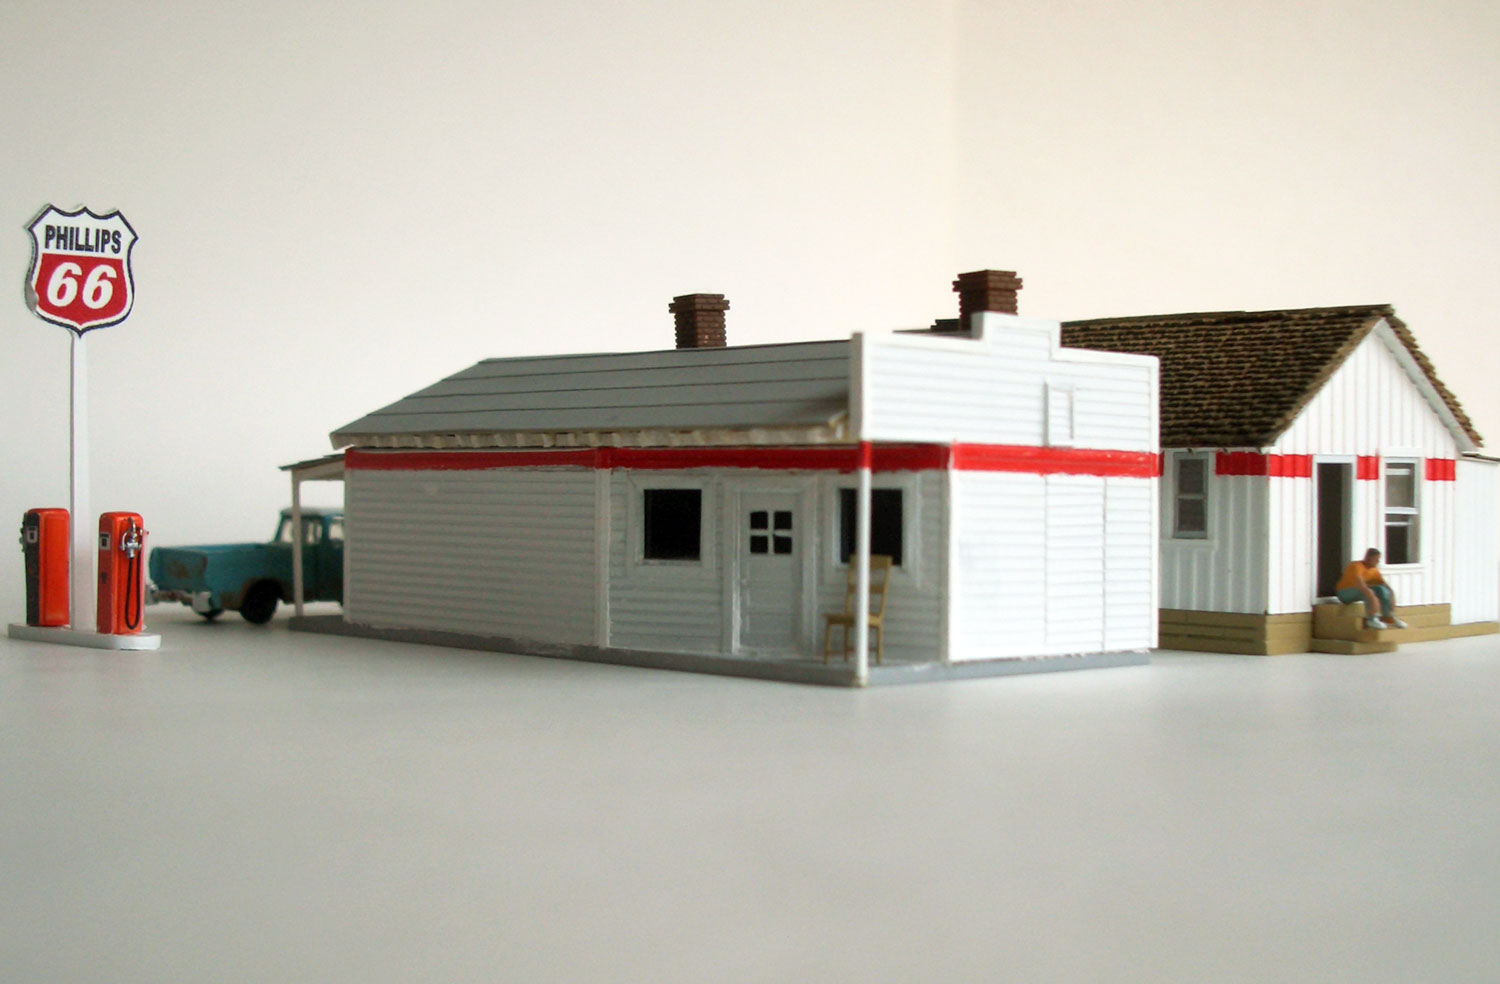
Some pictures show 50's style gas pumps torn down in front of the structure[1]. The picture used in Kathy Jordan’s article barely shows the sign pole standing between two pumps along US Hwy 6. Accordingly, I made two 50s style pumps and painted in Phillips 66 scheme. Added is the Phillips sign on the pole. All the graphics were done with self-made decals.
 : 50s style gas pumps
Roof, roof trusses and interior walls are kept removable for the future lighting, interior works and weathering. Co-starring pick up truck in the pictures is a Woodland Scenics product.
 : oblique rays of the sun lits
 : the end of the day
As I mentioned before, the purpose of “Cisco Project” is to bring the “landscape” to my N scale world. Photographer Stephan Shore says that the architectures are the parameter of the essence landscape has[2].
I received his thought as vast space is unnecessary if I could successfully model the structure. But I found, when I was taking the photos, that it needs a kind of space between objects to achieve the purpose; space between structure and structure, or structure and accessories. The evidences are shown above.
[1] One of the pictures showing the gas pump base (middle right);
[2] My review for Uncommon Spaces by Stephan Shore;
2013-06-07 09:00
コメント(0)
Making Ruth 66 Cafe, part 1 [Works_Cisco Townsite]
 : model drawings of Ruth 66 Cafe.
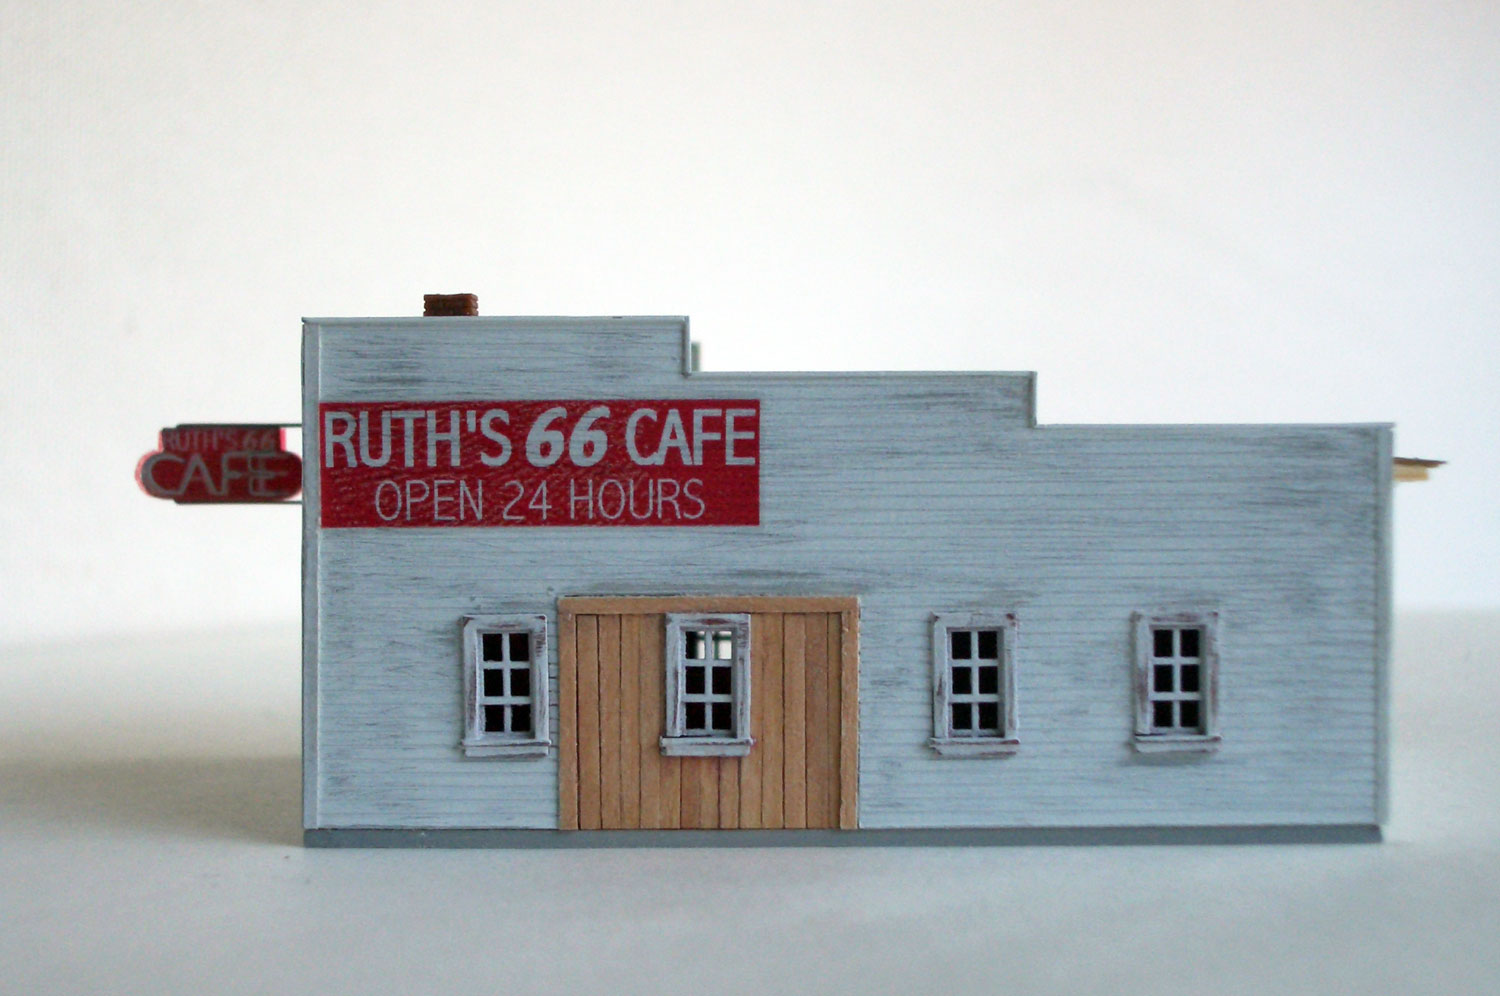
I’m trying to duplicate the whole town of Cisco, Utah in N scale. Here, I represent the making of Ruth 66 Cafe.
Ruth 66 Cafe was made of wood; horizontal siding wall and tarpaper (maybe) roof. I used Evergreen styrene sheet #4037 for the wall. I also used 0.1mm Tamiya Plastic Paper for architraves. Doors and windows are Tichy products. I drew model plans to adjust some prototype openings to fit. Result is shown above. Numbers in the drawing above shows the numbers of parts I used.
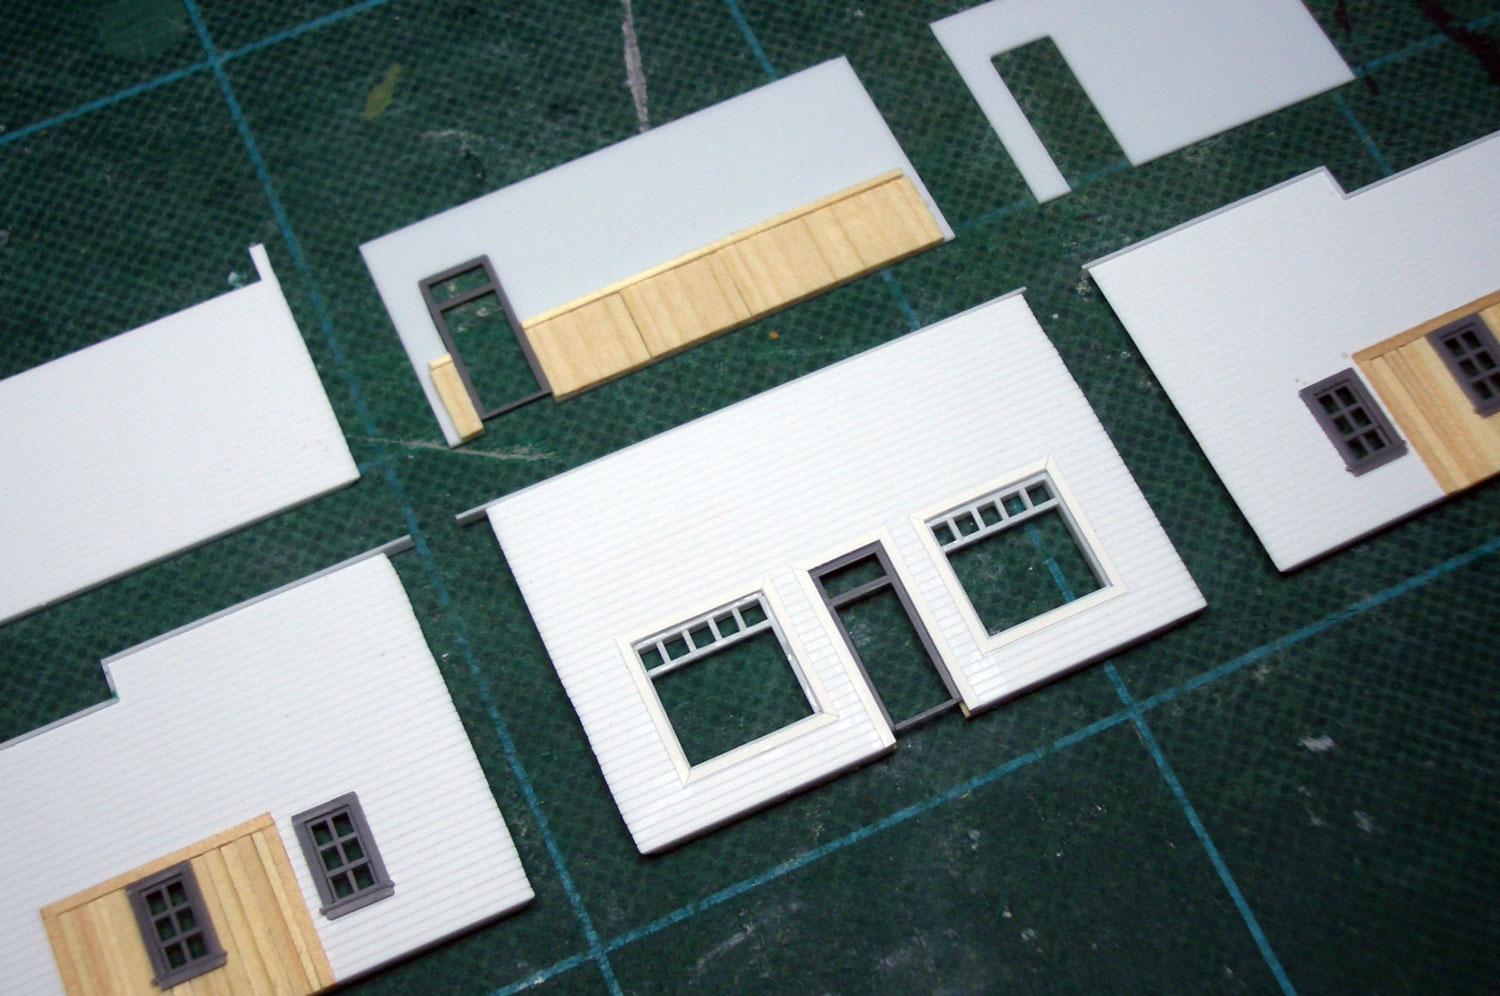 : wood siding walls
Thin wood is used for the roof trusses, flooring and retaining wall. I used 0.3mm brass plate for the roof. I applied sand paper on the brass plate to represent the tarpaper.
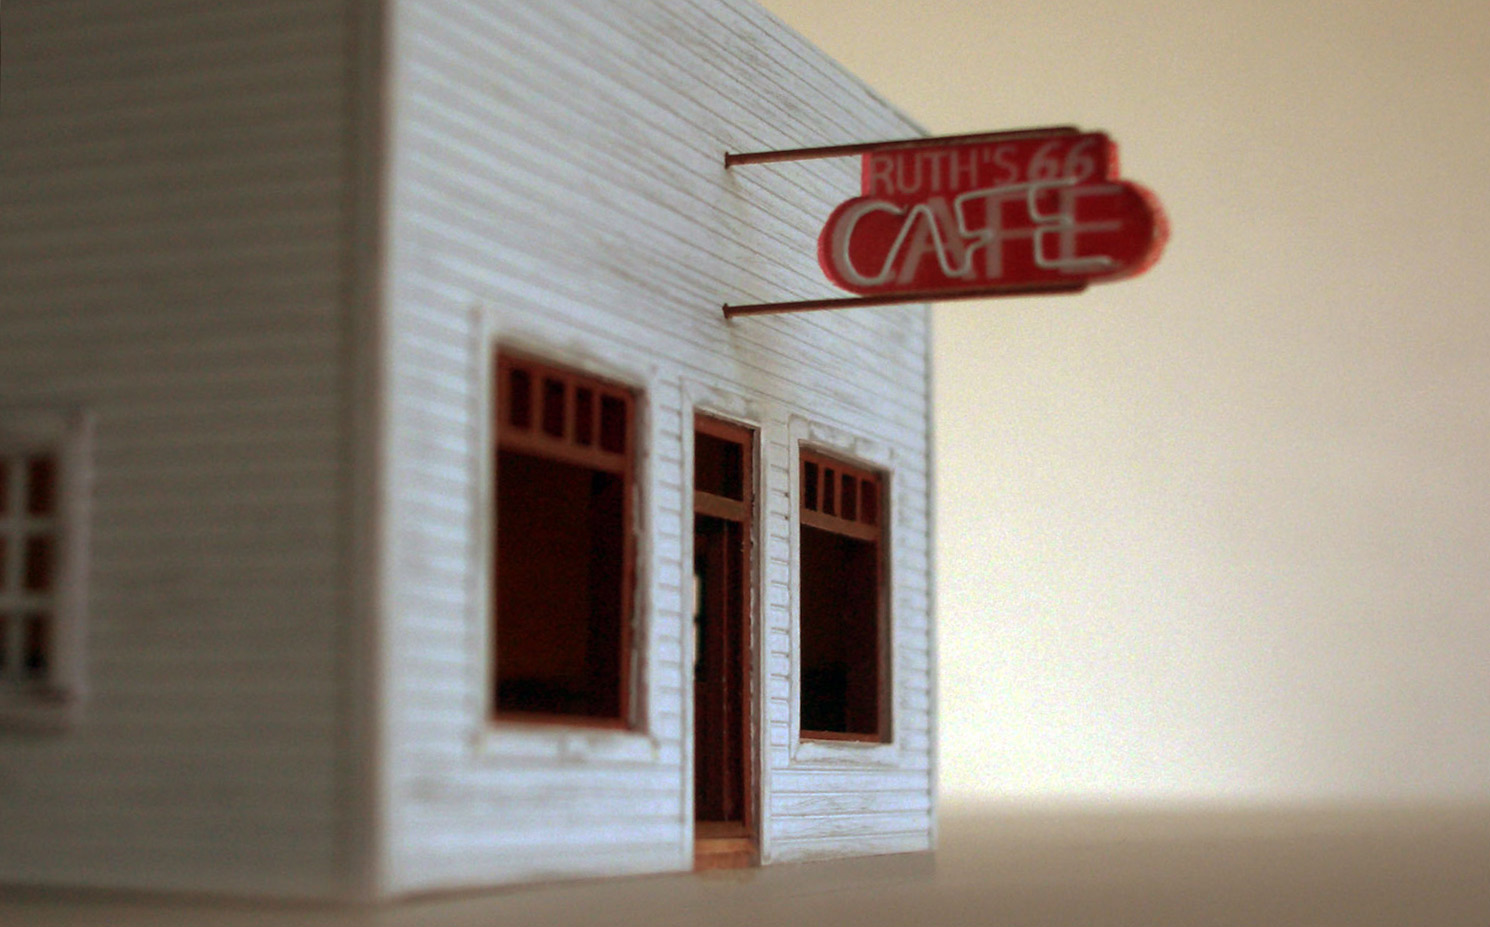
The one and only attractive feature of this structure would be the sign sticking out from the facade. I don’t know whether it was a neon sign or not. But I decided to make the neon tube using 0.2mm brass rod to represent the attraction.
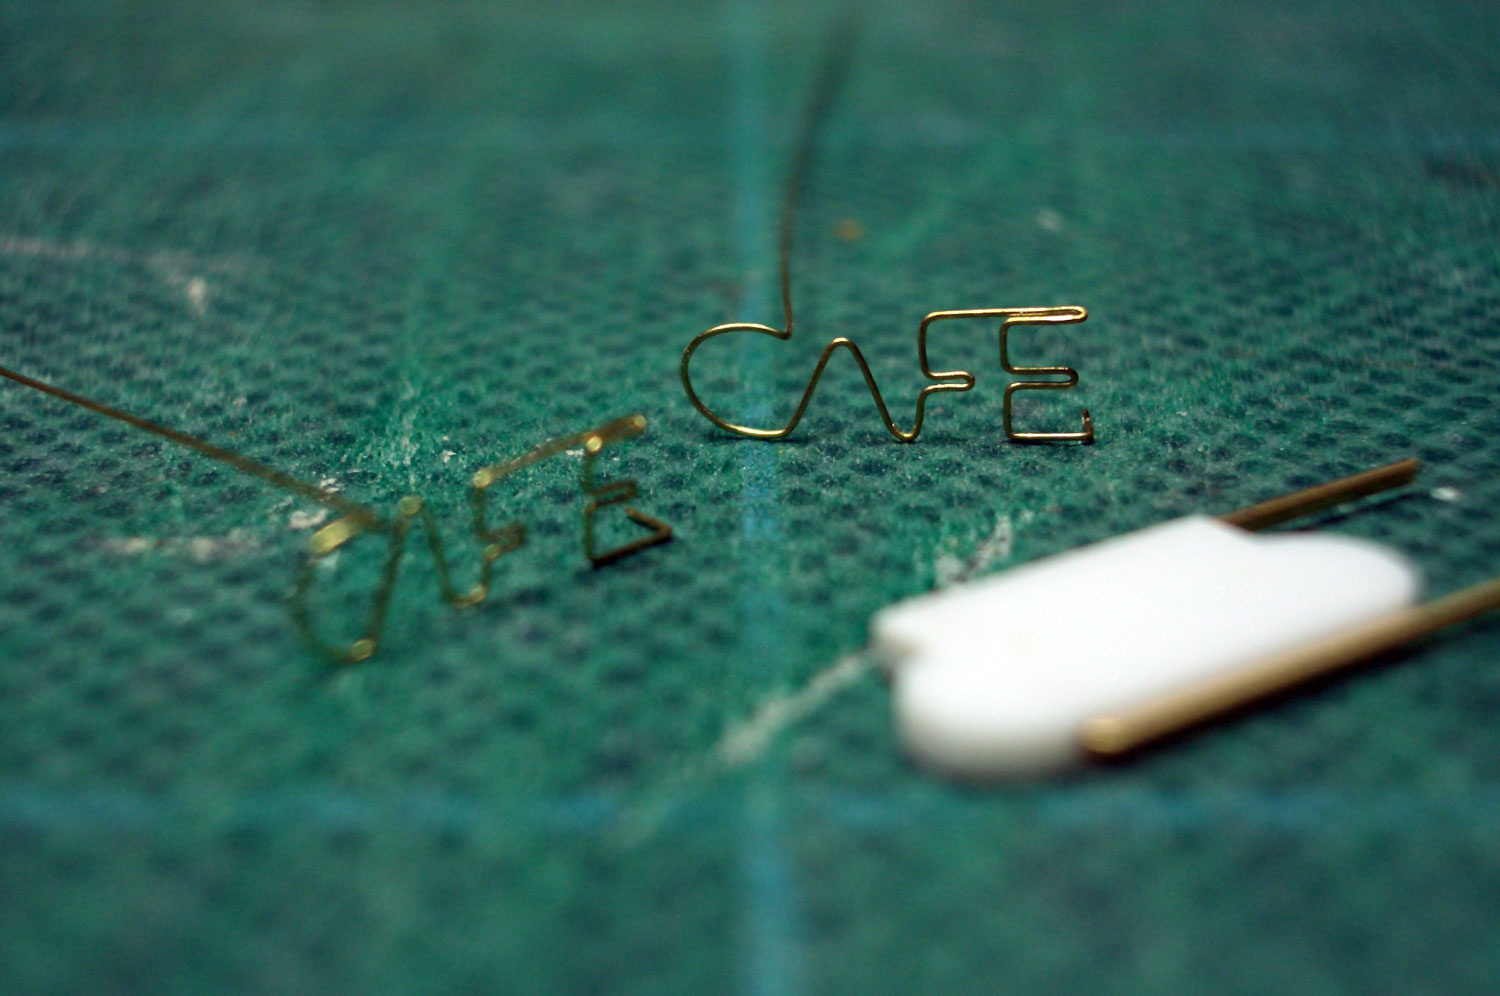 : neon tubes
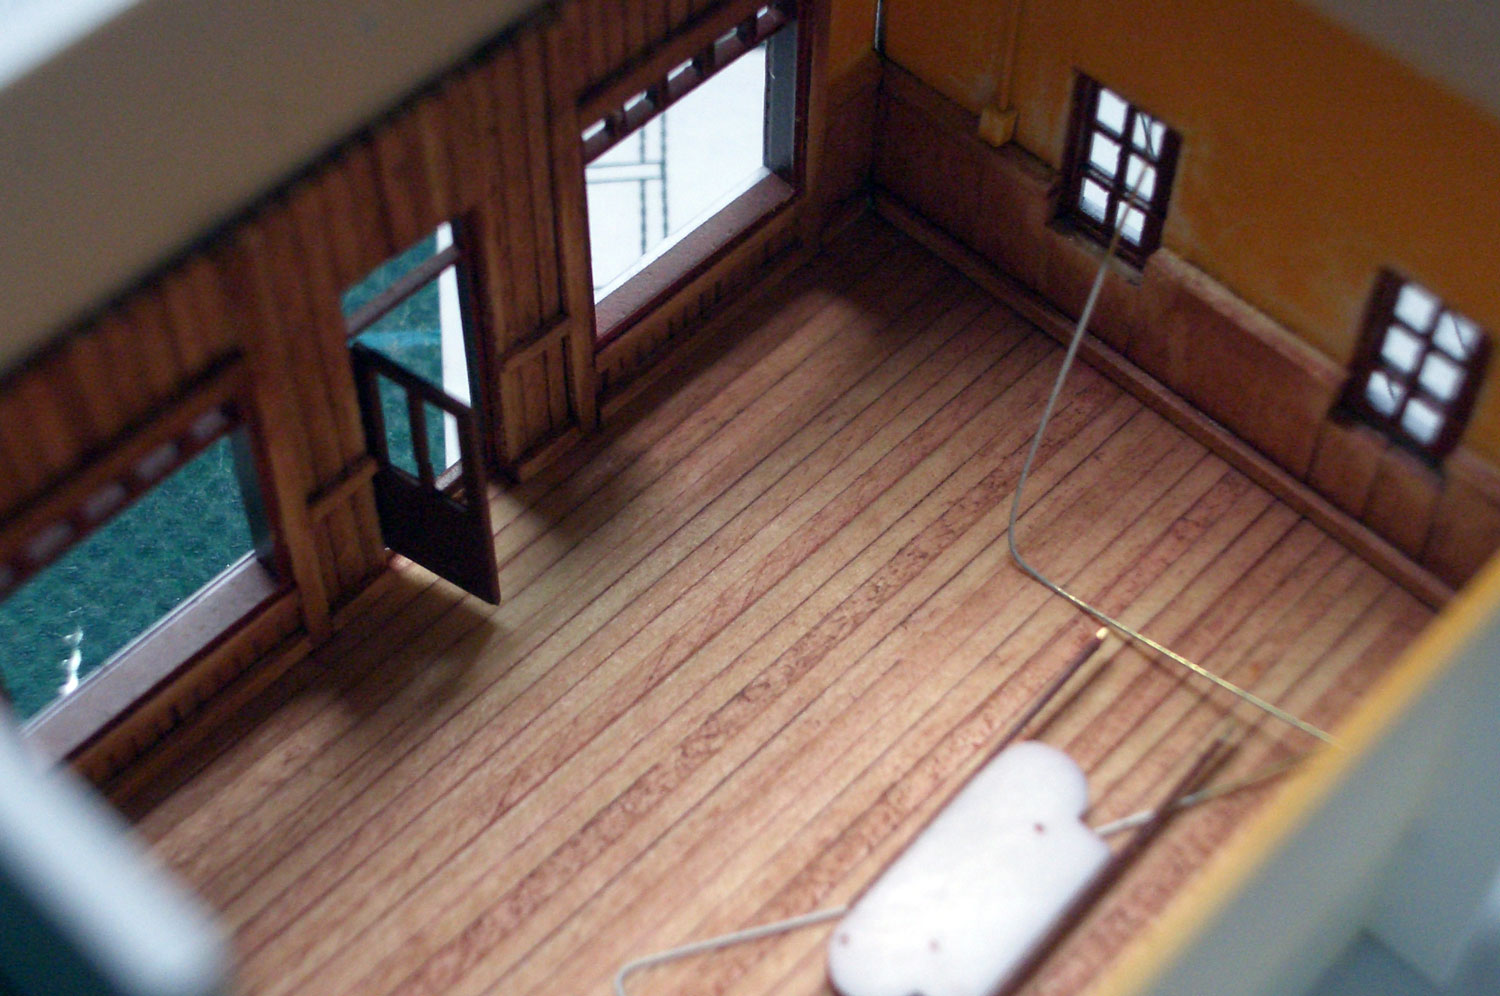 : interior under construction
2013-09-13 09:00
コメント(0)
Making Ruth 66 Cafe, part 2 [Works_Cisco Townsite]
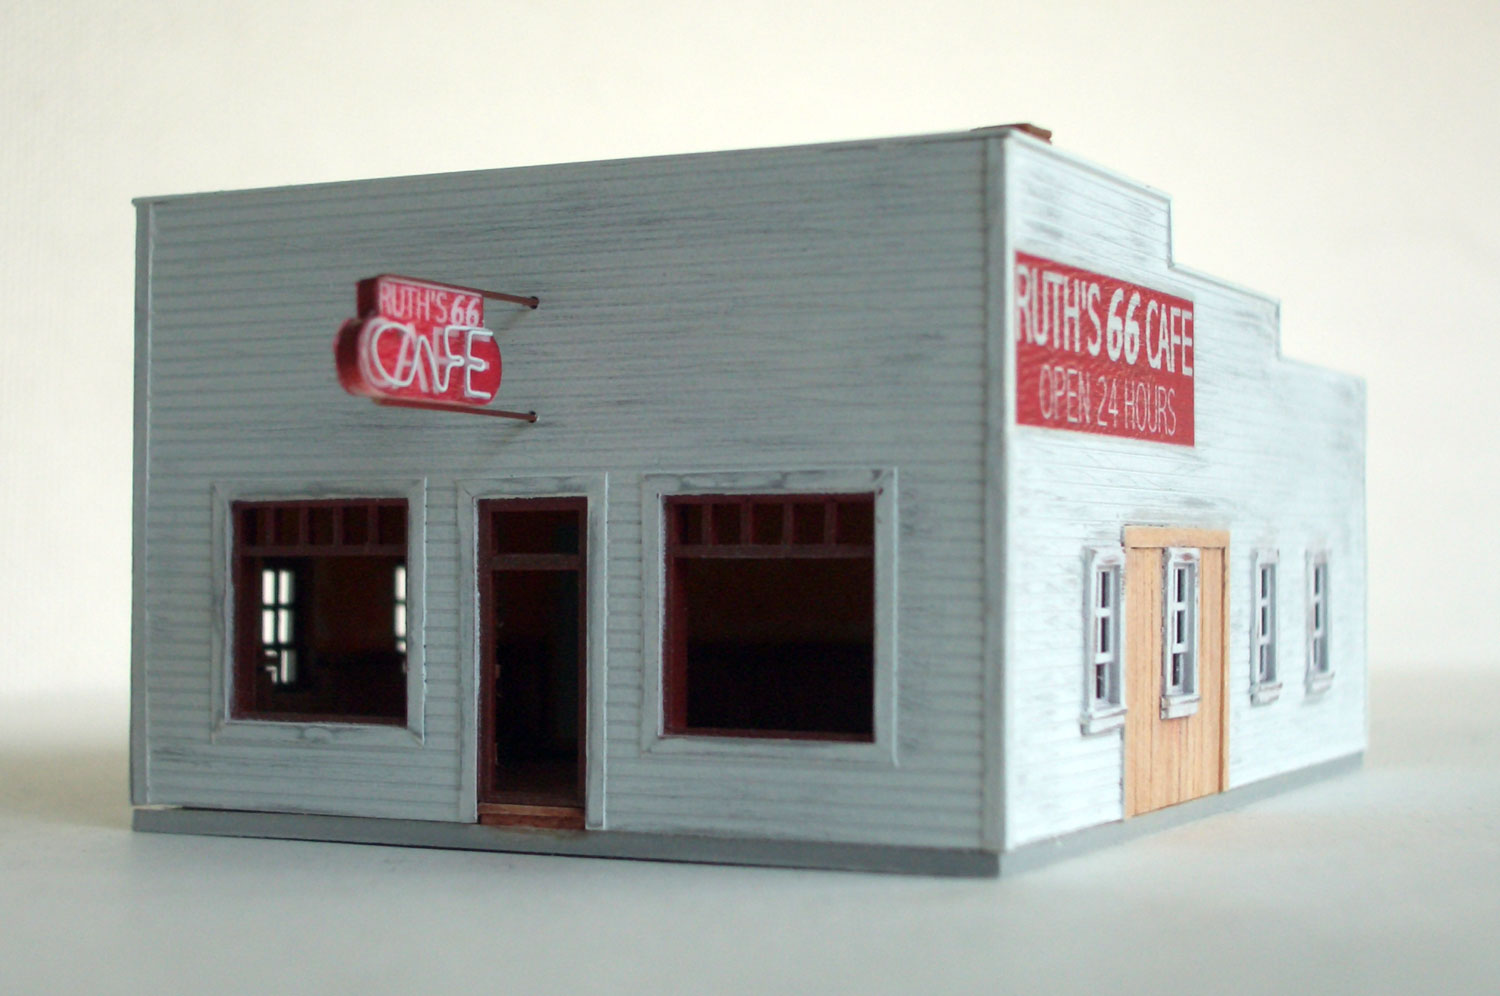 : North elevation facing US Hwy 6
I’m trying to duplicate the whole town of Cisco, Utah in N scale. Here, I represent the making of Ruth 66 Cafe.
I first painted walls with grey primer. Next, I painted the wall white. Windows, doors, floor and retaining wall were painted brown. Interior wall color in the movie “Vanishing point” seemed yellow/ocher. So I painted the wall yellow with Tamiya TS-34. Finally, I added light weathering with sand paper. Applied graphics are the homemade decals.
 : West elevation appeared in the movie “Vanishing Point”
Roof, roof trusses and interior walls are kept removable for the future interior works. Glazing is lost, the same to prototype.
I previously mentioned that it needs a kind of space between objects, between structure and structure or structure and accessories, to bring the landscape. In other words, this space brings the essence of place. To make space fulfill its function, I think objects must have crisp edges. Crisp edges activate the function of space because dull edges don’t particularly bring us the recognition of the space between the objects.
 : neon sign hung high up
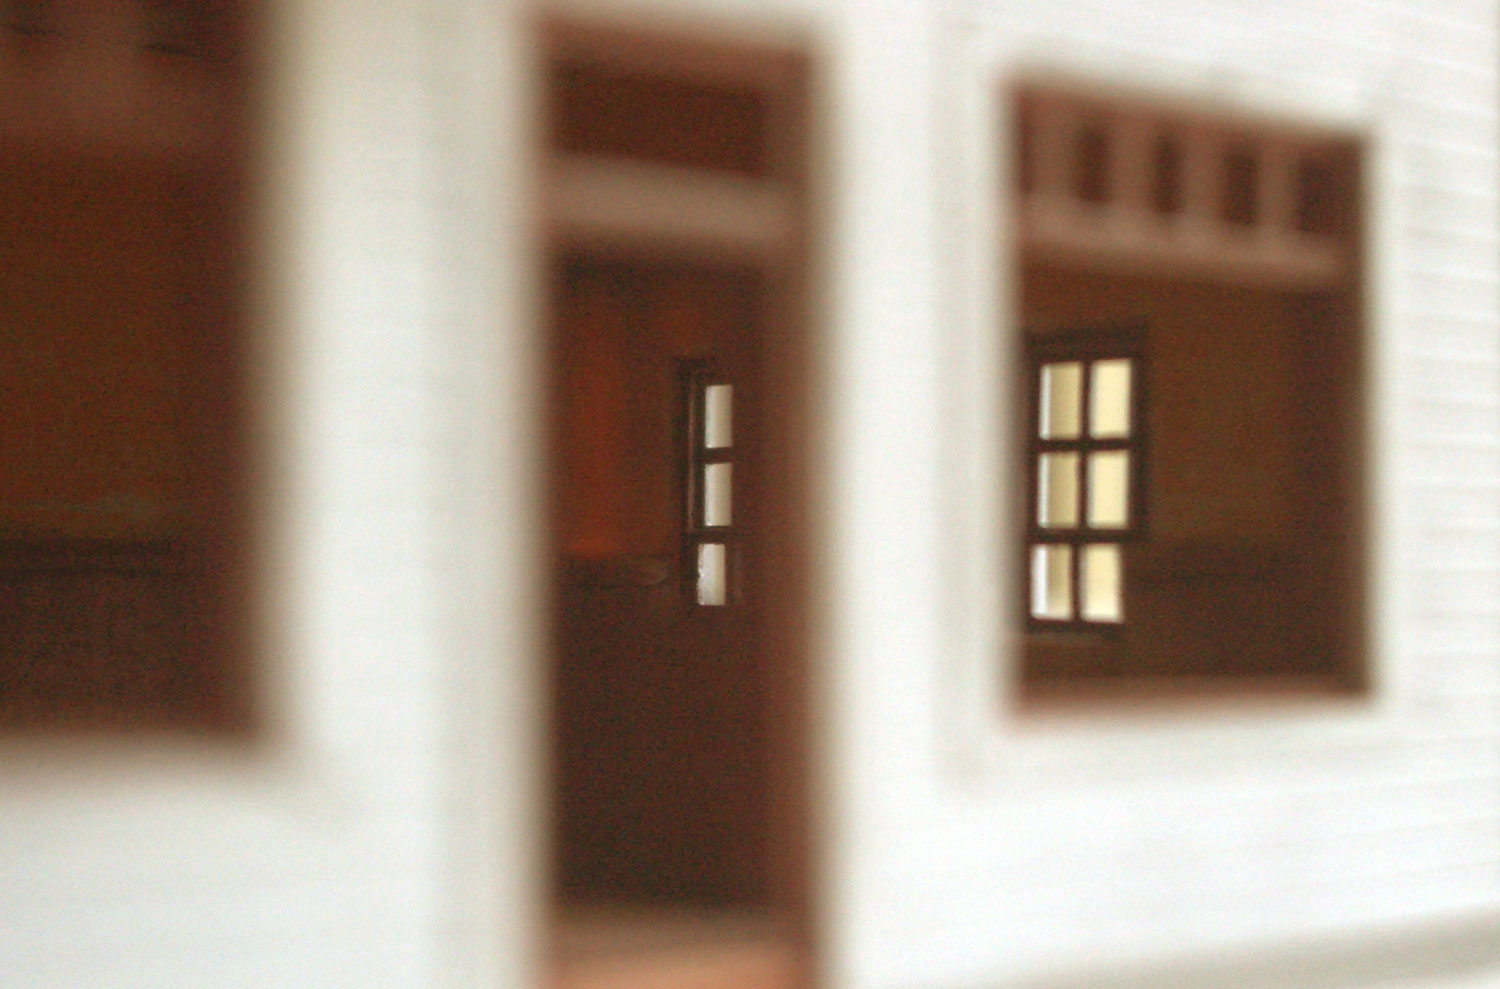 : but only desolation fills the vacant room
2013-09-20 09:00
コメント(0)
1950 Ford F-1 for Town of Cisco [Works_Cisco Townsite]
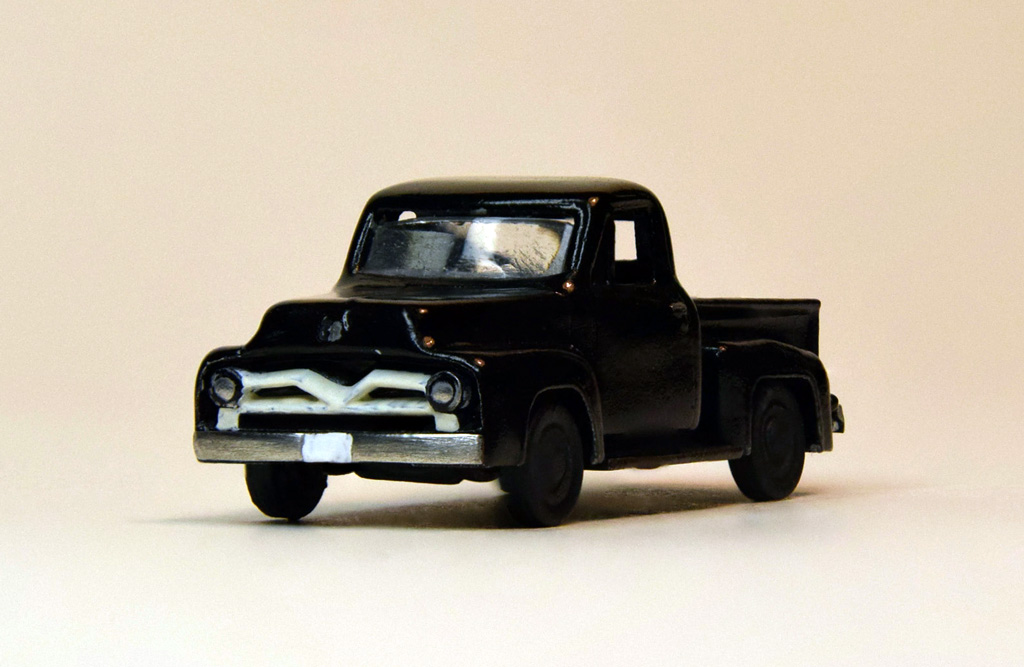
 : 1950 Ford F-1 by GHQ
This is a making of a 1950 Ford F-1 kit produced by GHQ.
GHQ kit is made of pewter and manufactured accurately with no burr, and no mold shift. As front wheels can be fixed in steered position, I made a steering wheel in the cab and fixed the wheels as so. I also fit glazing and polished the molds after painting to represent the chrome-plated molds.
 : parts ready to assemble
The bonnet of this Ford reminded me of EMD GP30 cab while I was polishing the parts. They resemble to each other. Both front-halves retain two-piece housing, have cowl with edge on horizontal plane, and have cowl widen toward the end.
The characteristic design of this Ford pickup was produced between 1948 and 1952. EMD parent GM also produced pickups similar to Ford’s in these days. Sedans of these days already had their bonnet and fender integrated. And in the ’60s, pickups also had one-piece housing.
It is said that the design of GP30 was inspired from a car design. GP30 was first produced in 1961. So, I may say that, if GP30 design was inspired from a car design, it was inspired not from the latest car design of those days, but from a decade old pickups.
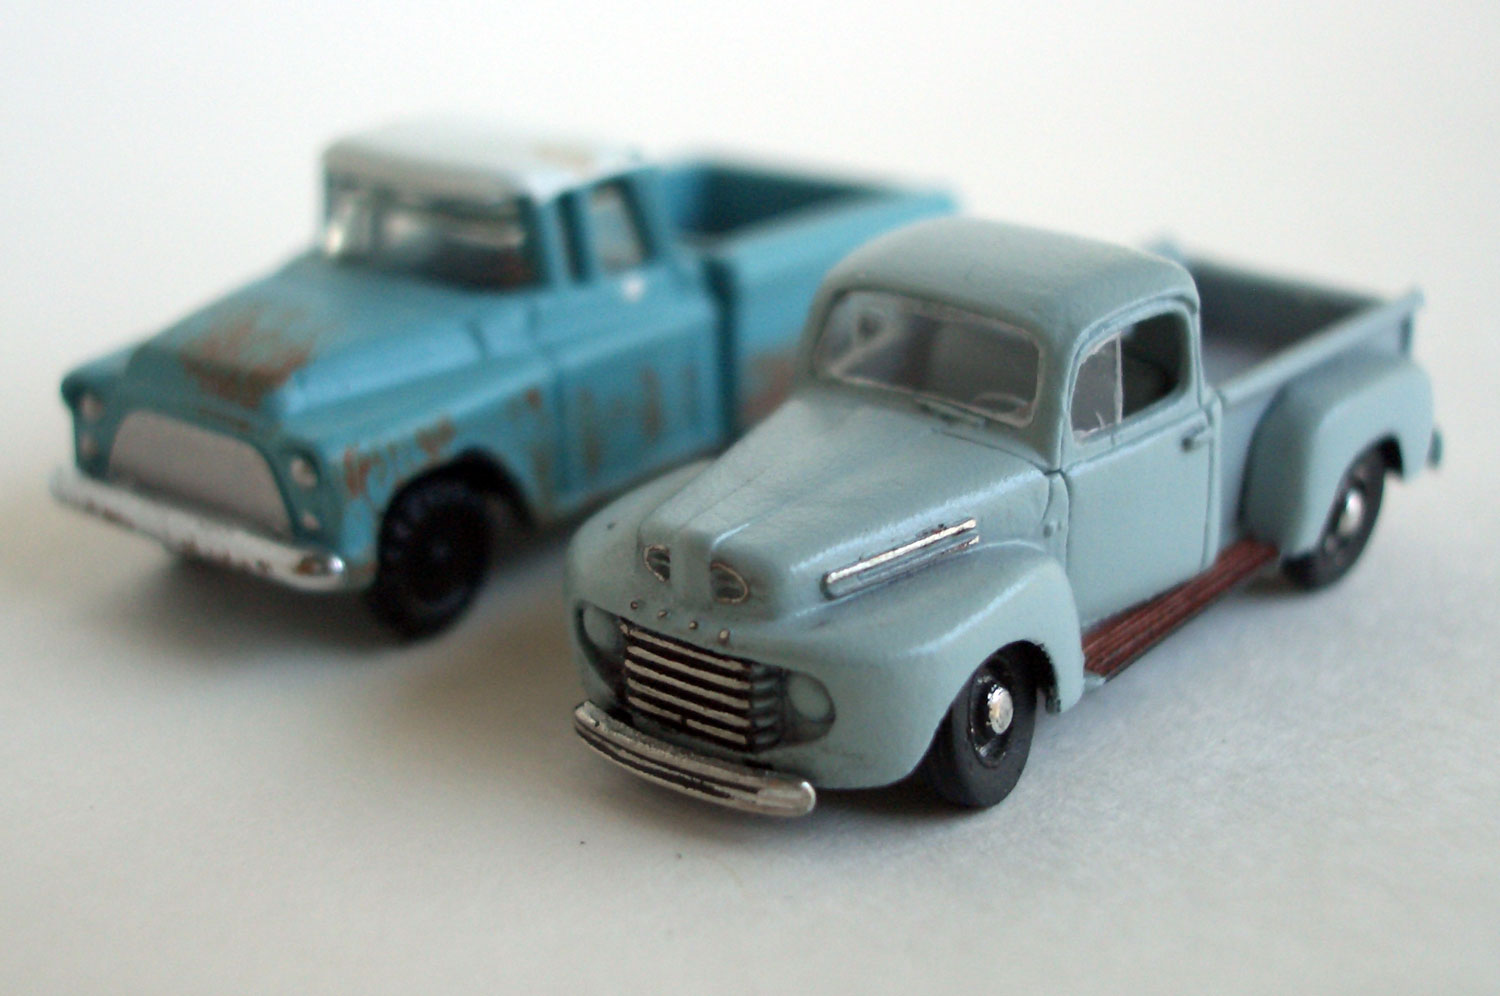 : 1950 Ford F-1 by GHQ and 1956 Chevy pickup by Woodland Scenics
2013-09-27 09:00
コメント(0)
Making Cisco Mercantile, part 1 [Works_Cisco Townsite]
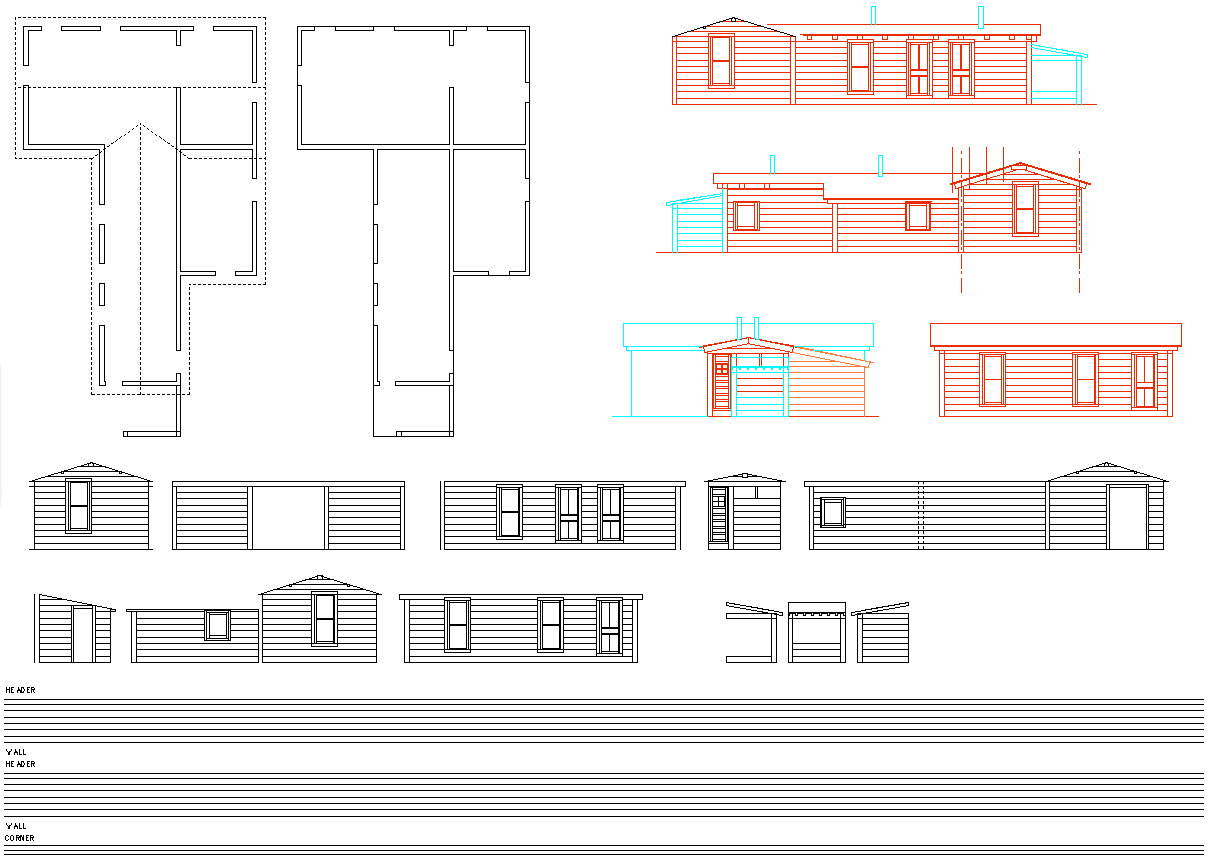
 : model drawings of Cisco Mercantile
I’m trying to duplicate the whole town of Cisco, Utah in N scale. Here, I represent the making of Cisco Mercantile
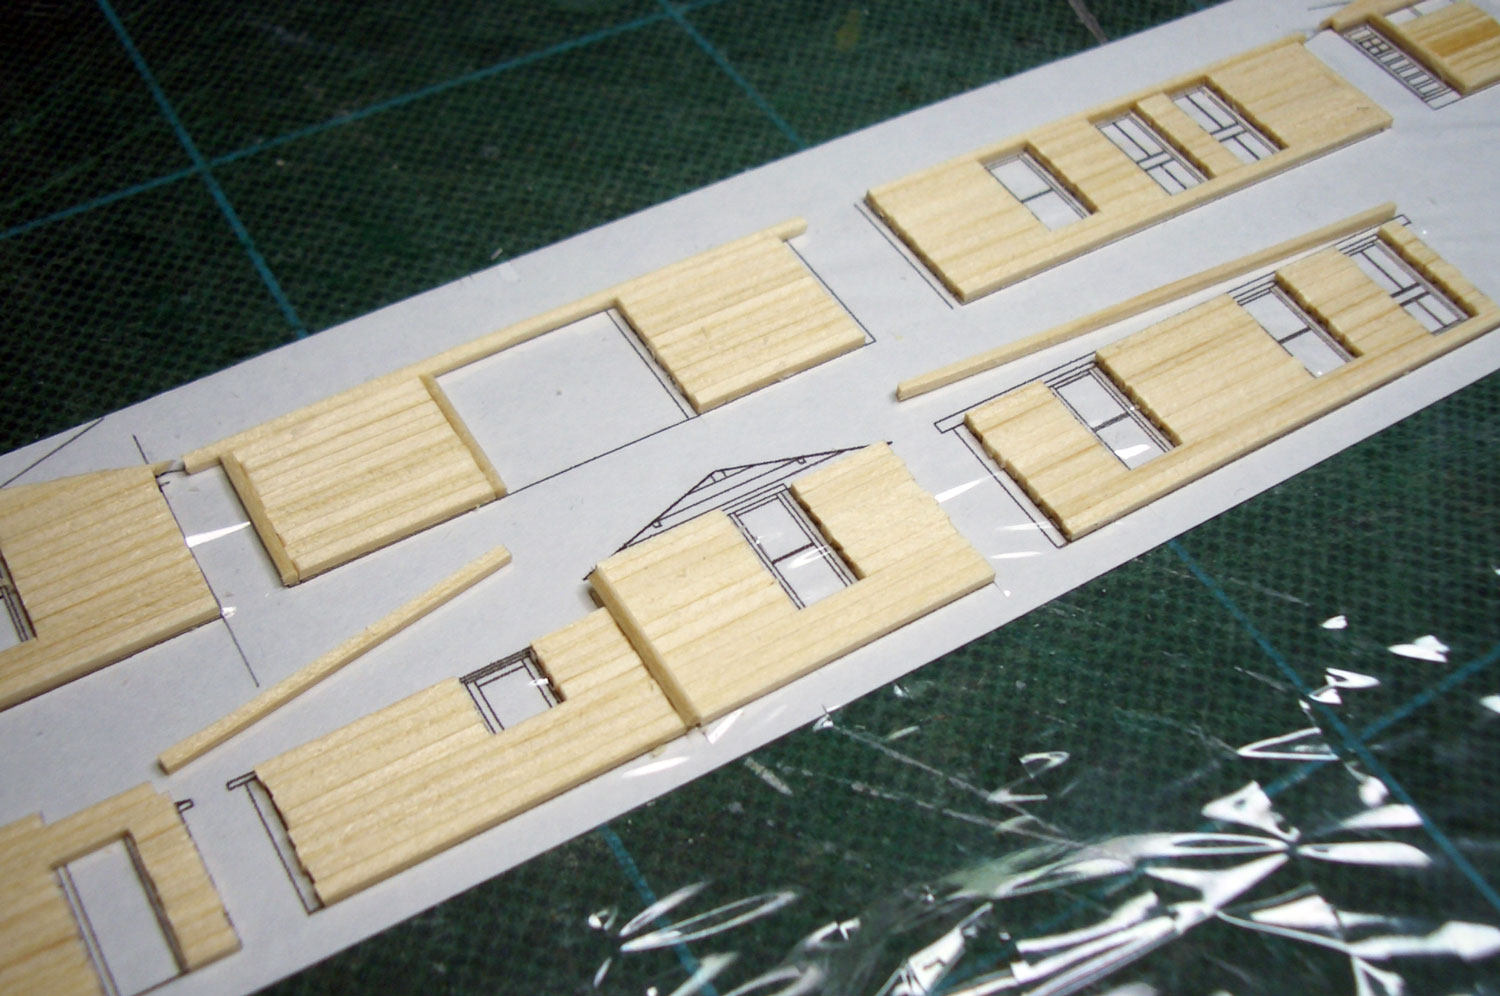
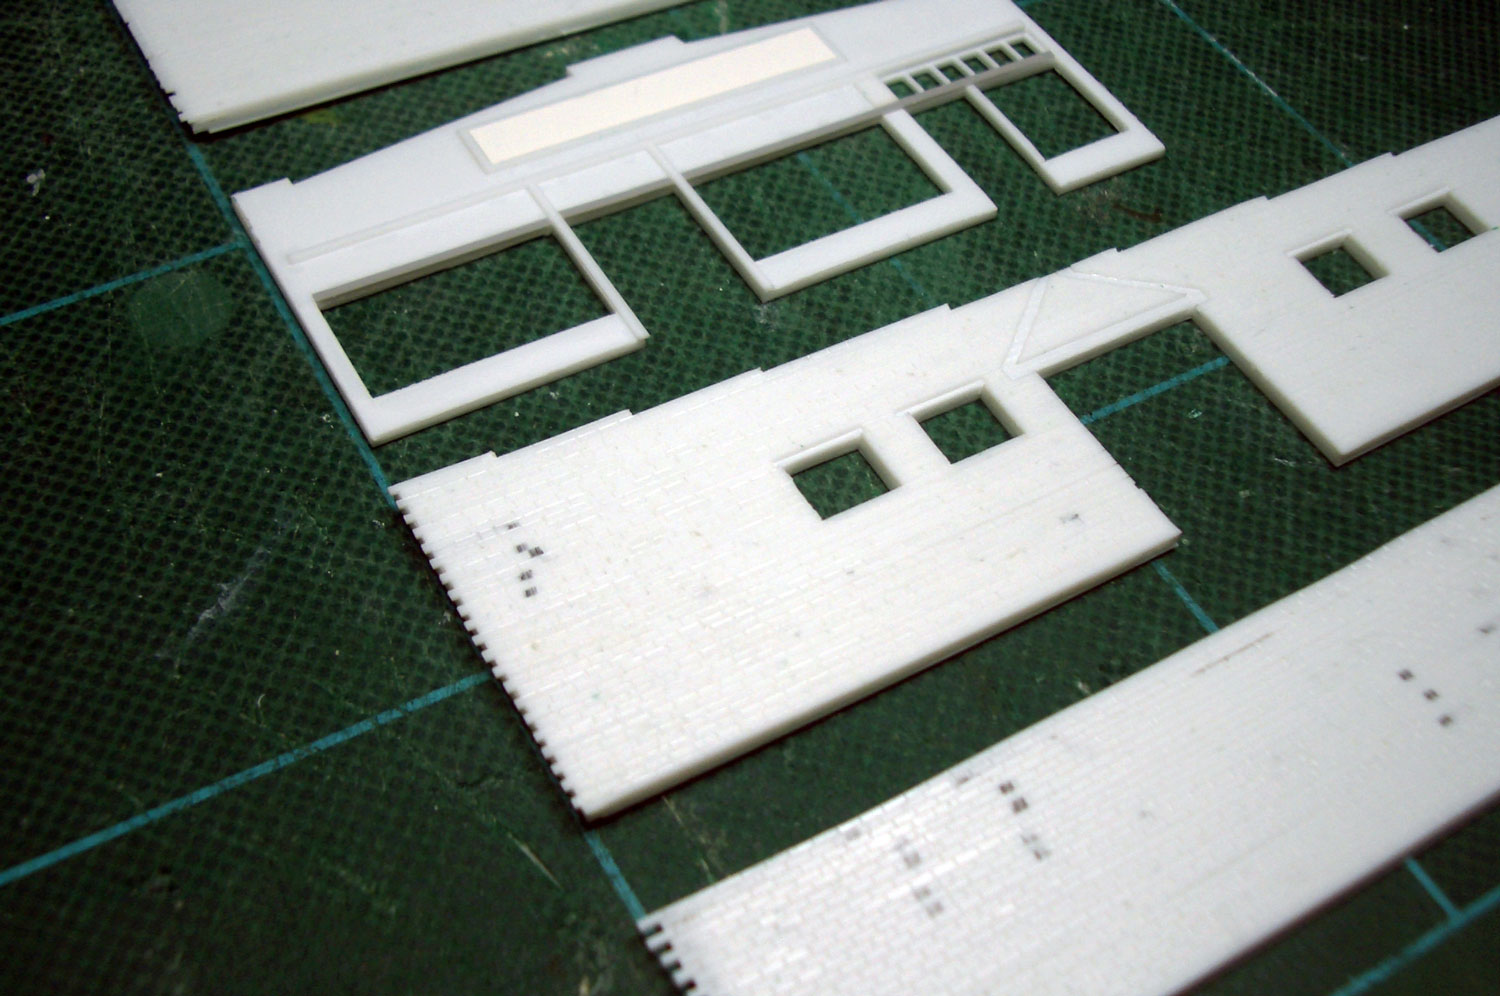 : brick/block walls
Cisco Mercantile was made of brick/block wall and tarpaper (maybe) roof. I tried to lay series of blocks, made from strip of styrene, level by level. The height of the series of blocks is about 0.8mm. Thanks to its irregular (large) block size, I could make it. Result is shown above.
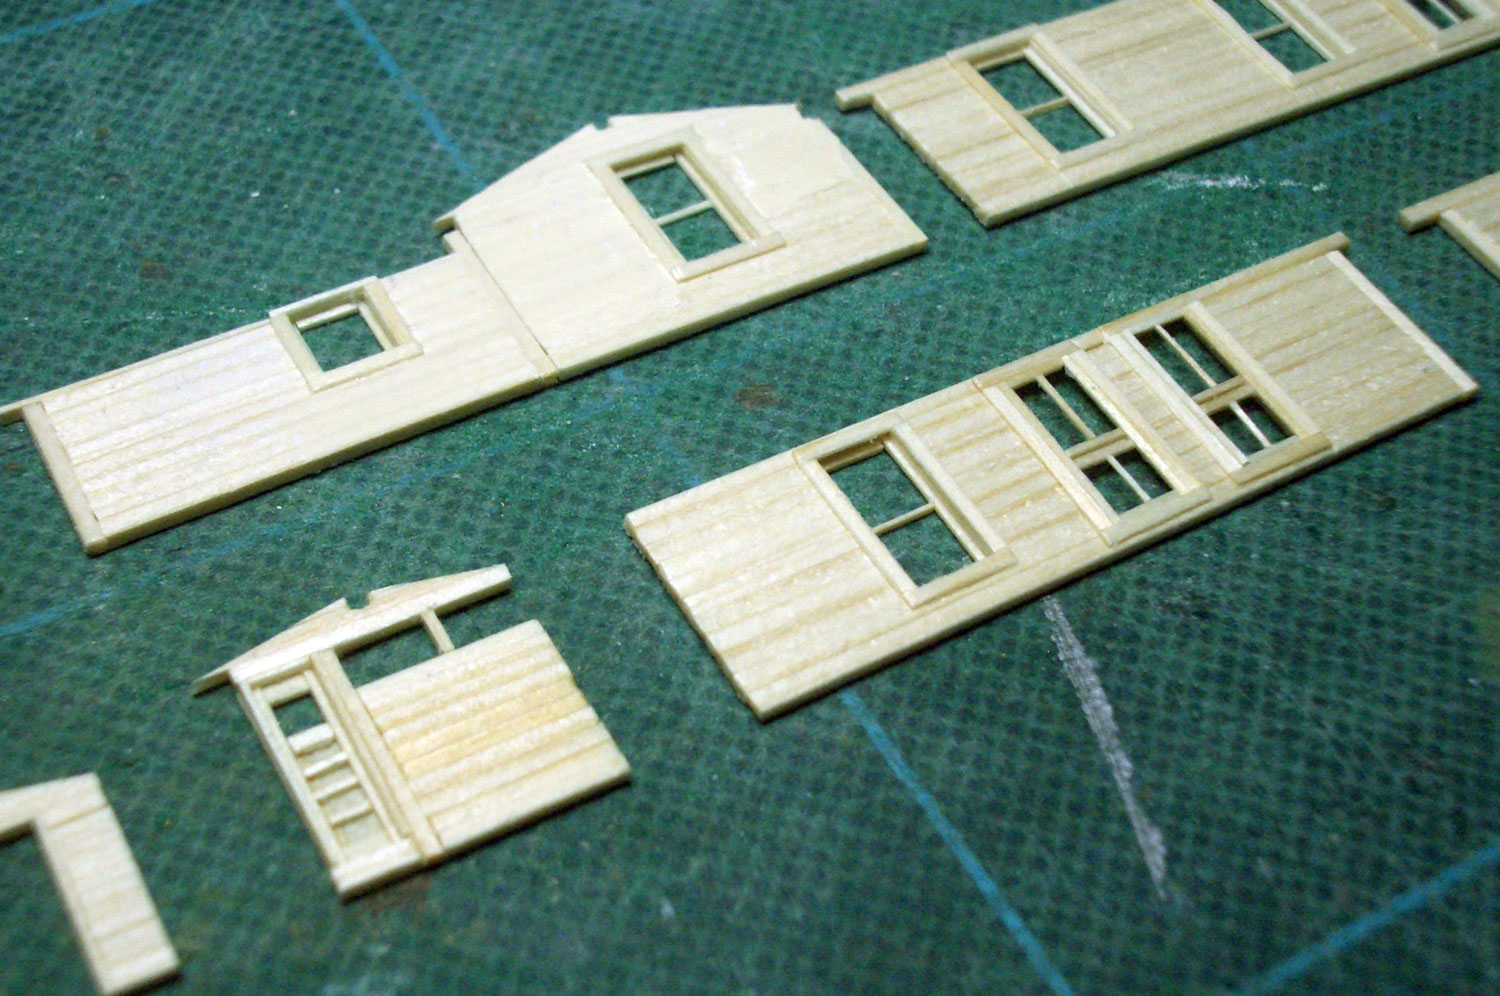
 : windows
Windows are homemade. After applying painted strips of styrene on clear styrene sheet, I cut to exact size and applied the painted frame. Interior doors came from Tichy.
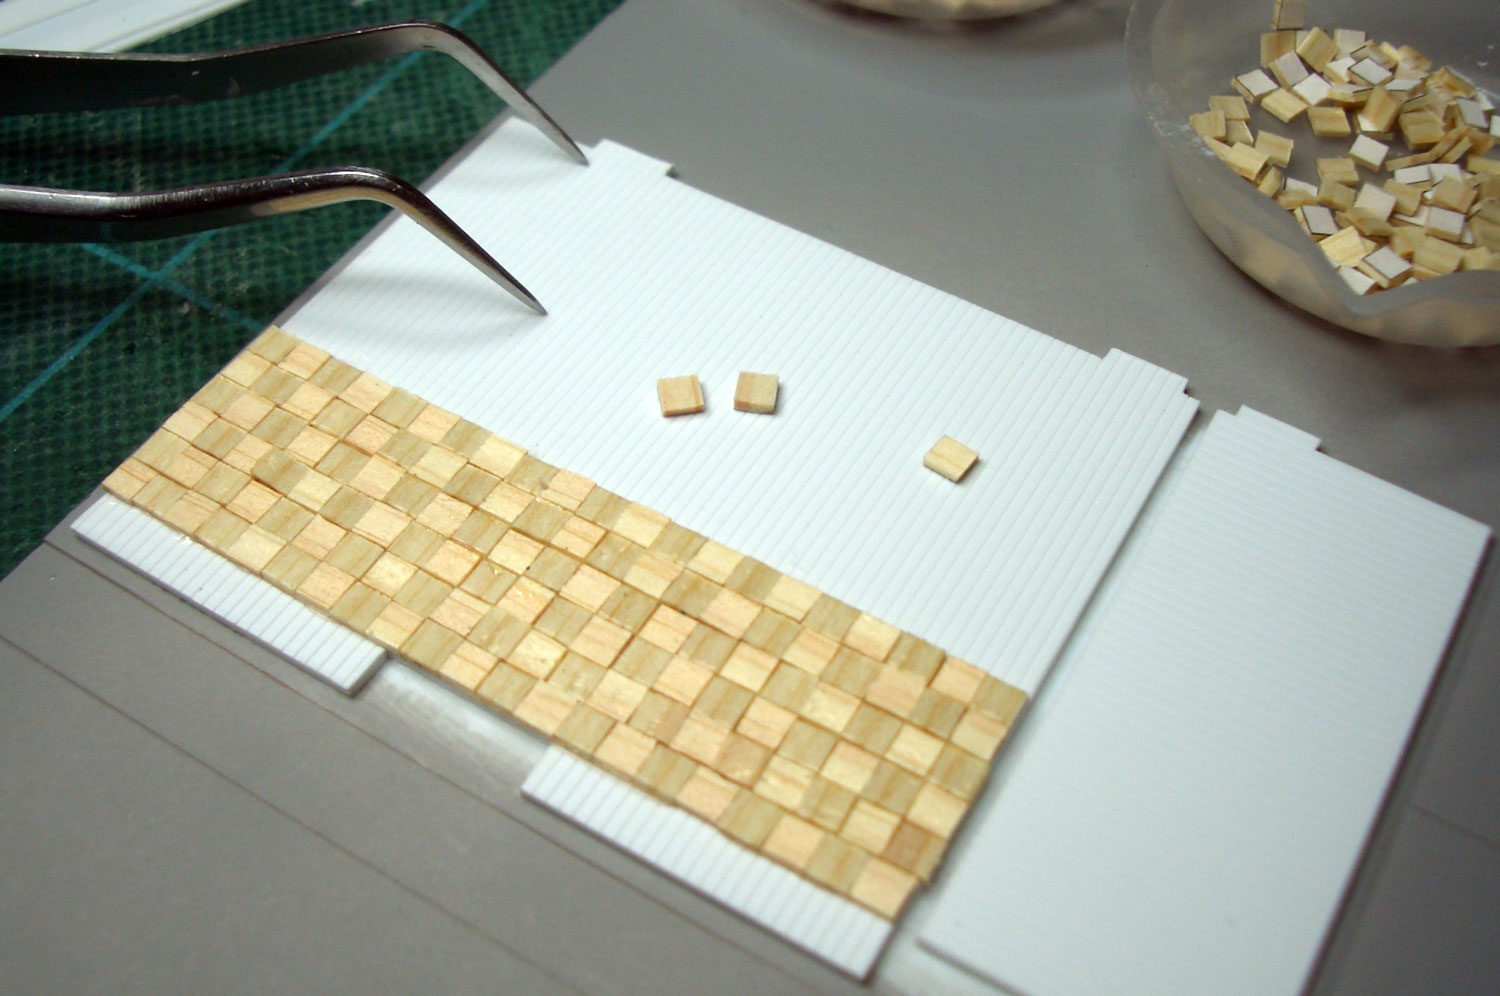 : applying the parquet
Thin wood is used for the roof trusses and floor. In Erich Hartmann’s photo, the floor seemed finished not with flooring but with sheet like linoleum. Model floor without texture and joints lacks charm. So I decided to finish with parquet flooring. I applied 18 scale inches square wood checkered. After the adhesive is dried, I leveled them using sandpaper. The parquets were dyed with thinned dark brown paint. Finally, walkways are again filed to represent the aging.
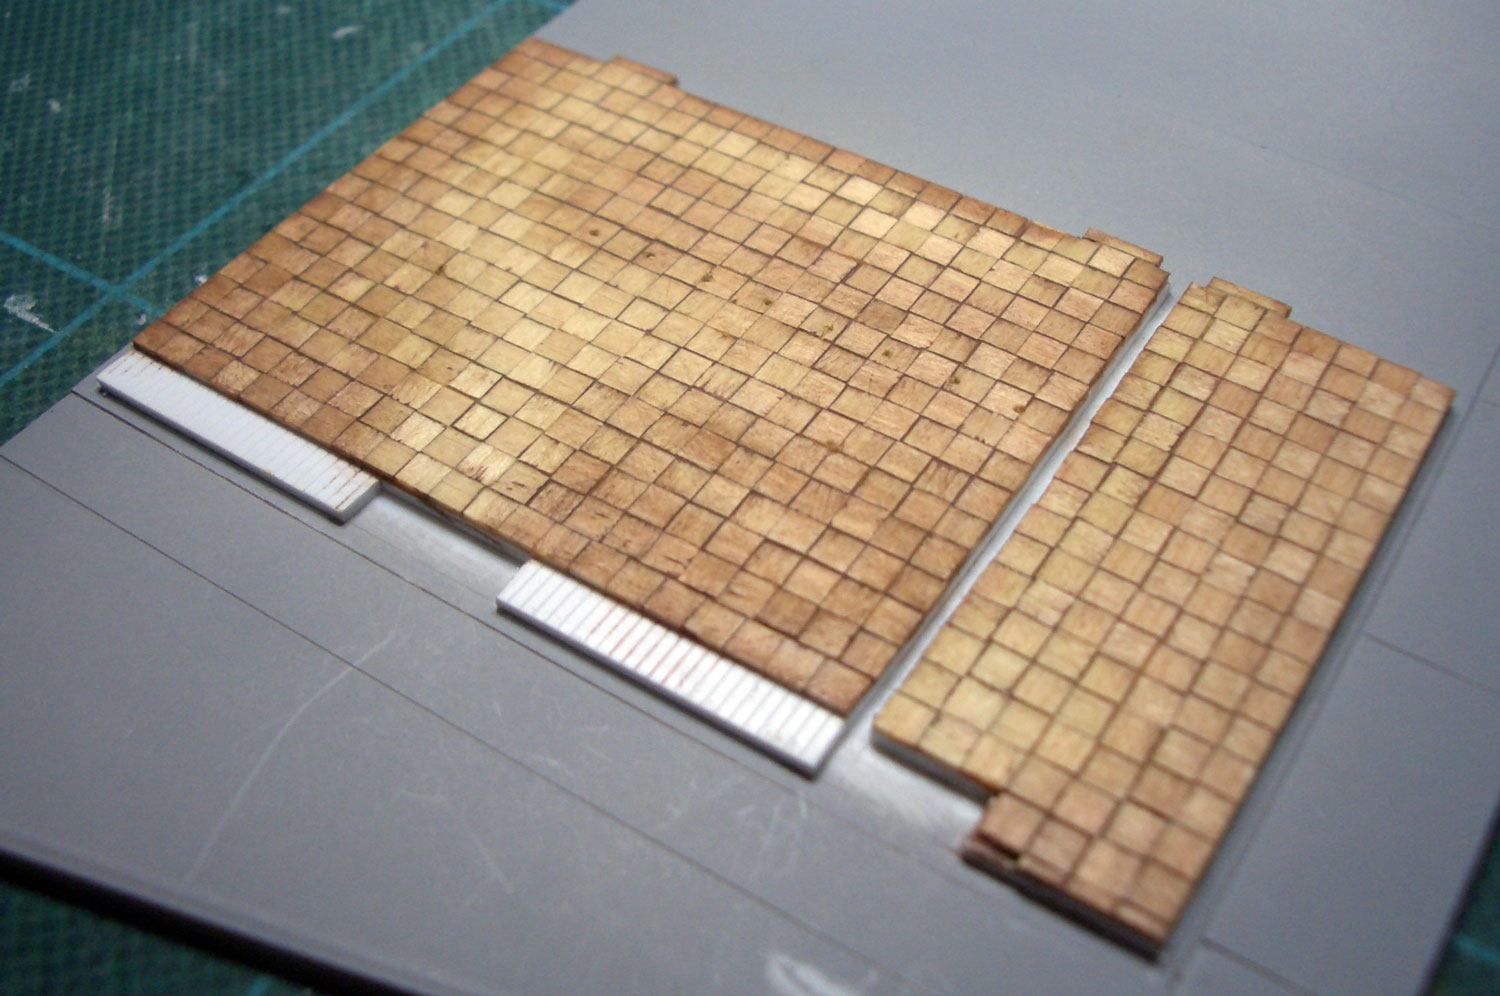 : finished parquet floor
I, first, painted the brick wall with brown primer. Next, I painted the wall dark brown using Tamiya TS-1. When paints were dried, I rubbed the compound into the joints. After all, I lightly filed the wall with sandpaper. The powder from the paint and the compound mingle in block joints to create the exact block wall.
Facade is spray painted with Tamiya TS-46. Cafe interior walls are painted with Tamiya AS-6.
 : finished block wall
2013-11-15 09:00
コメント(0)
Making Cisco Mercantile, part 2 [Works_Cisco Townsite]
 : interior parts for the cafe
I’m trying to duplicate the whole town of Cisco, Utah in N scale. Here, I represent the making of Cisco Mercantile
In one scene of the movie “Vanishing Point”, we can barely see the interior of the cafe. There seem a counter, round stools and box seats. I scratchbuilt the counter and stools referring to the movie. Box seats came from MTL heavyweight paired window coach car, which are the remnants of making GN X187.
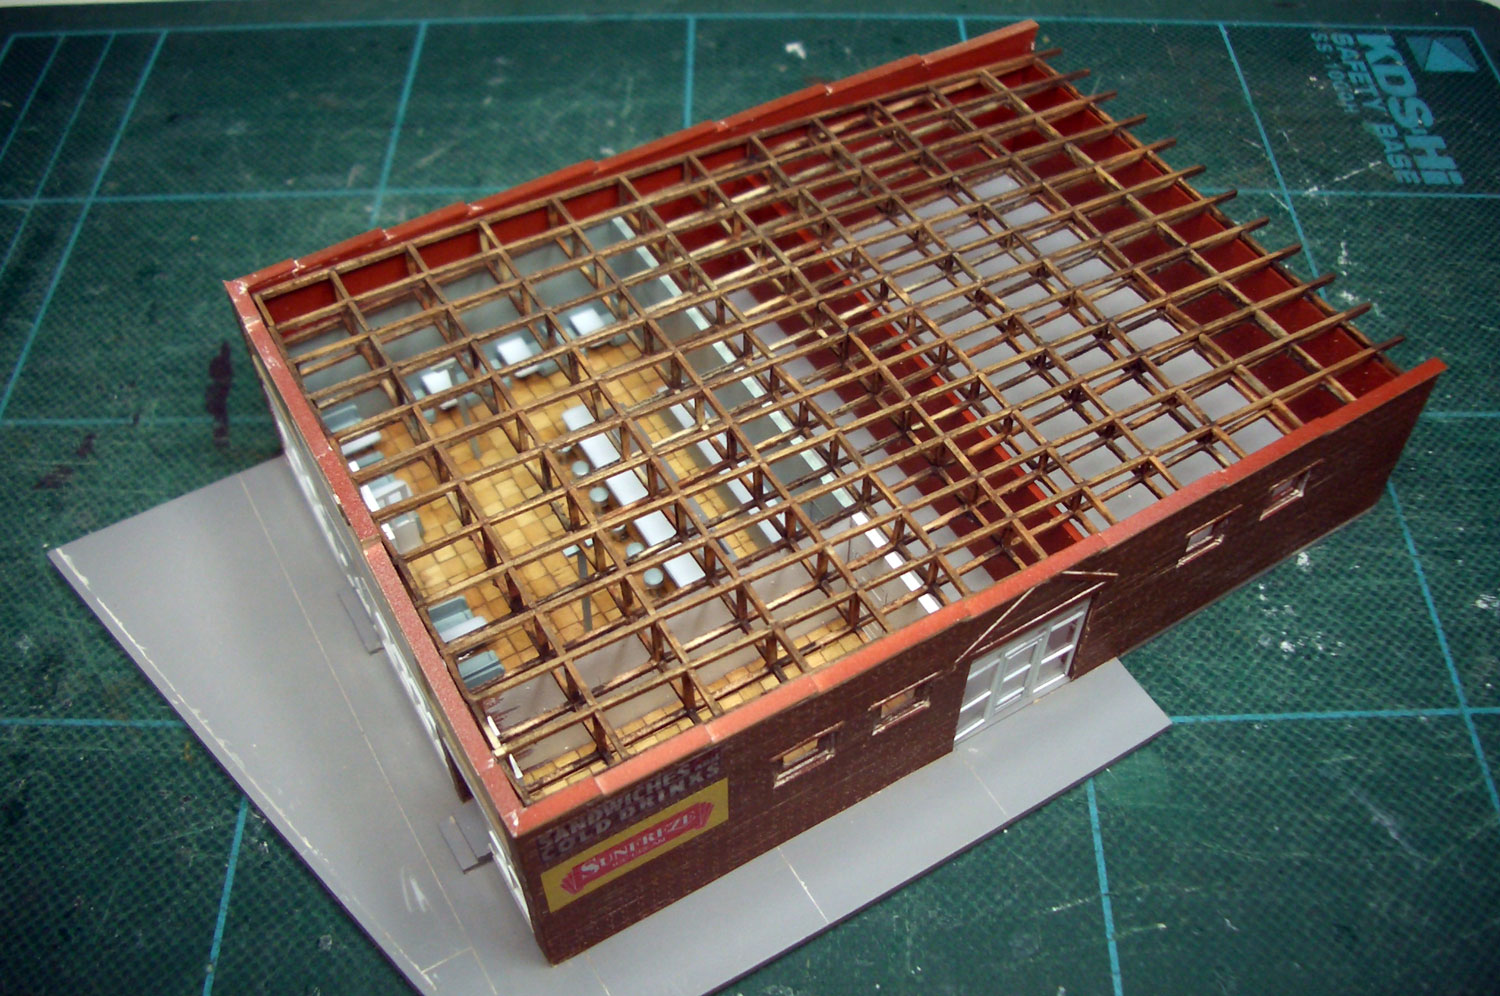 : interior parts and roof trusses applied
I, this time, tried to light the structure with LED as Cowgers seemed still running the business in 1970. The attractive signs sticking out from the structure were made from clear plastic; exactly, from an Atlas plastic box. I thought homemade decal printed on white decal sheet would gently light the sign, as if lit by neon tubes.
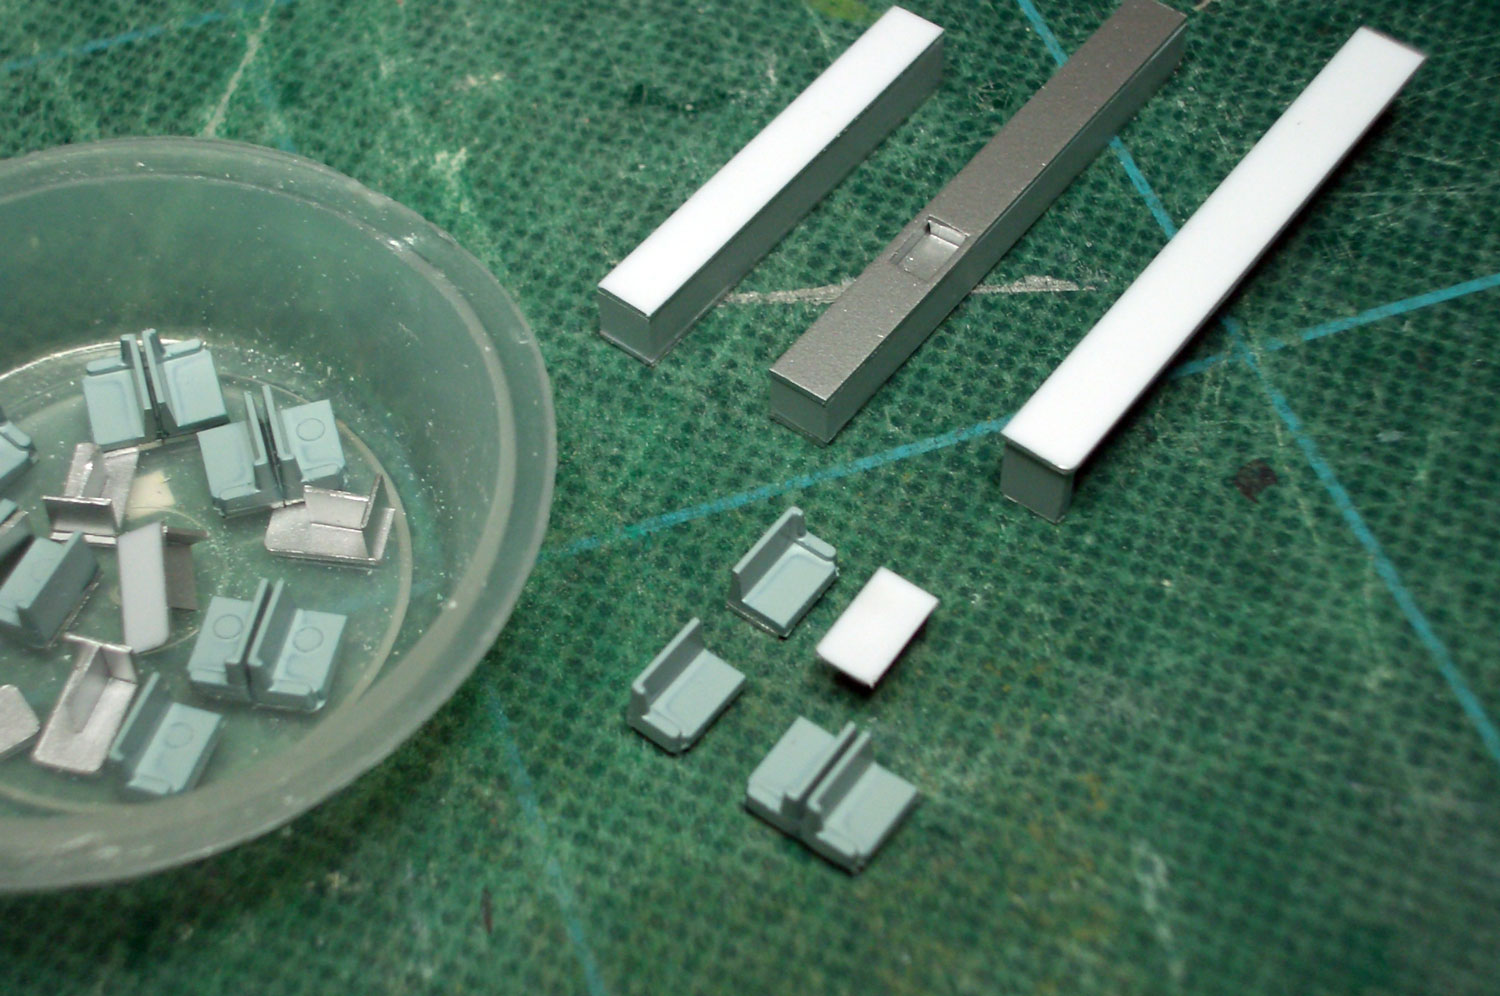
 : parts for the neon signs
I tried white 3.3V 20mA square LEDs for the signs. I sliced one end of the clear plastic to slip in the LED. After the clear adhesive is dried, I roughly filed the surface. I first painted the edge of the parts with silver, later black before applying the homemade decals. Finally, the neon tubes made from brass rod were glued to them. Advertisements on the brick wall next to the signs are also homemade decals.
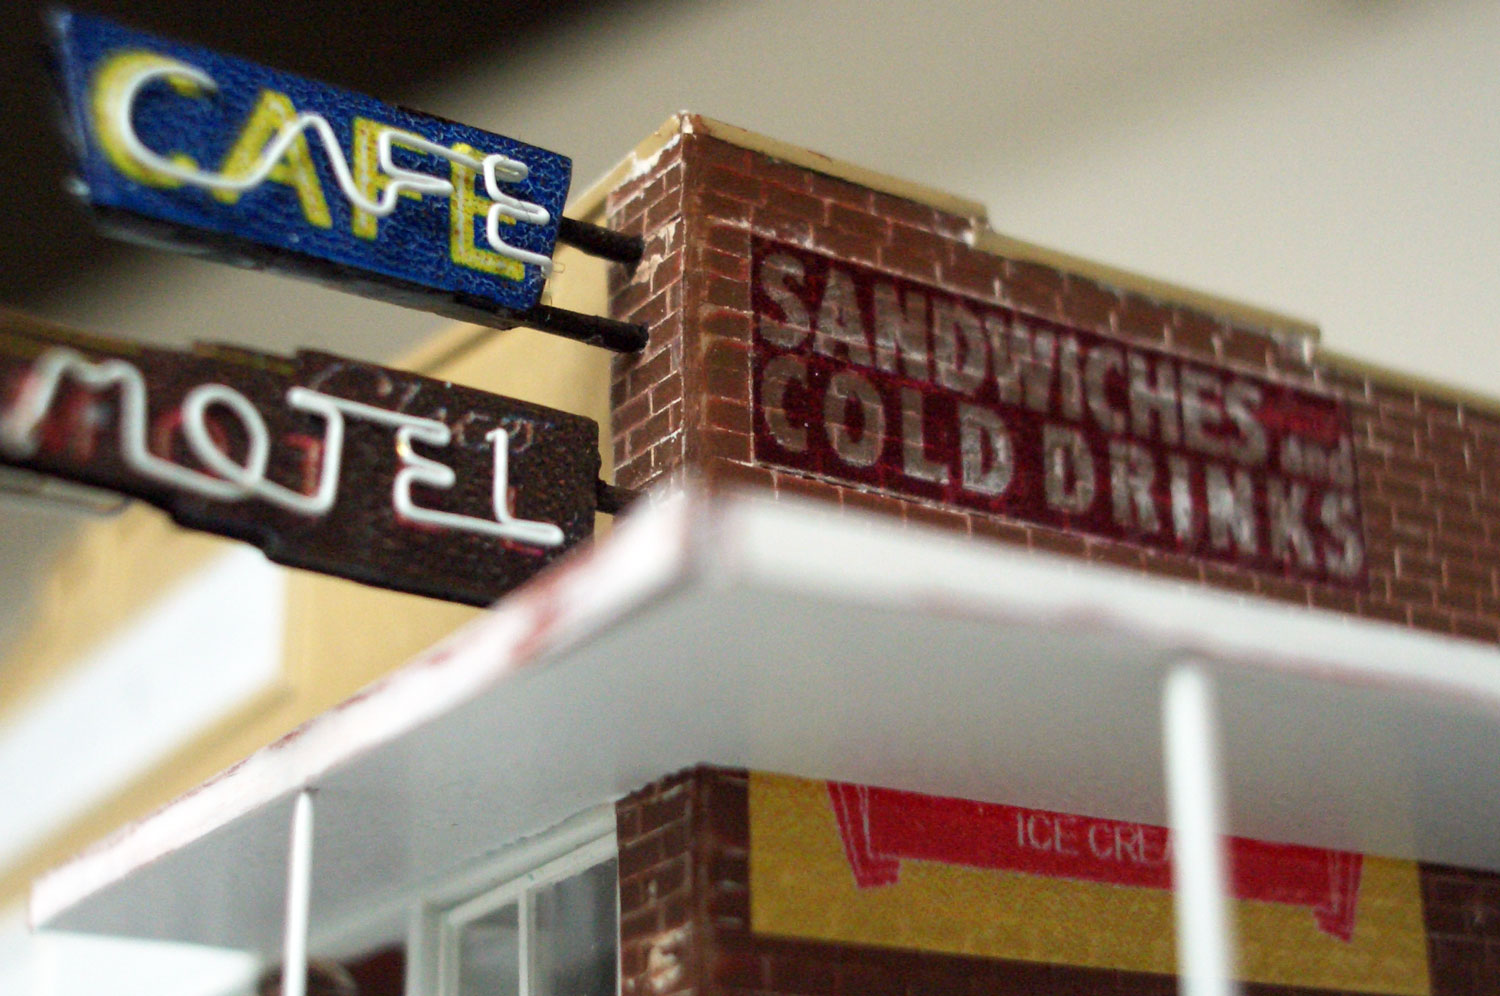 : applied neon signs and advertisements
2013-11-22 09:00
コメント(0)
Making Cisco Mercantile, part 3 [Works_Cisco Townsite]
 : looking from northeast
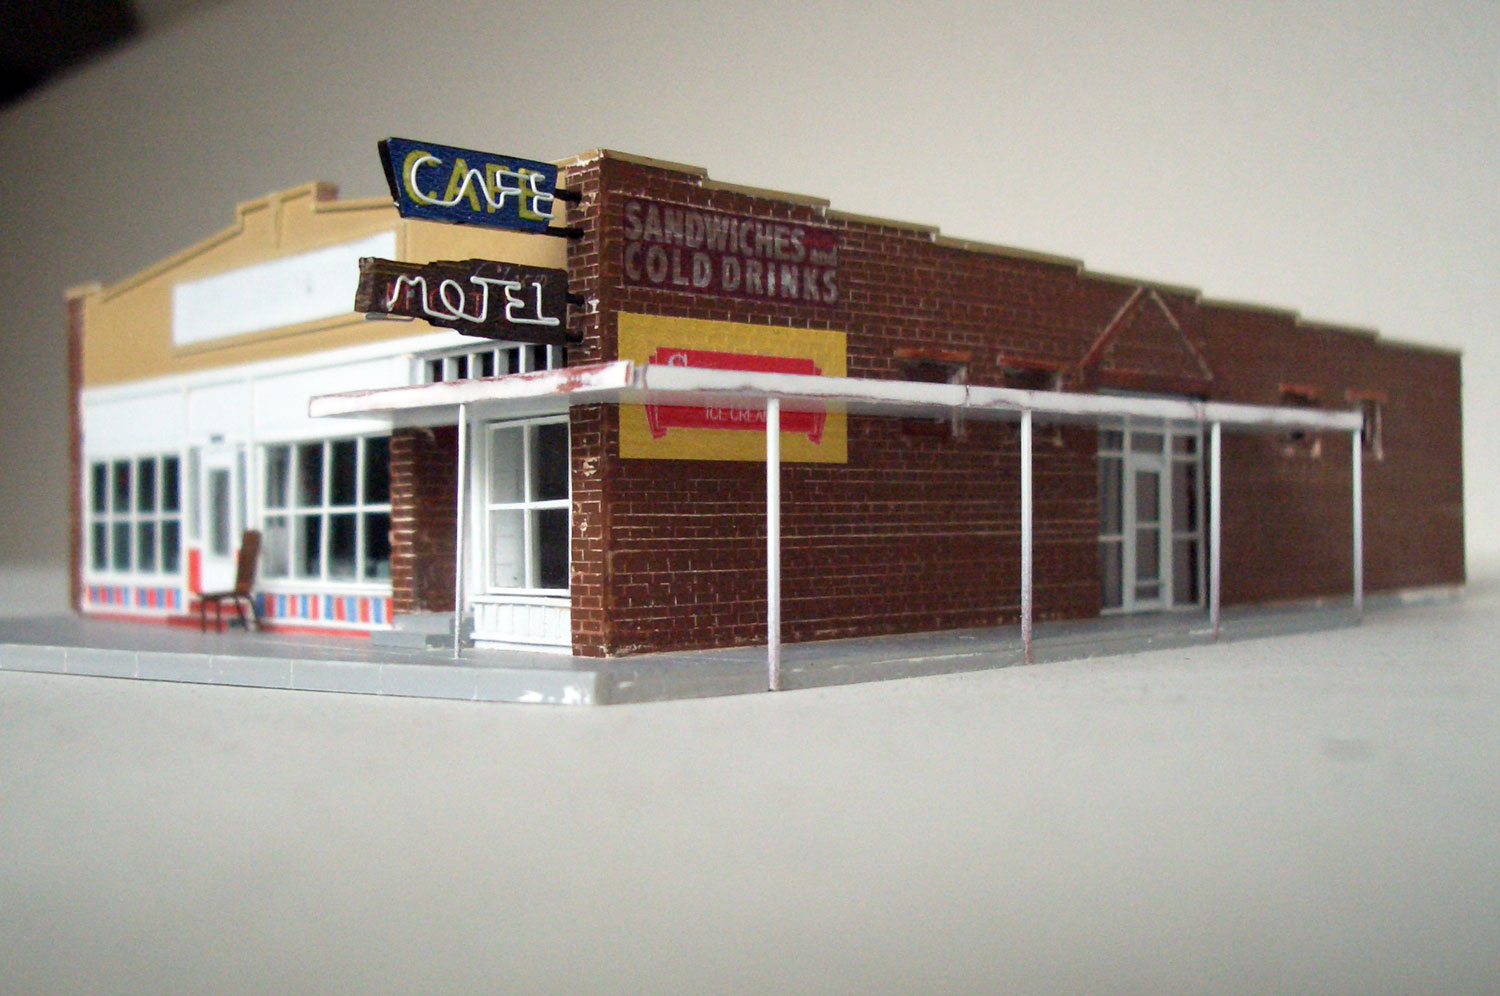 : looking from northwest
 : the north elevation
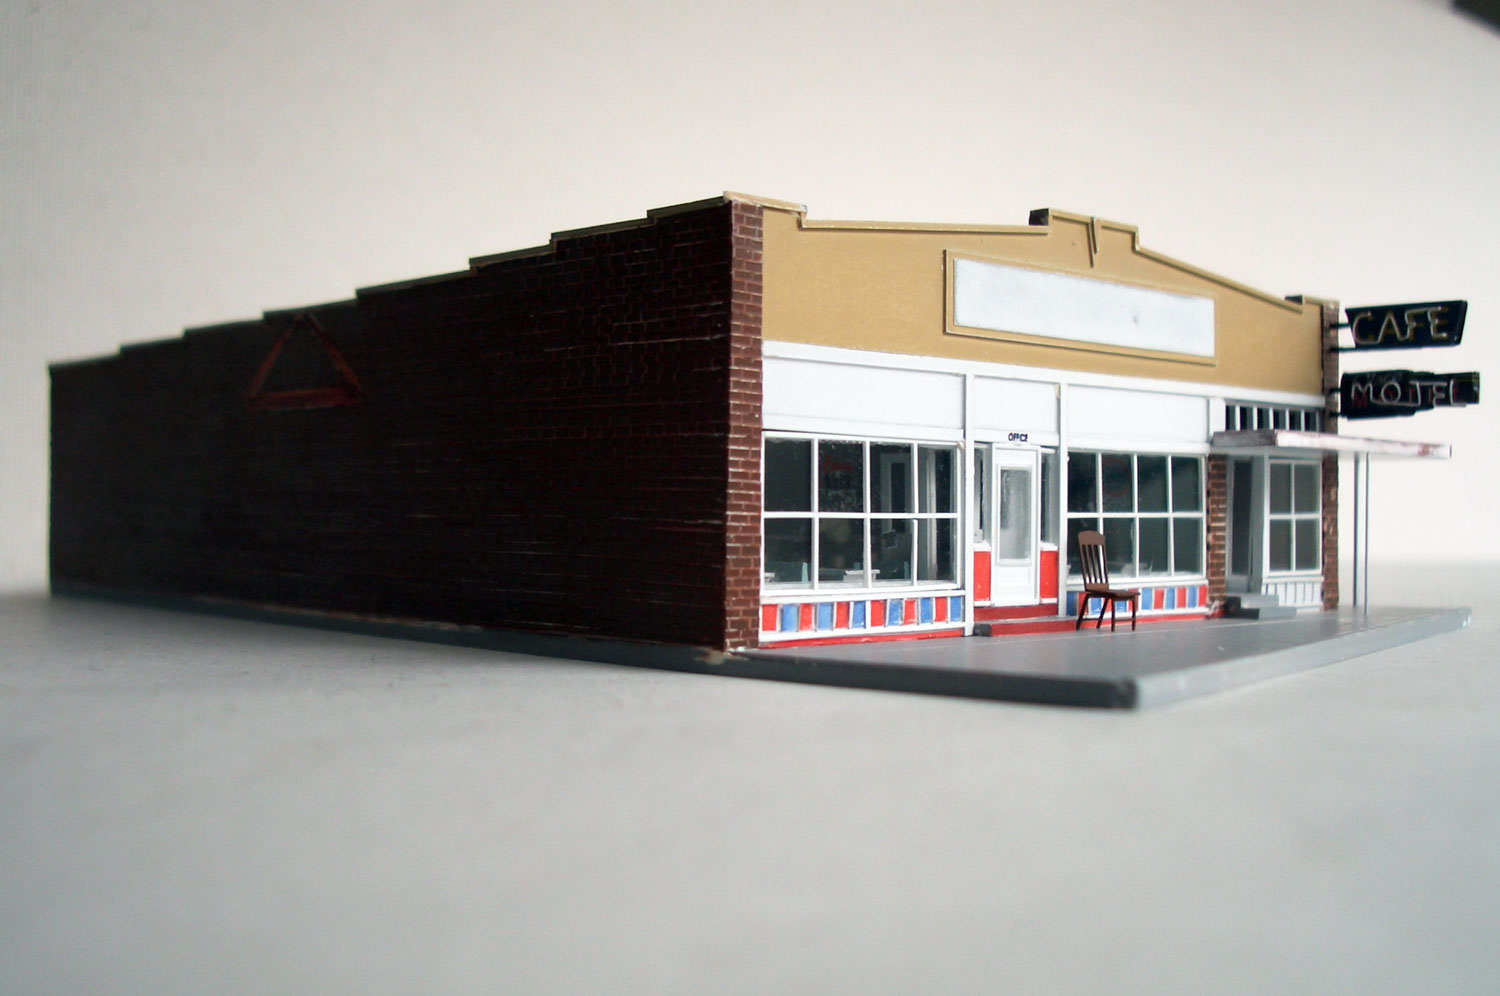
I’m trying to duplicate the whole town of Cisco, Utah in N scale. Here, I represent the making of Cisco Mercantile.
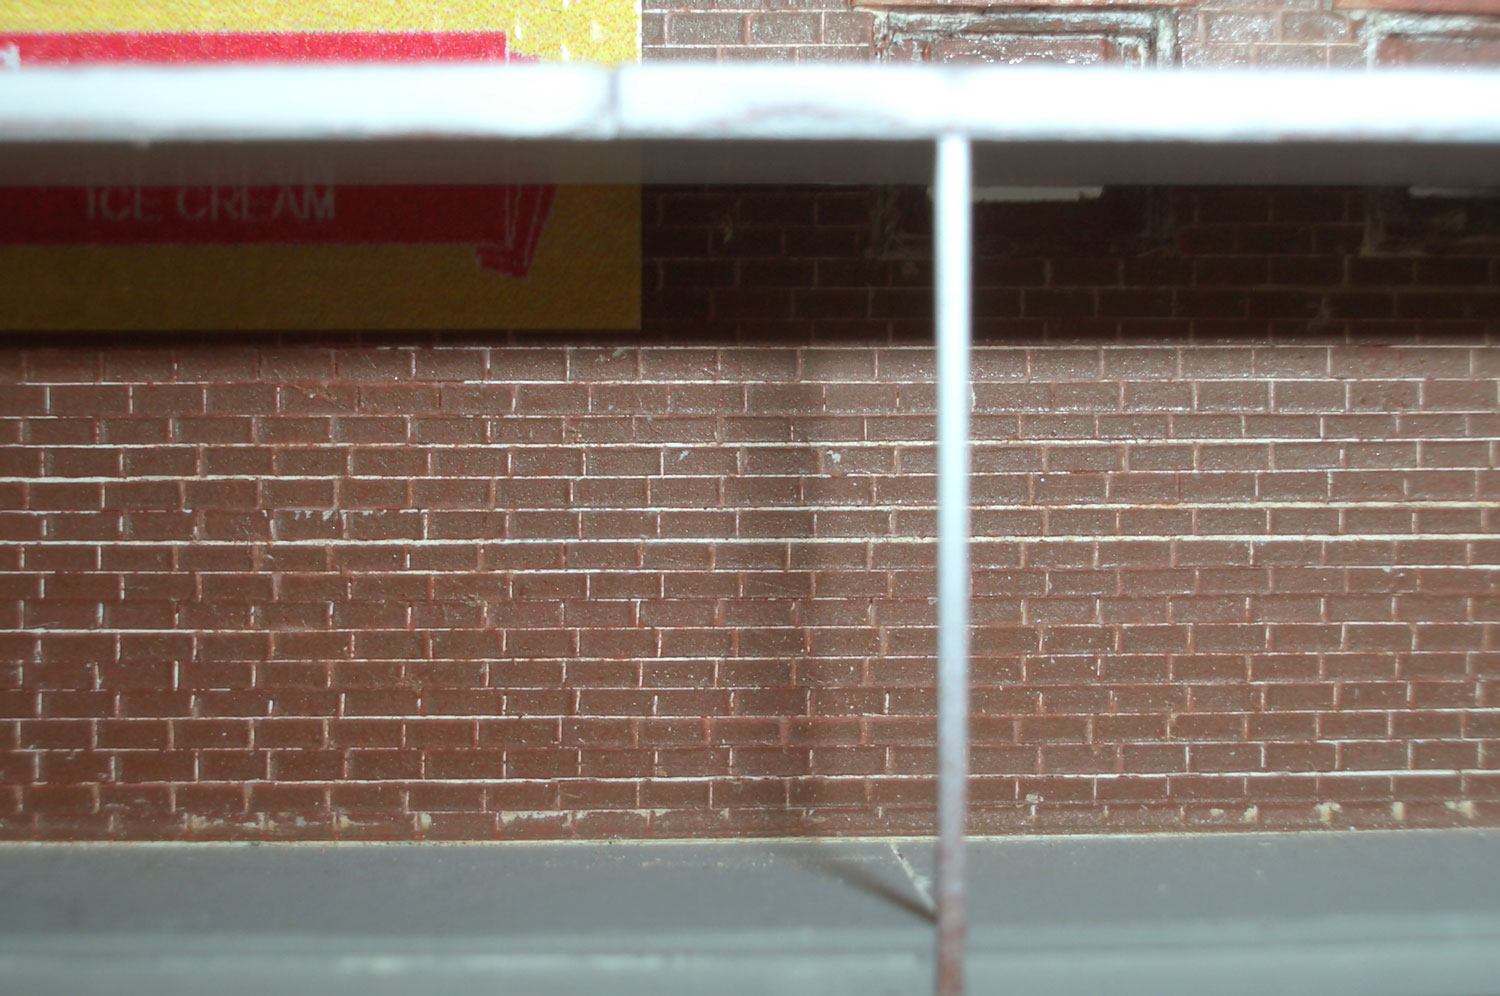
Here are the results of my work. I finally added the canopy to prevent demolishing during the work. The prototype canopy must also be a later addition, as it covers the vintage ice cream advertisement on the brick wall. Faded red and blue paints on window panels, might be also a later addition, are of homemade decals.
There seemed the letters “GENERAL MERCHANDISING” on the large billboard above. But the letters were almost faded out in the 1978 photo and couldn’t find the fonts used. So, I left it blank.
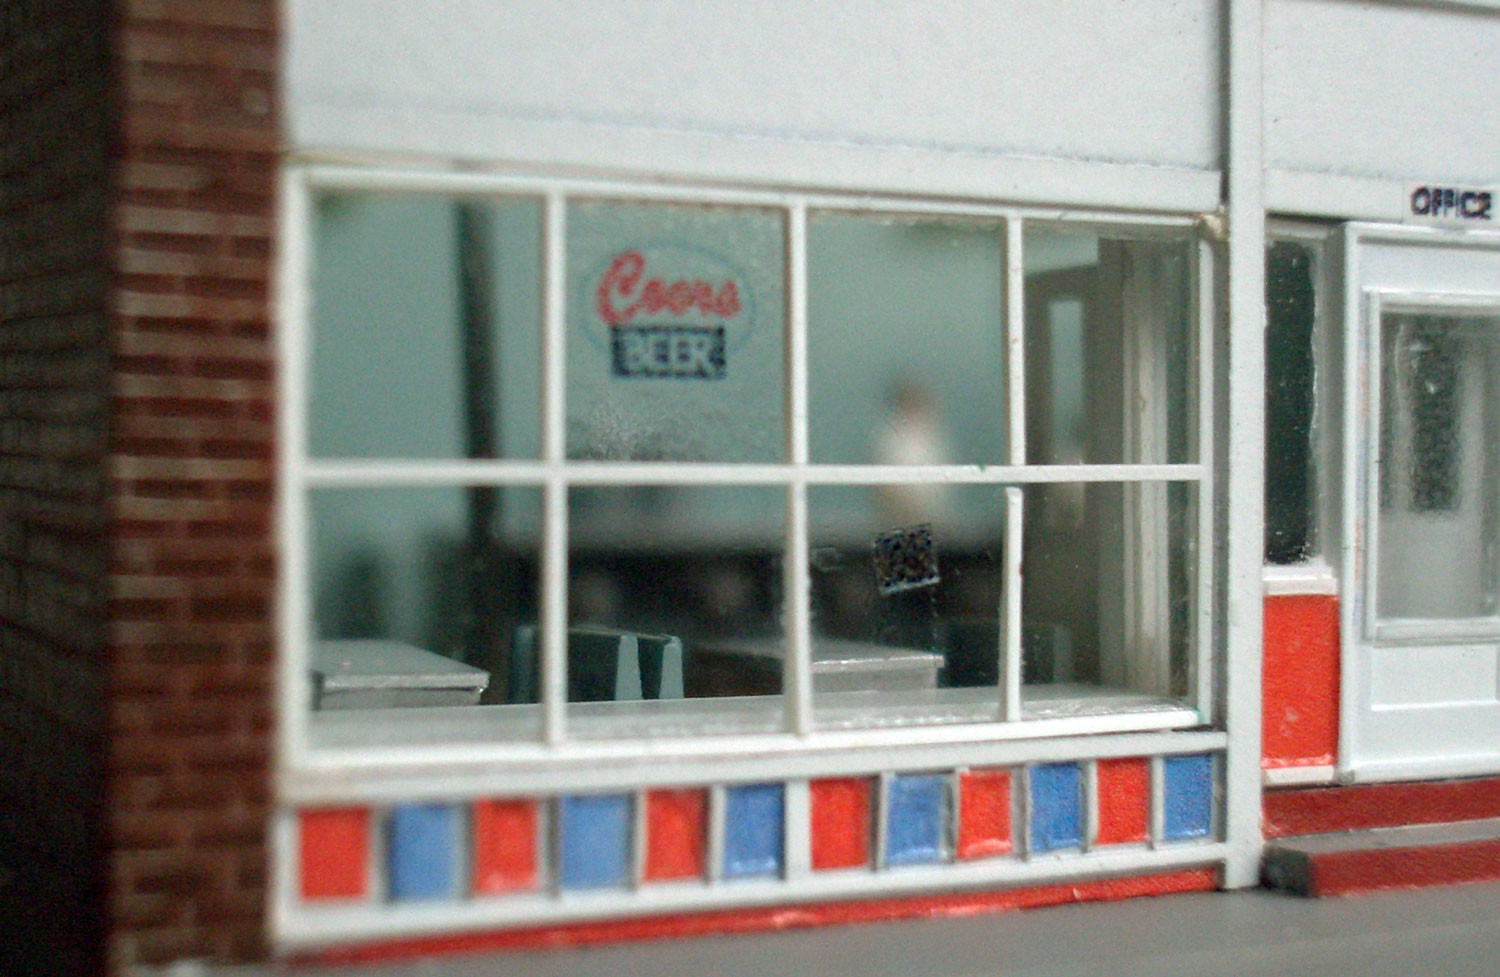 : looking through the facade window
 : cafe interior
Mr. Cowger and his customer in the cafe are the Woodland Scenic products. They were placed meeting their gazes to make a lively conversation. I added two coffee urns referring Edward Hopper’s painting “Nighthawks” to show this is a cafe.
Chair in front of the cafe is a Gold Medal Models product. Coors neon sign on the window is a homemade decal applied from the inside. Mosquito net on the door is made of clear decal sheet.
2013-11-29 09:00
コメント(0)
Making Cisco Mercantile, part 4 [Works_Cisco Townsite]
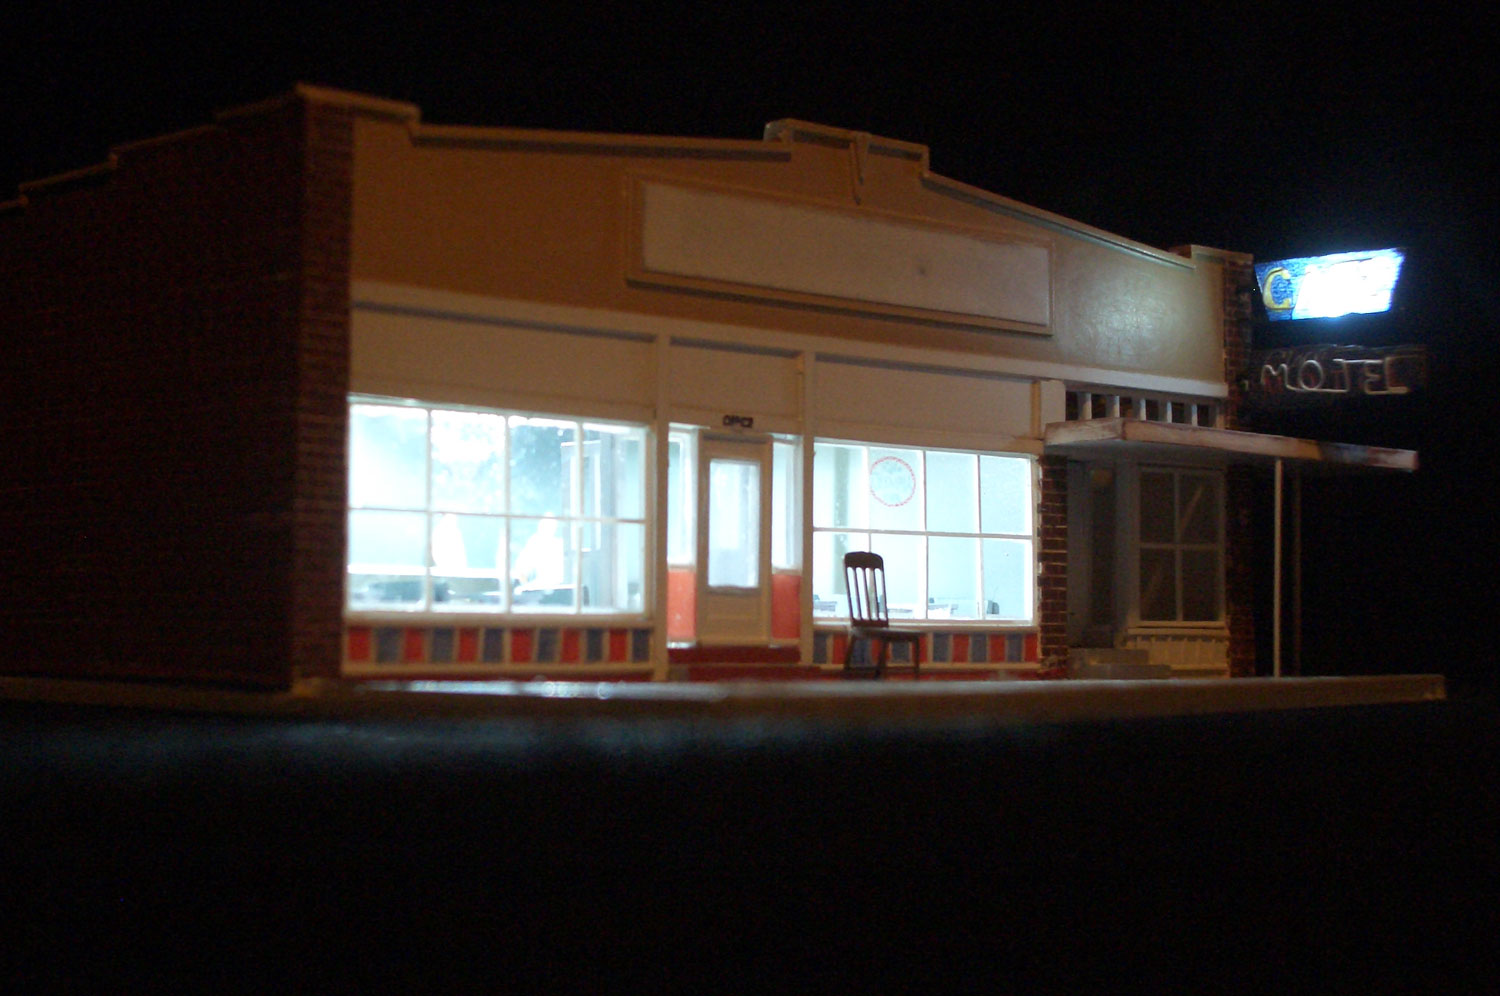 : At last, night had fallen to Cisco.
I’m trying to duplicate the whole town of Cisco, Utah in N scale. Here, I represent the making of Cisco Mercantile.
Here are the night scenes. I thought fluorescent light would be suitable for this 70’s cafe. So, I used single 3.2V 20mA round diffusion white LED for the cafe interior. Single LED in the space would make sharp and clear shades too.
I installed the LED on the bottom of roof trusses, not to light the other rooms. Also is that the LED is placed a little near the back wall to let the light draw long shadow on the street. As there was few streetlight at Cisco, streets were dark enough to show shadows from the windows. I wanted that because long shadows on streets are also appeared in the Edward Hopper’s painting “Nighthawks”.
 : Thanks to the sticky customer,
 : shadows grew long on the street,
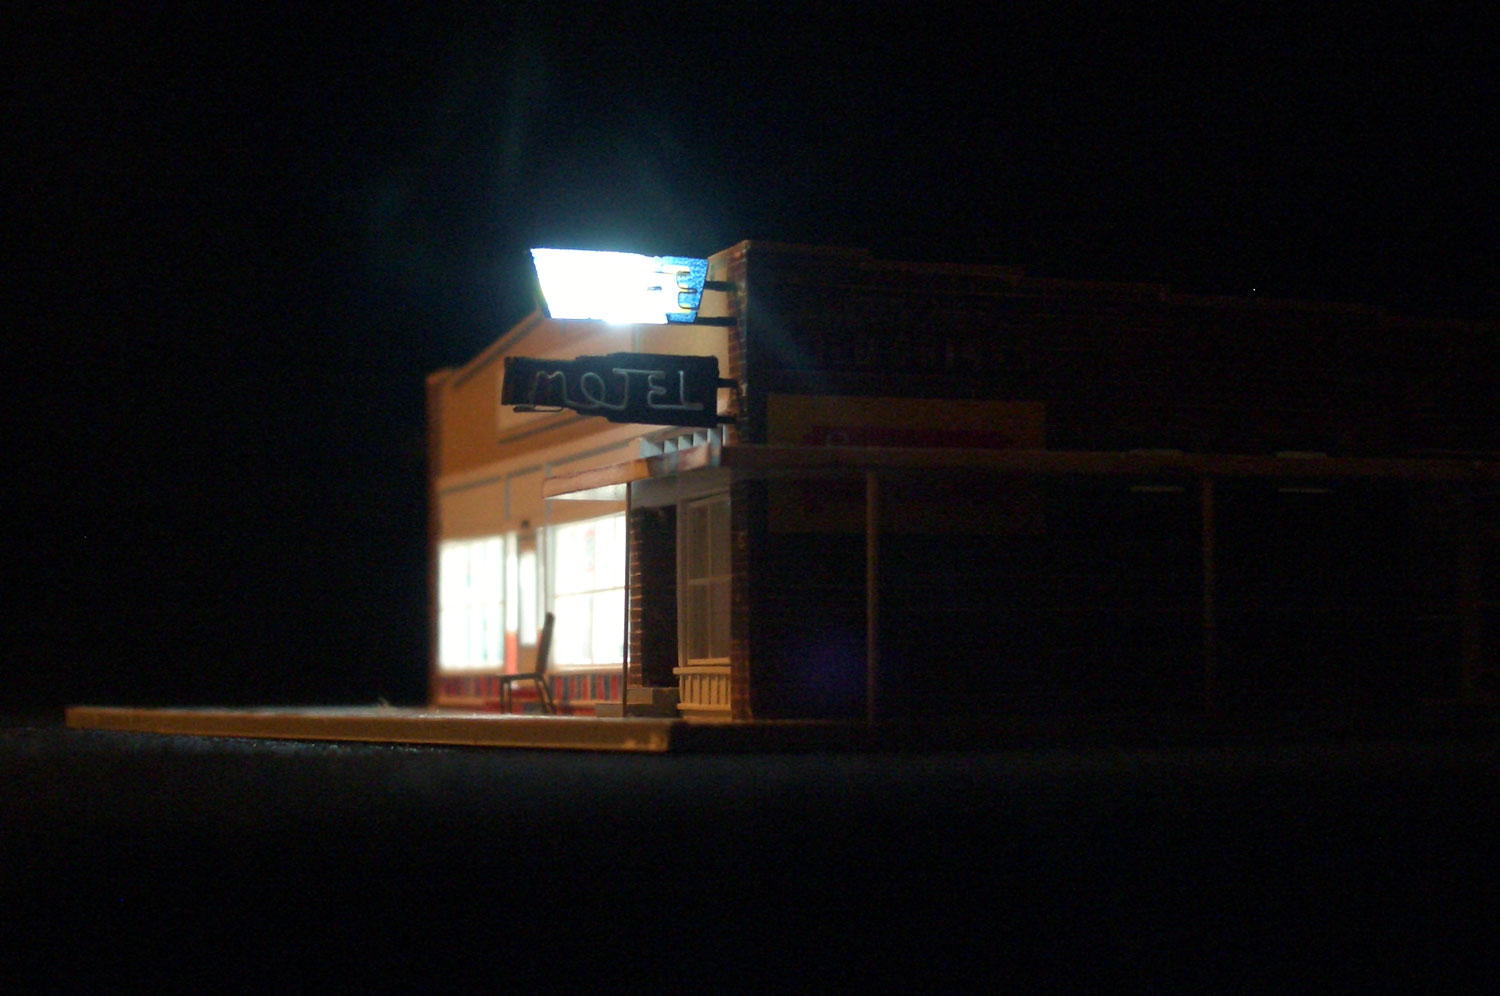 : in the darkness of the night.
Thanks to the LED, clear and long shade grew on the street. To catch this image, I put off the base light to take the picture. The result resembles the painting “Nighthawks” by Edward Hopper.
2013-12-06 09:00
コメント(0)
Making Cisco Motel, part 1 [Works_Cisco Townsite]
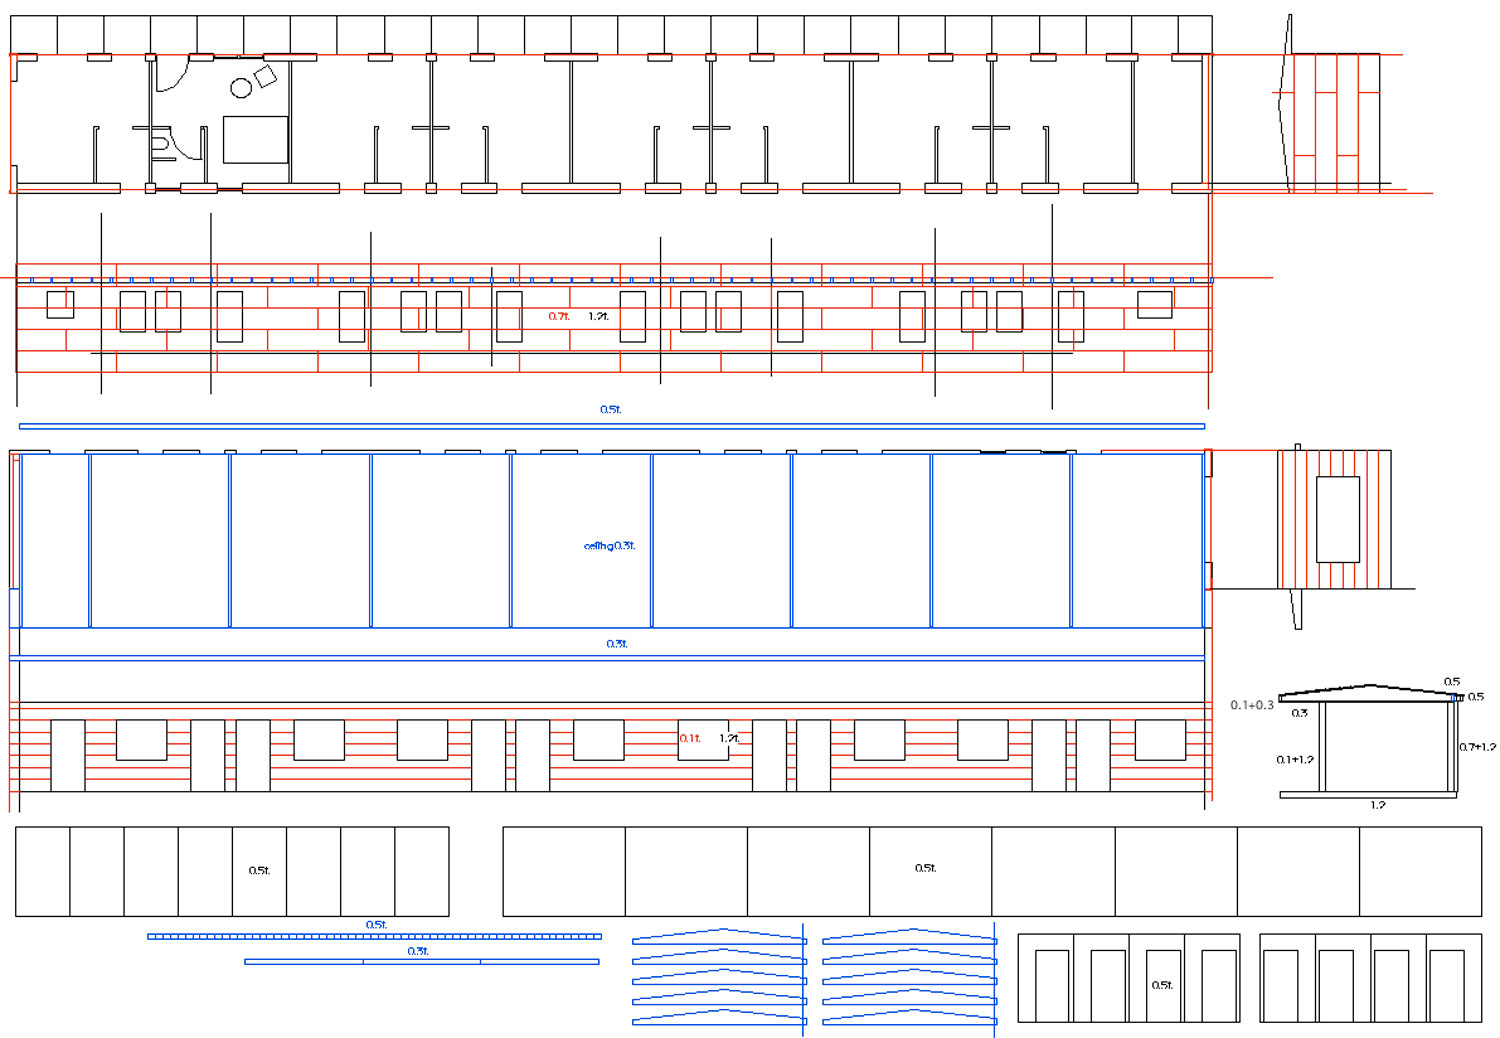 : model drawings of Cisco Motel
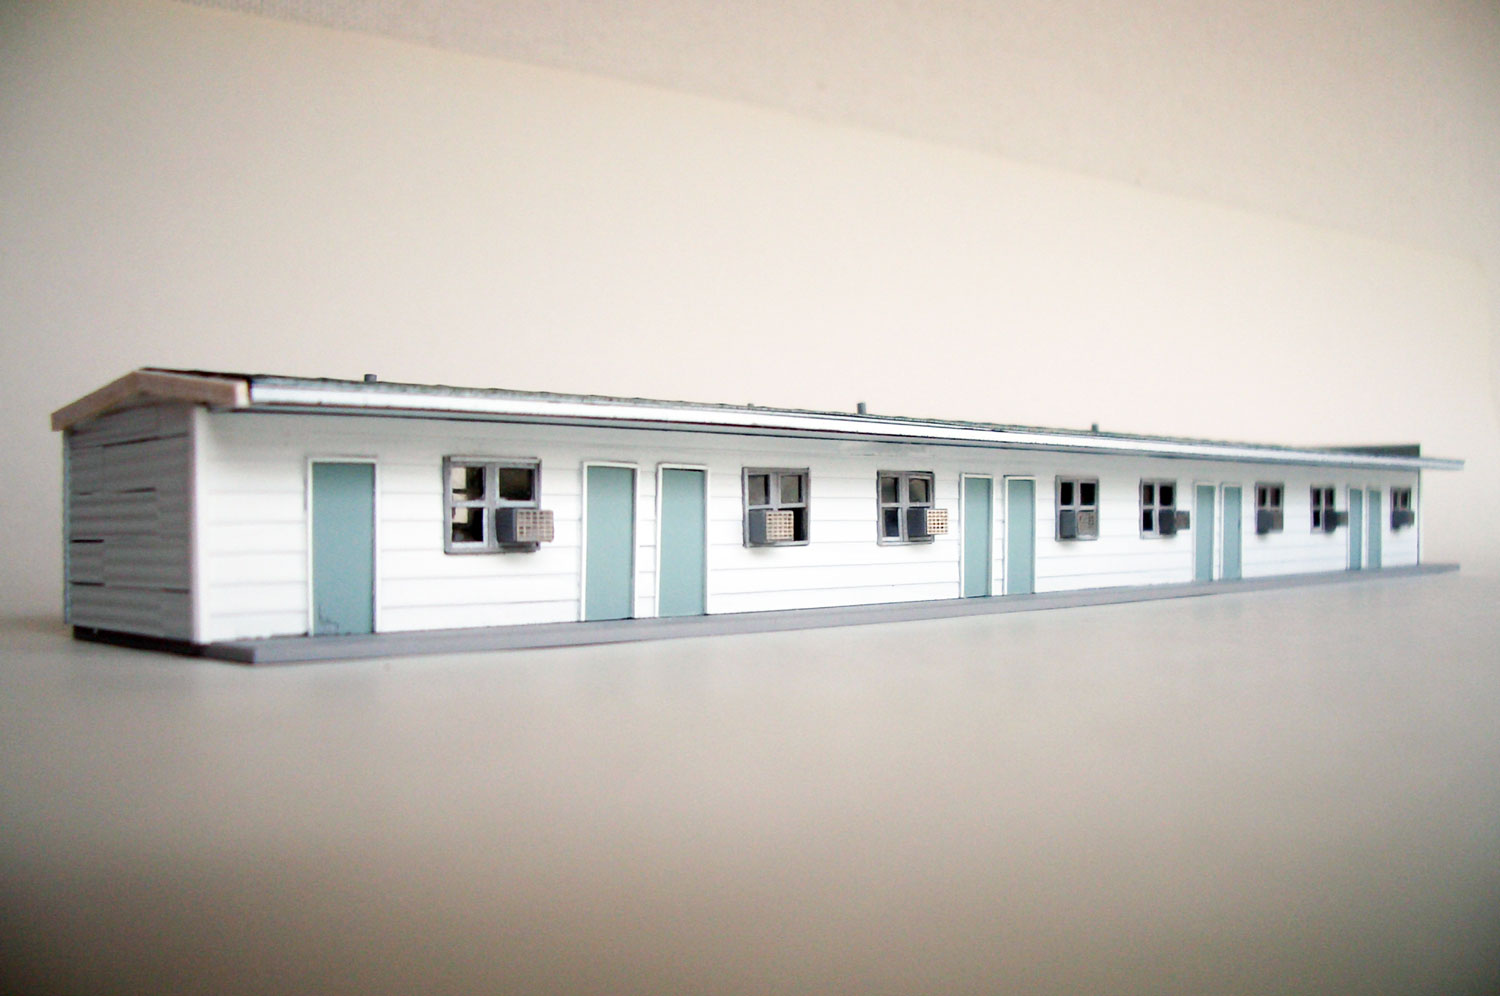
I’m trying to duplicate the whole town of Cisco, Utah in N scale. Here, I represent the making of Cisco Motel.
Cisco Motel is consisted of metal siding wall and sheeting roof. Wall facing west is finished with corrugated steel sheets, while wall facing north are finished with more modern horizontal siding panels. I drew model plans and made the wall parts. Result is shown above.
 : siding walls
Basic walls are made from 1.2mm styrene sheet. I applied 0.7mm corrugated styrene sheet on it as the corrugated steel wall. I tried to lay panels made from 0.1mm styrene sheet level by level for siding walls.
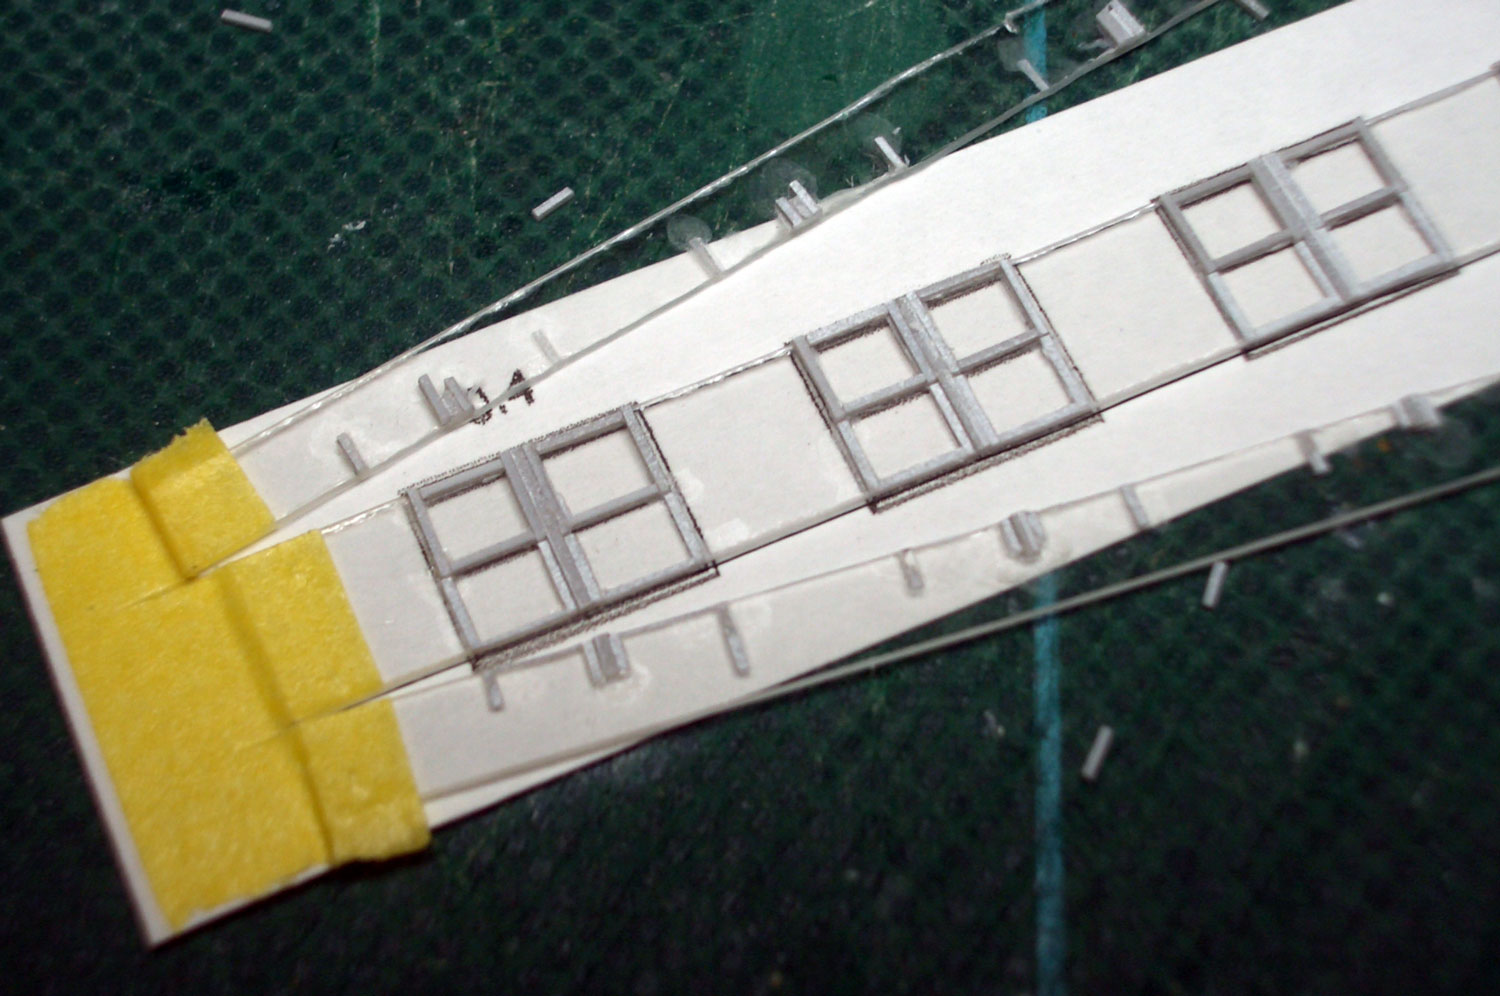 : windows
All the windows and doors are homemade. That’s the cheapest way. After applying painted strip of styrene on clear styrene sheet as window frames, I cut to exact size and applied the painted rim.
0.3mm brass plate is used for the roof. I applied 0.1mm styrene sheet on the brass plate to represent the sheeting. To use loft as a light box to illuminate the porch, there are no trusses this time. Space between ceiling and roof make space for LEDs.
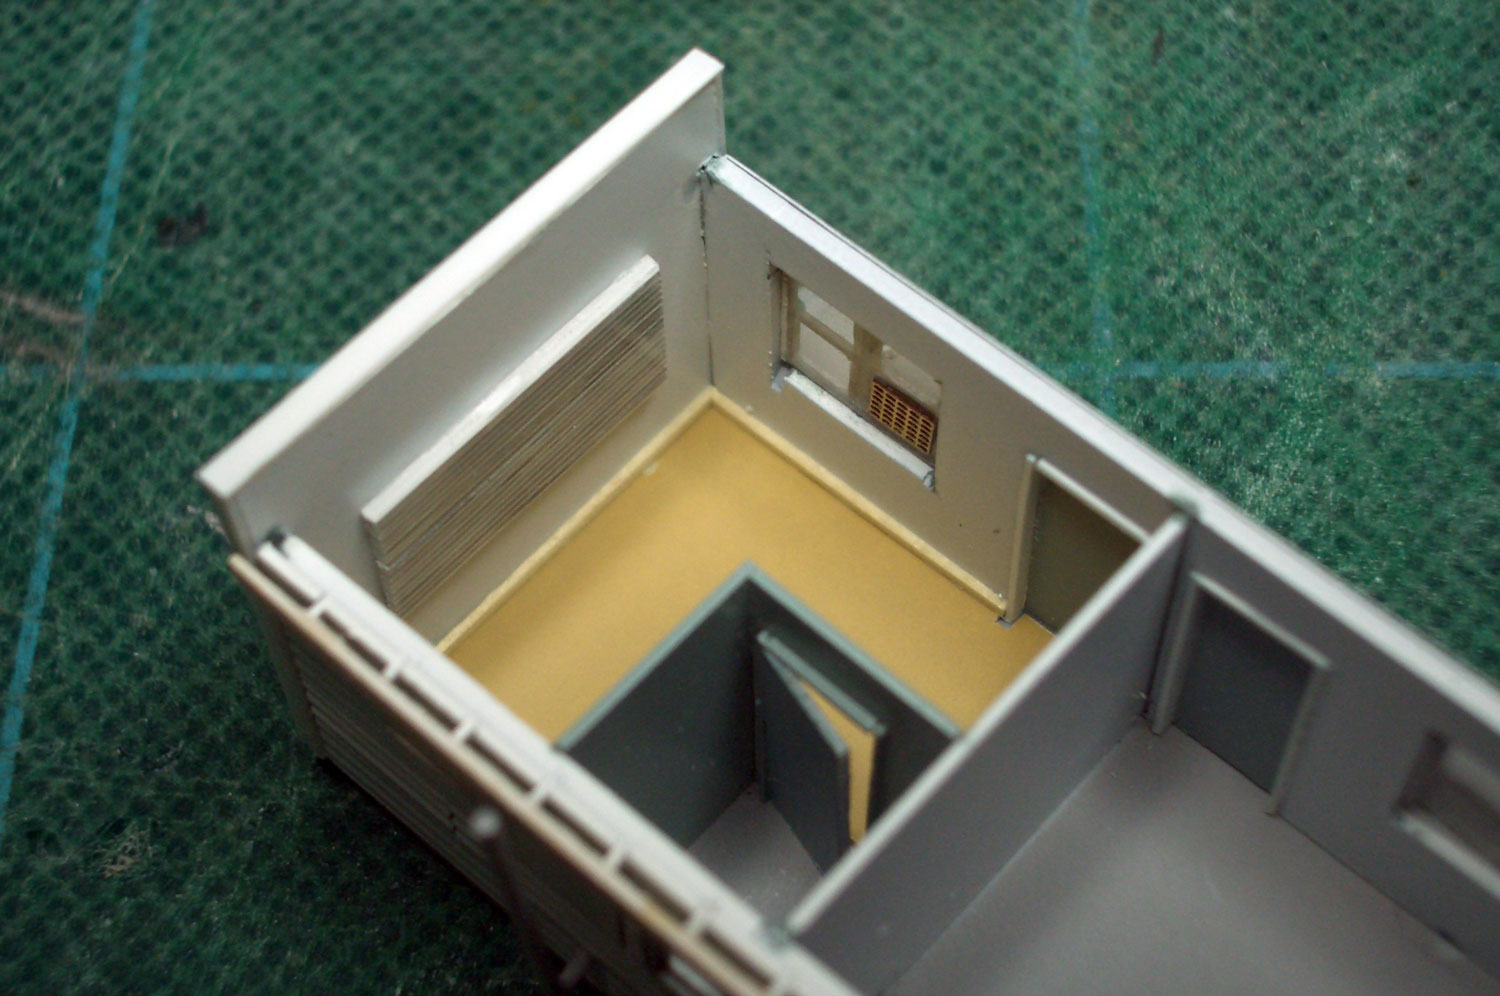 : finished guestroom with some accessories
2014-02-28 09:00
コメント(0)
Making Cisco Motel, part 2 [Works_Cisco Townsite]
 : looking from southeast
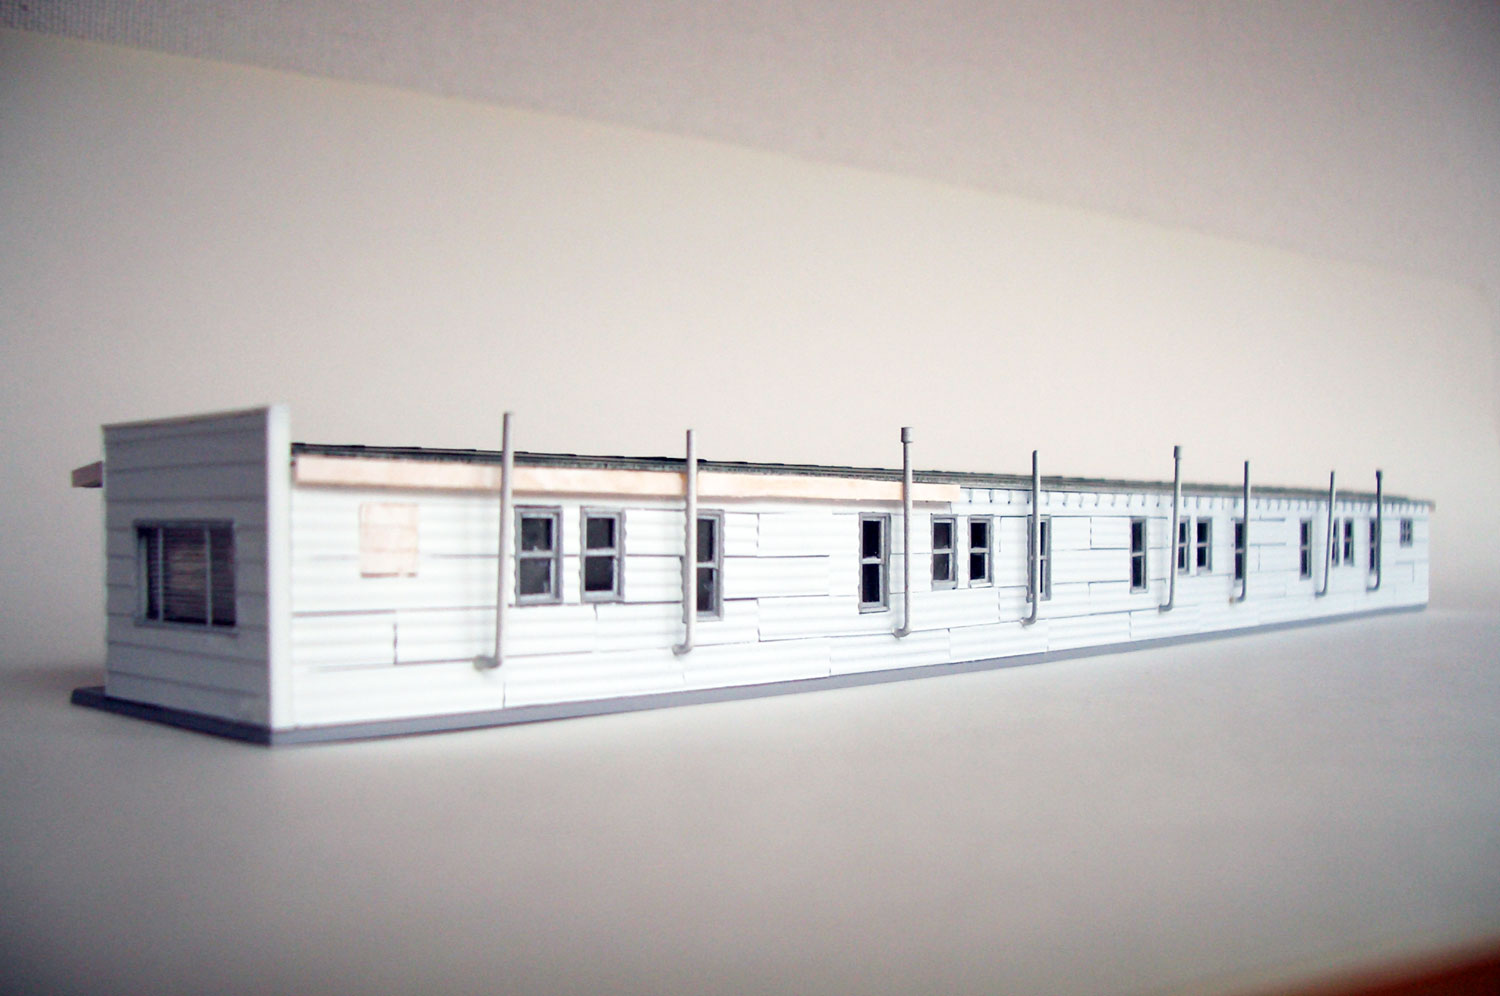 : looking from northwest
I’m trying to duplicate the whole town of Cisco, Utah in N scale. Here, I represent the making of Cisco Motel.
Details were finally added to the structure.
Ventilating stack is made of 0.8mm brass rod. Vent cap is made of 1.2mm aluminum pipe. Some stacks lost vent caps and/or leaned as the prototype.
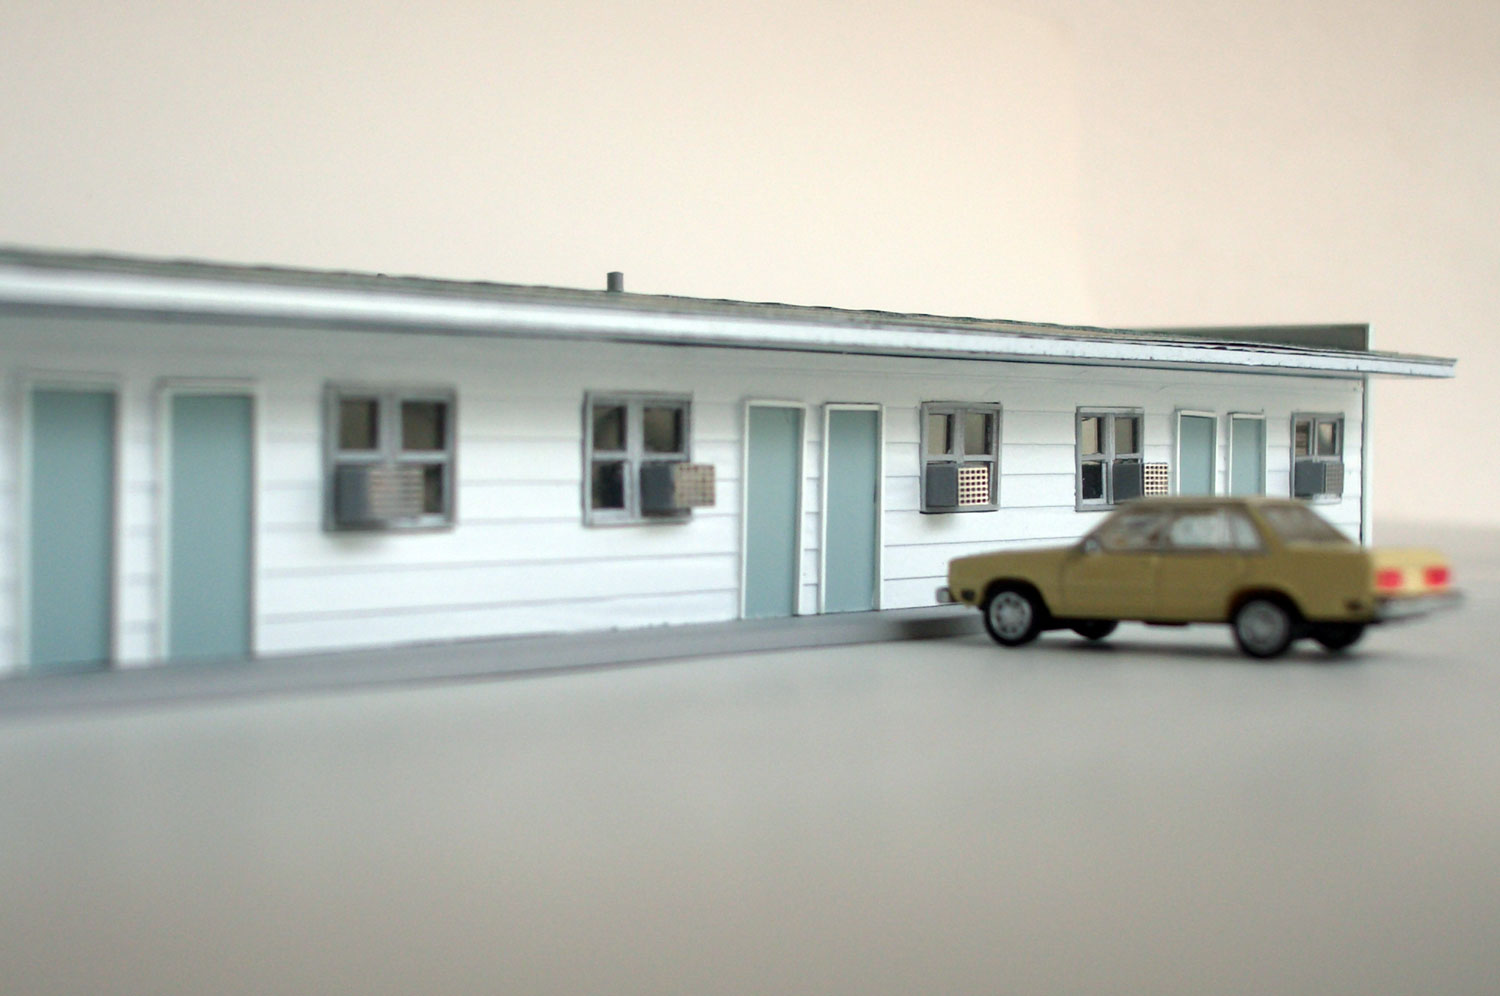 : porch of the motel
In the references, we can’t see any air conditioner on west side nor on the roof. But it seems so hot without it as the roof is shallow. So I added air conditioners at the windows on east side. Units are made of styrene and grill from Athearn boxcar roofwalk.
Horizontal shade is fixed on the large window of northernmost guest room as a blind: I didn’t make interiors this time. The shade is made of layered clear and white styrene strips.
I used 3.2V 2mA warm white LED to light the porch. I shove the LED tip to install in the shallow loft of the structure. To eliminate the light leakage was the most time-consuming work.
There used to be a lawn garden with a big tree between the motel and the Mercantile, surrounded by wooden fence painted white: an oasis in the desert. Accordingly, guests couldn't ride their cars up to the room. The car appears in photos, a Ford Fairmont produced by Atlas, is a fake.
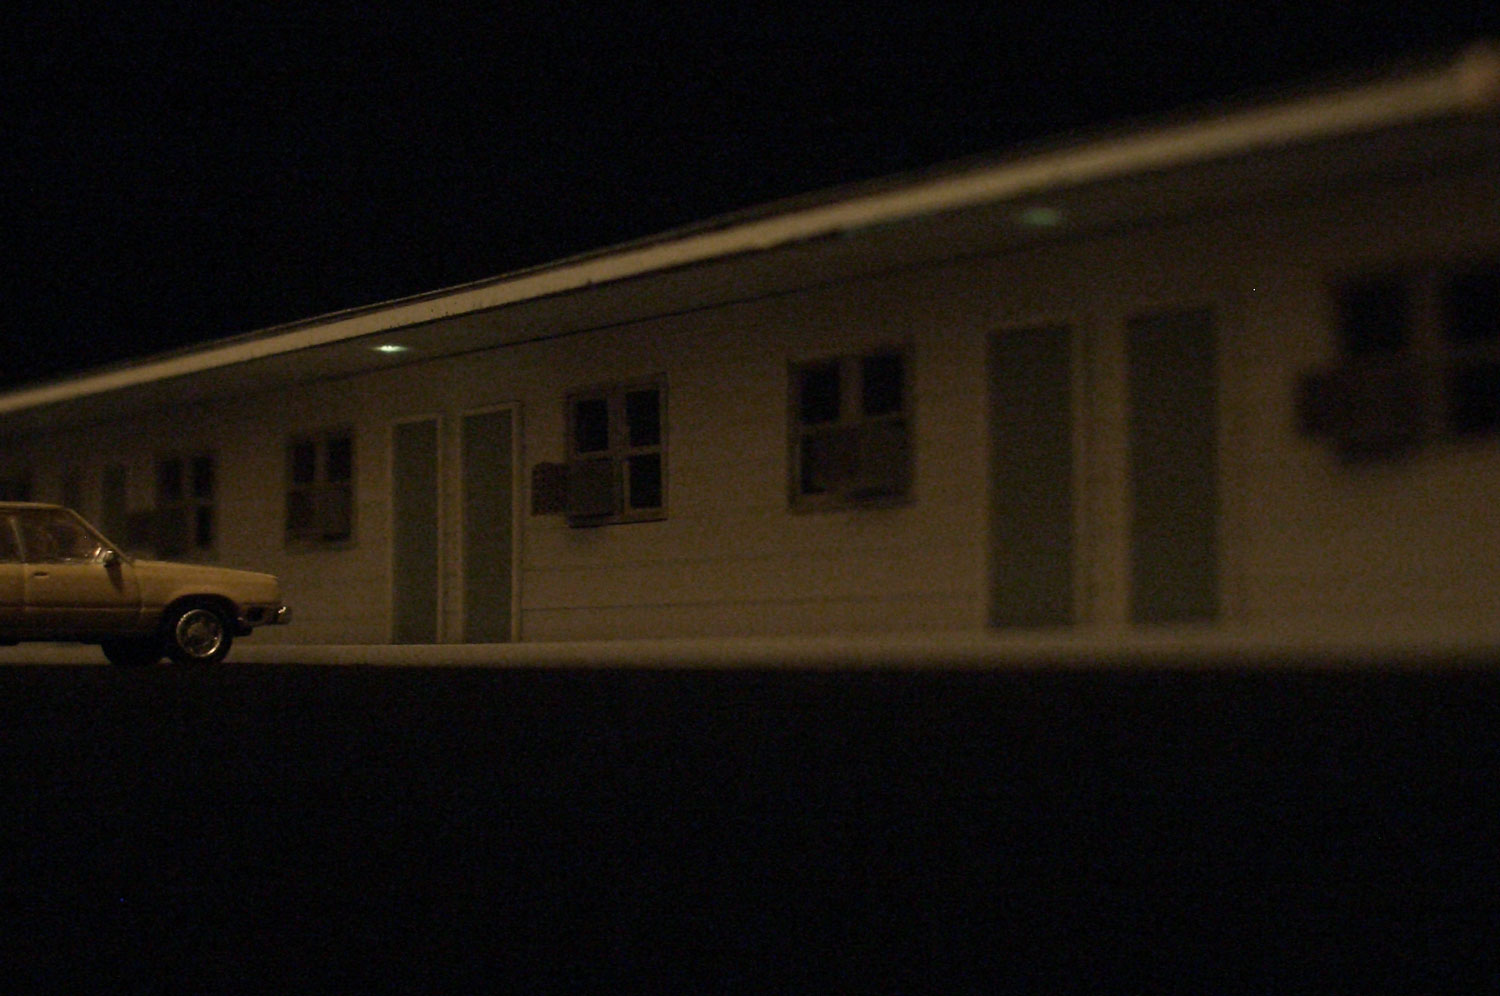 : Fortunately, Cisco Motel has a guest tonight.
2014-03-07 09:00
コメント(0)
Making Duke's Service Adjoint, part 1 [Works_Cisco Townsite]
 : model drawings for Duke's Service Adjoint
I’m trying to duplicate the whole town of Cisco, Utah in N scale. Here, I represent the making of Duke's Service Adjoint.
Duke's Service Adjoint is made of wood: horizontal, partially vertical siding walls on stone foundation, mounted with shingle roof. I first drew model plans. Results are shown above.
 : wood siding walls
I used 1.2mm plain styrene sheet for the stone foundation, Evergreen styrene sheets #4037 and #4542 for walls. Doors are Tichy products, accompanied with self-made windows.
 : floor under construction
I used wood stripe for the floor. I dyed with brown acrylic paint and polished the interior floor. The porch floor was dyed with grey acrylic paint.
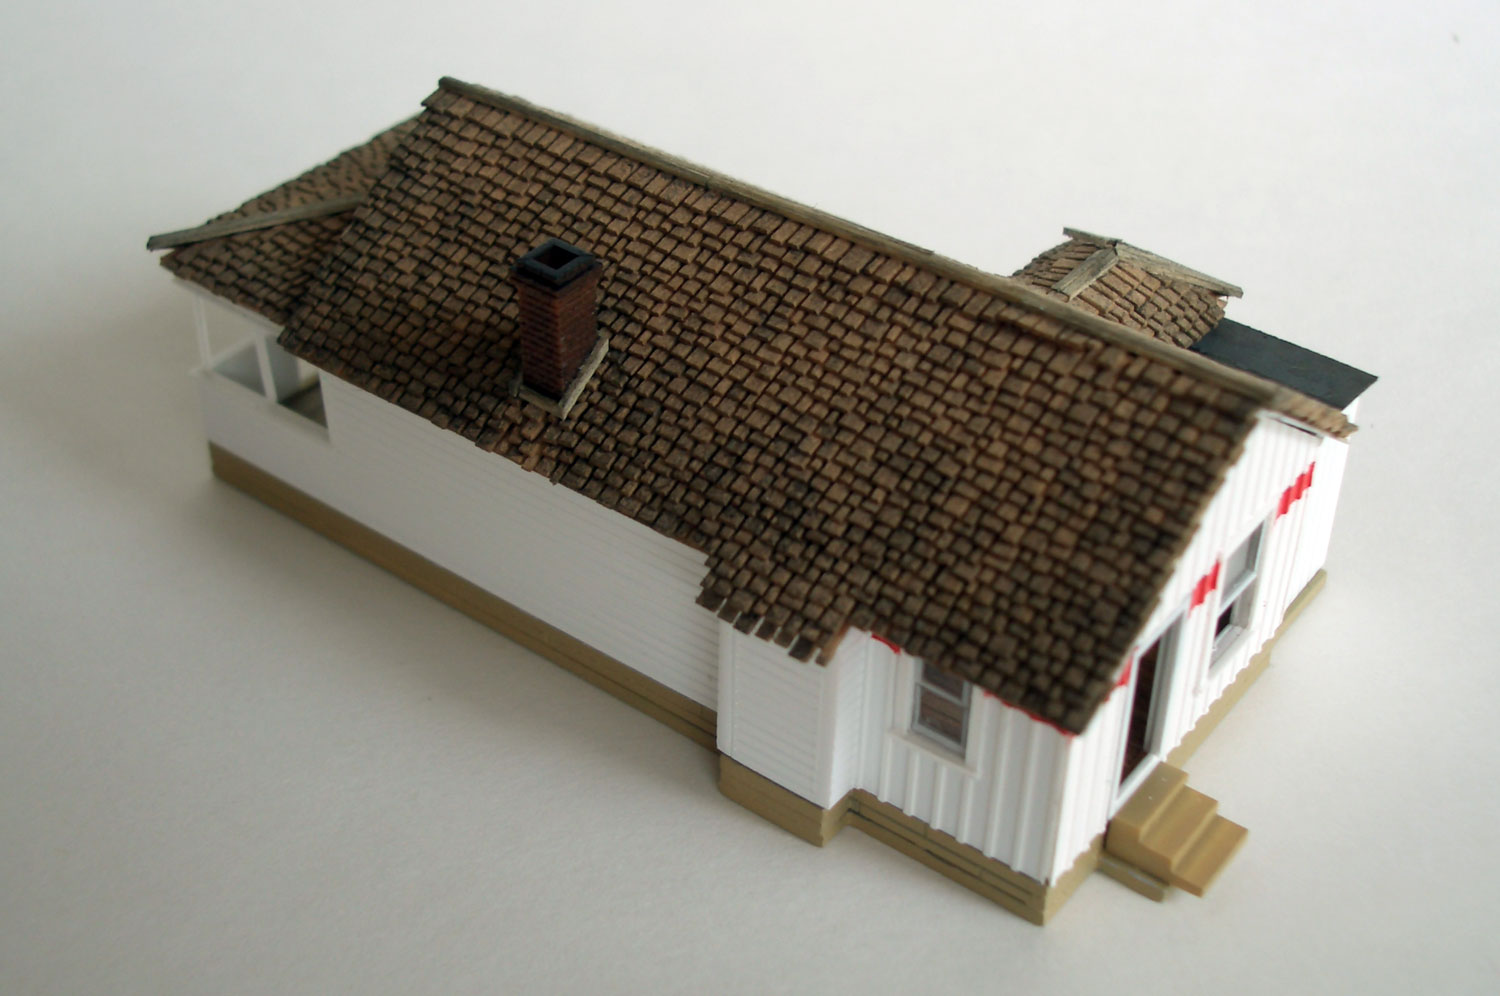
Roofs are 0.3mm brass plates with Rusty Stumps Scale Models random shake shingles. Material of this shingles seems rather thin Homasote than paper. Their textures are great but they seem a little bulky for N scale. I dyed them with mixture of beige and black acrylic paints after applying them.
 : roof under construction
2014-05-09 09:00
コメント(0)
Making Duke's Service Adjoint, part 2 [Works_Cisco Townsite]
 : looking from southwest
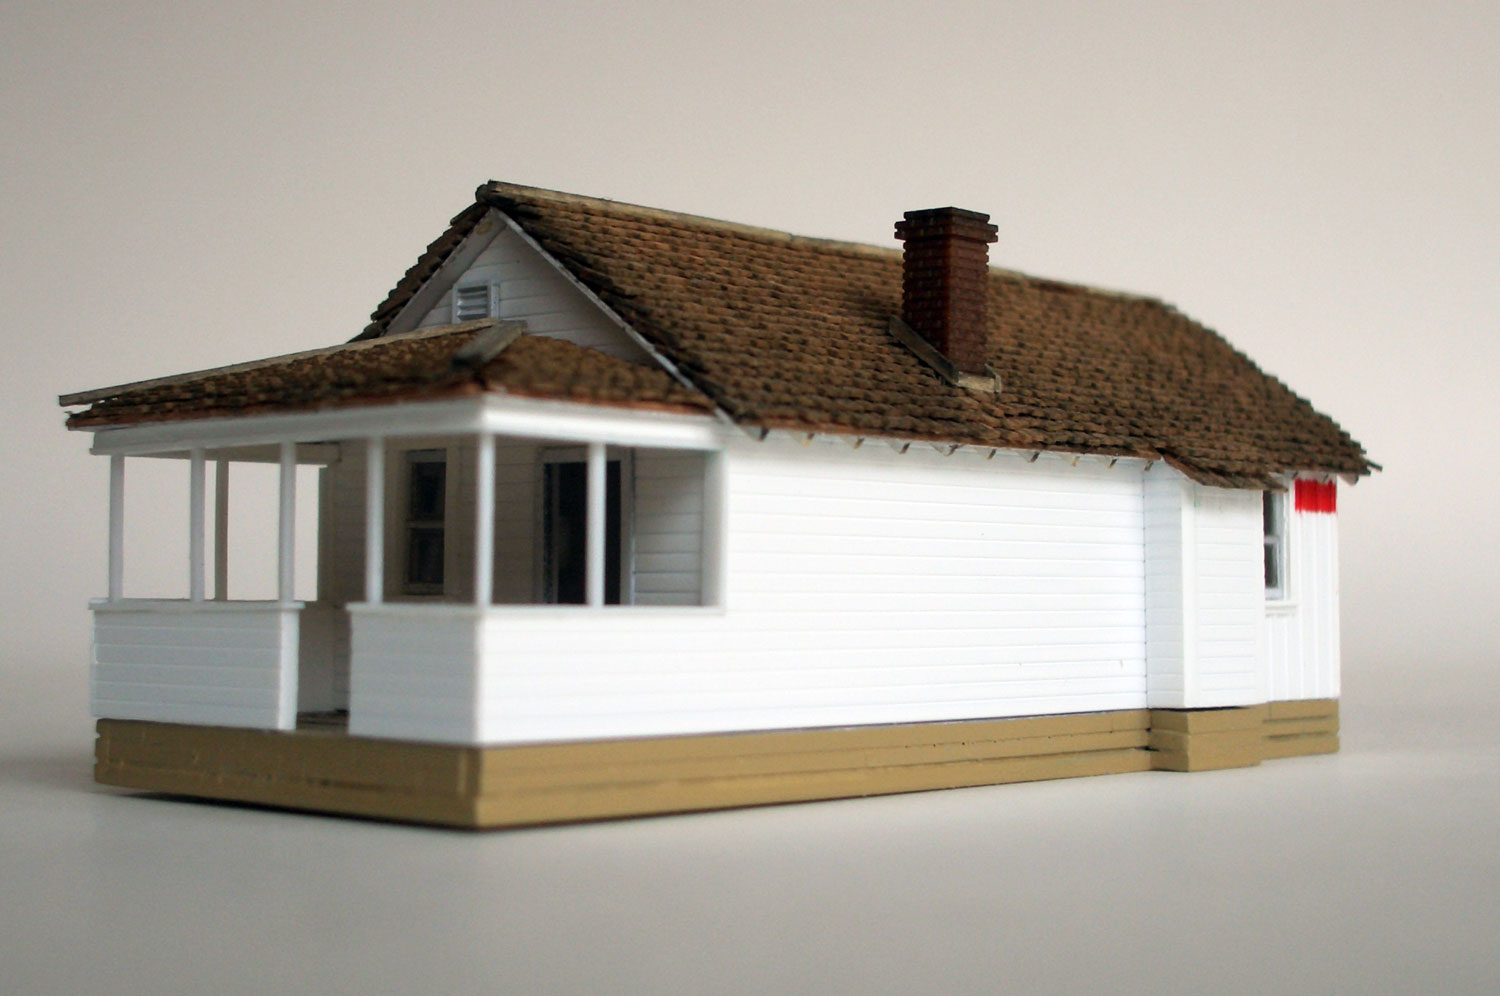 : looking from northeast
I’m trying to duplicate the whole town of Cisco, Utah in N scale. Here, I represent the making of Duke's Service Adjoint.
I first painted walls and eaves with grey primer. Next, I painted them white. Red line is my constant concern. Ribs of the wall prevent me from painting crisp line. Maybe I go decals next time. Roof is kept removable for the future interior works and lighting. Chimney is a Tichy product.
 : looking from northwest
 : looking from southeast
 : bay window details
2014-05-16 09:00
コメント(0)
Making Duke's Service Adjoint, part 3 [Works_Cisco Townsite]
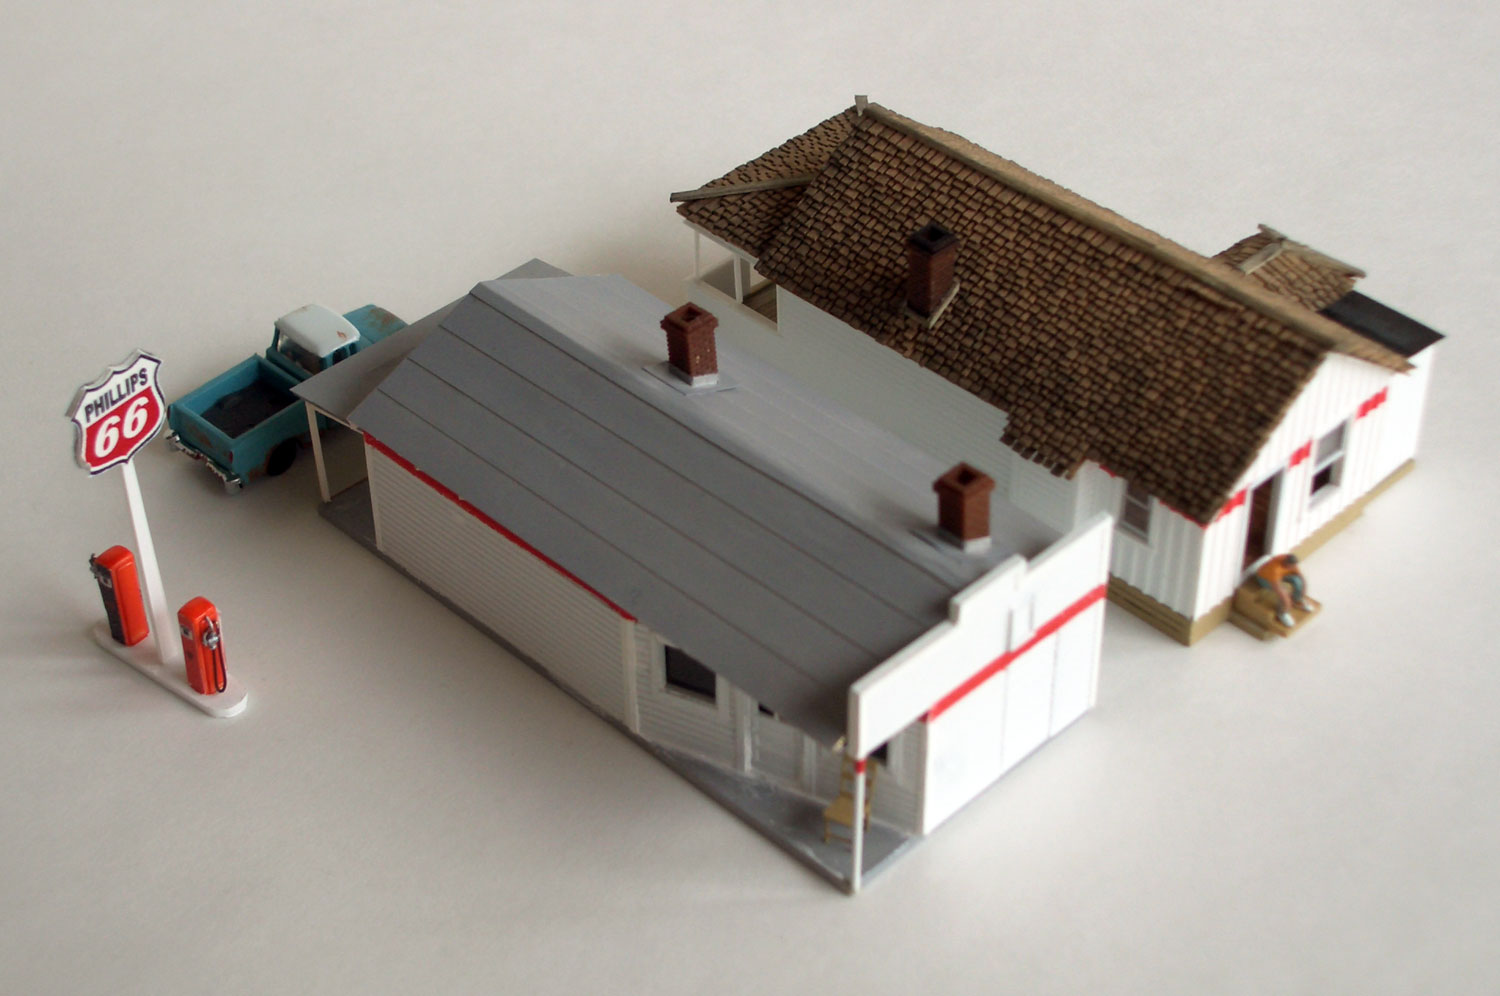 : overall view of Duke's Service Adjoint
I’m trying to duplicate the whole town of Cisco, Utah in N scale. Here, I represent the making of Duke's Service Adjoint.
As I wrote before, Duke's Service structure and this Adjoint structure form the Complex. The photo above shows the overall view of it.
revised Dec 15, 2014
revised Feb 4, 2015
 : looking from northwest
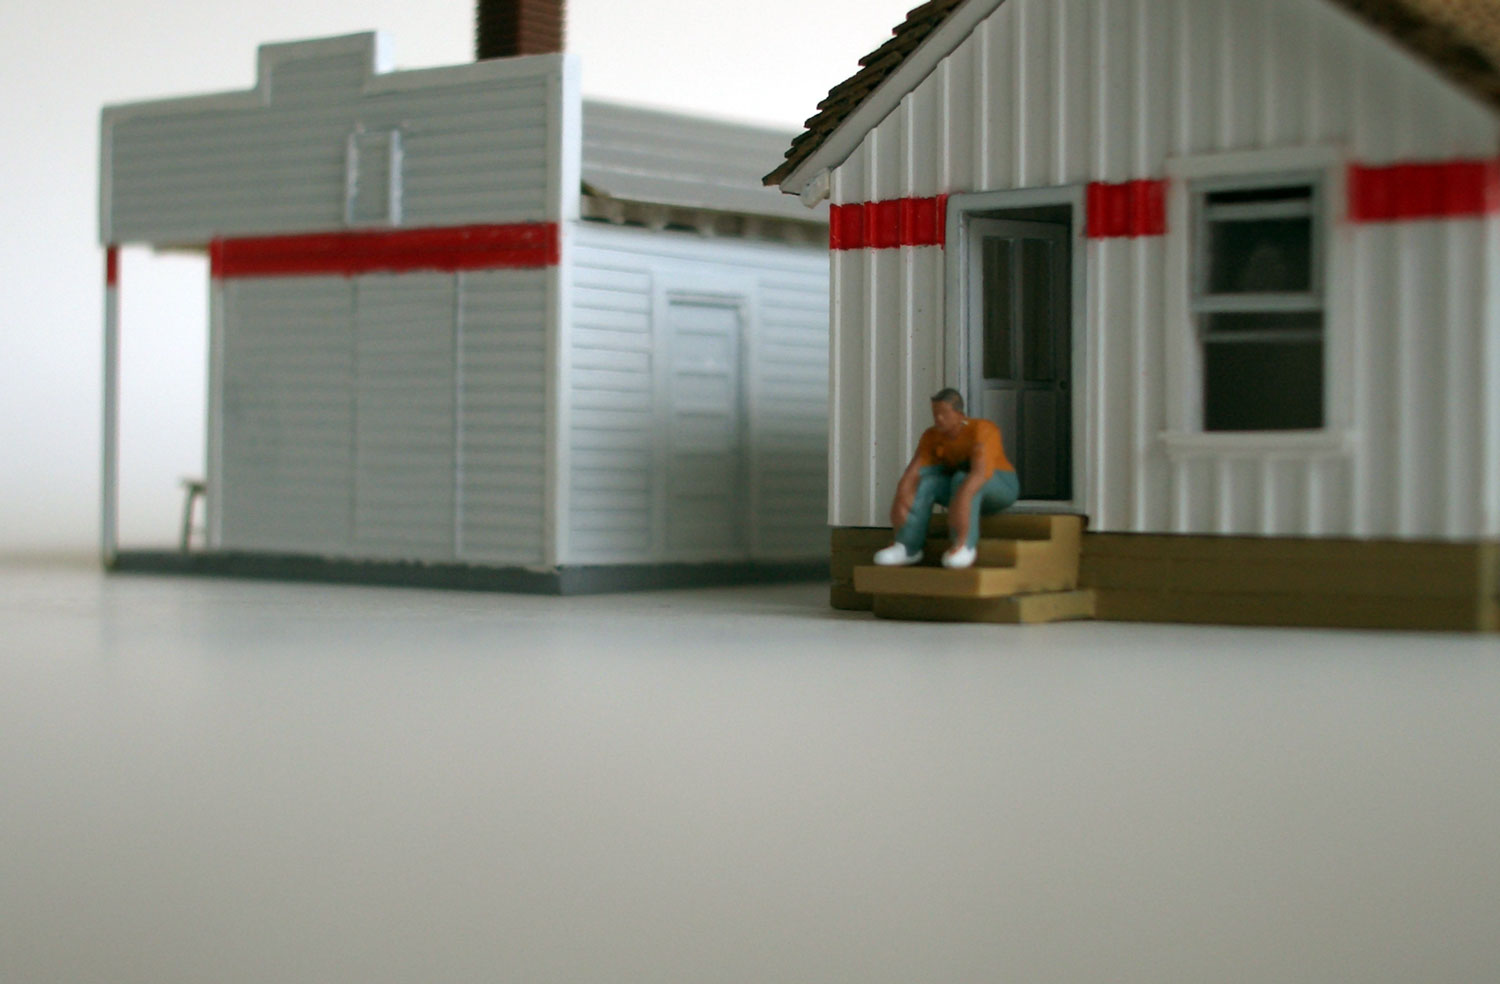 : looking from southwest
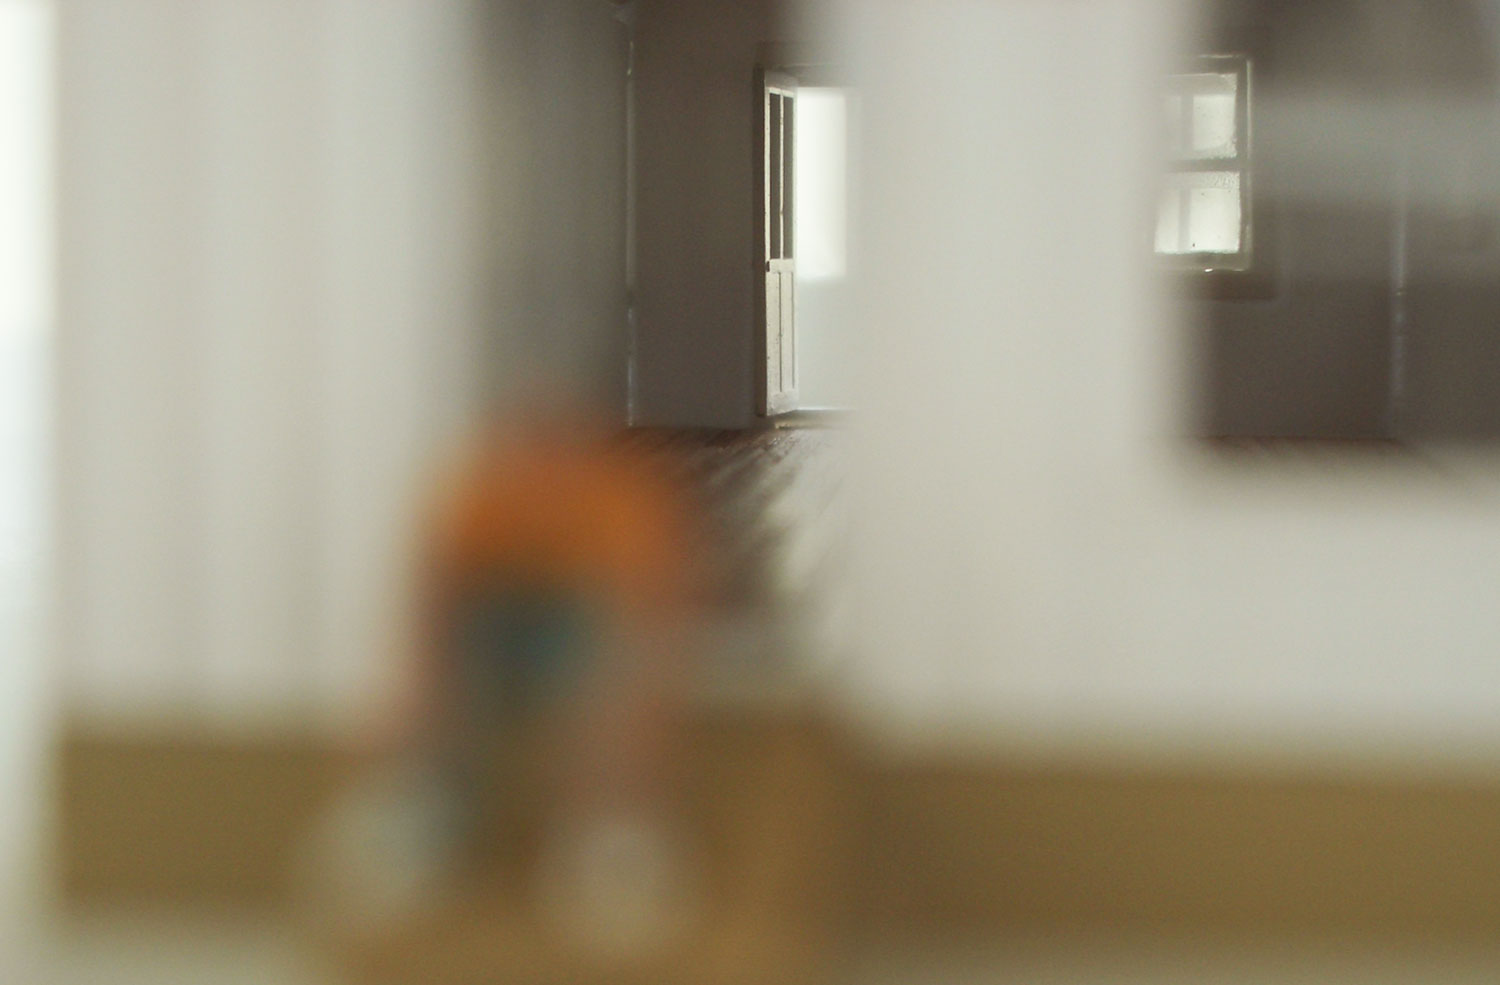 : While the pleasant breeze plays over the polished floor,
 : Robert seems lost in thought.
2014-05-23 09:00
コメント(0)
Making Capansky's Garage and Dwelling, part 1 [Works_Cisco Townsite]
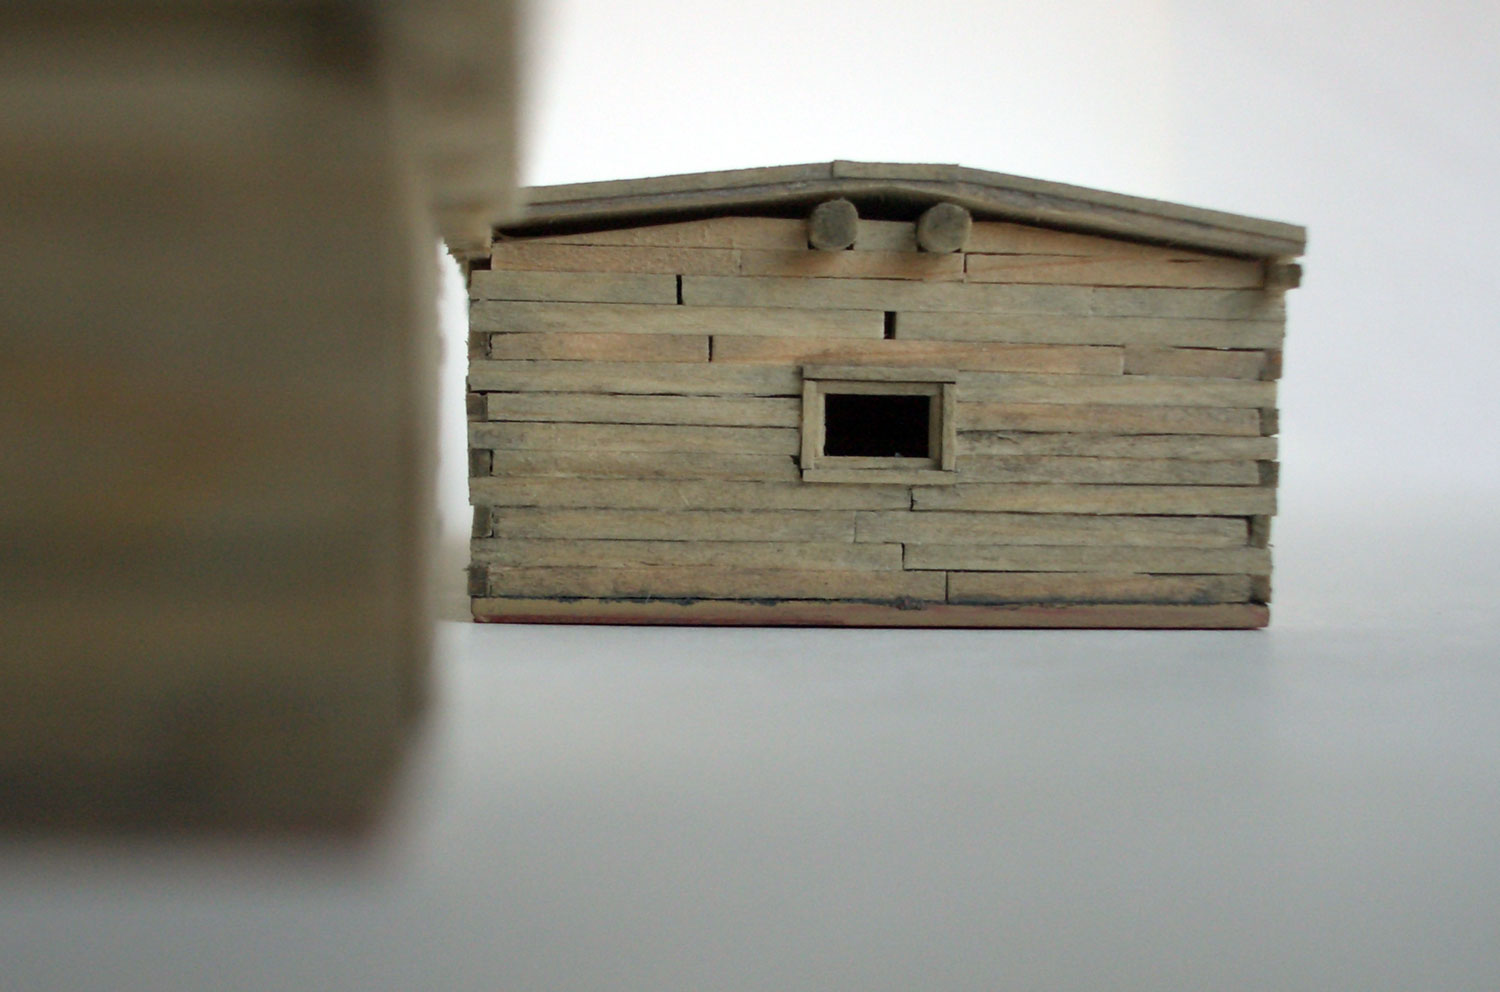
 : stacking the ties
I’m trying to duplicate the whole town of Cisco in N scale. Here, I represent the making of Capansky's Garage and Dwelling.
Garage and Dwelling is made of ties with earth on roof. I stacked ties one by one. I duplicated the joints referring to the photos. Windows and doors are made from thin wood strip. Earth on roof is made of patty.
I dye/washed the whole structure with the mixture of black, white and brown thin acrylic paints.
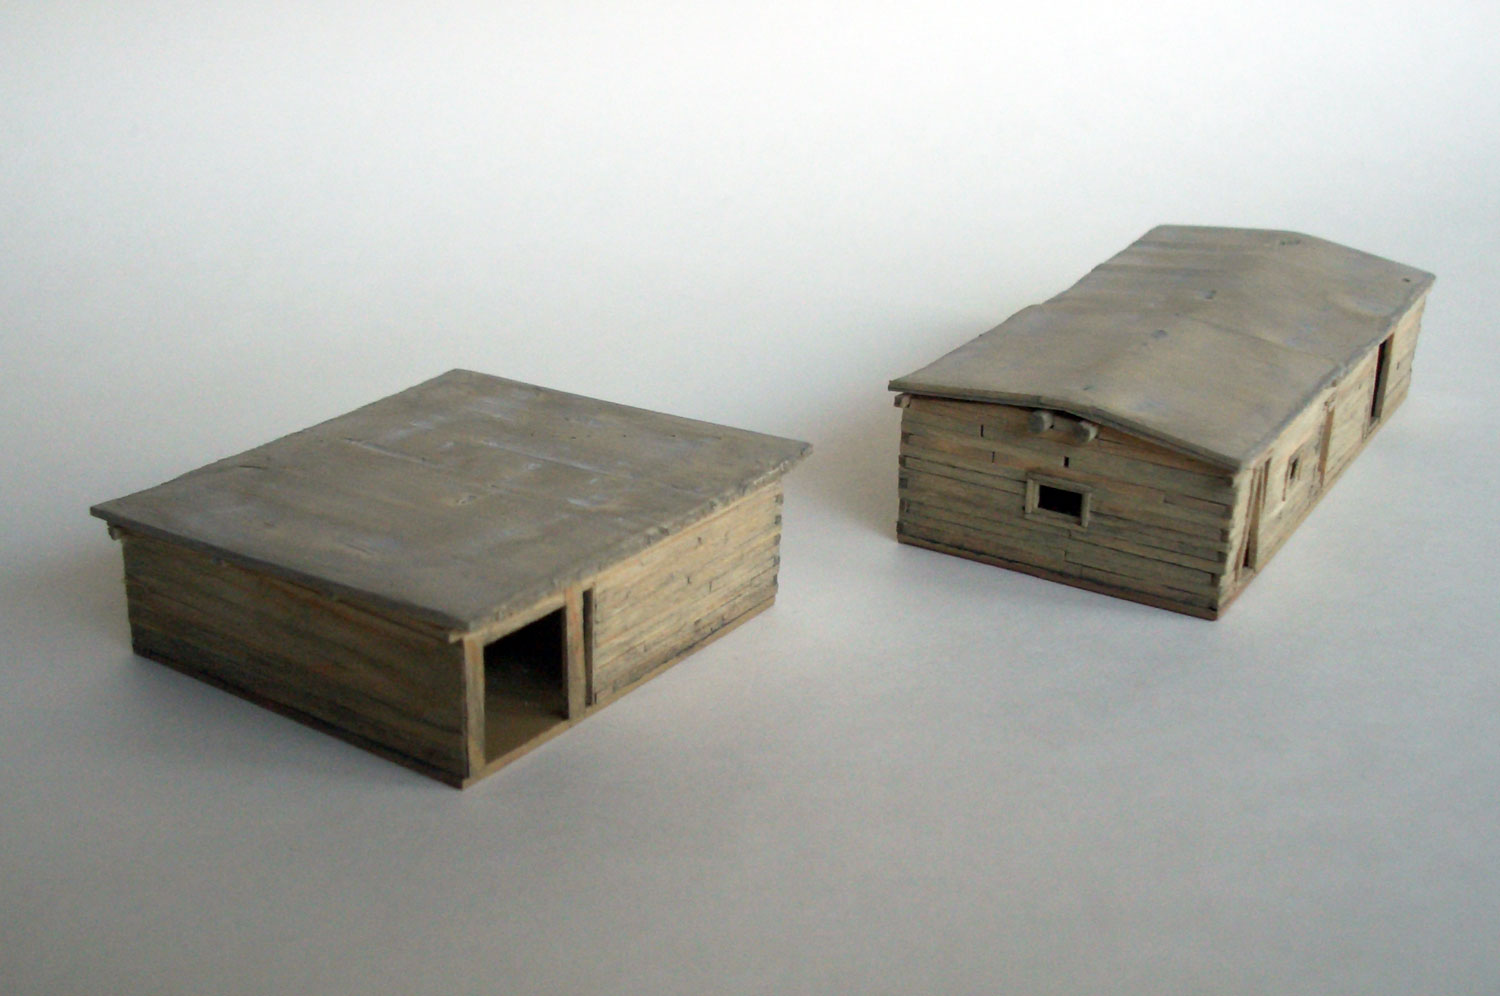
 : completed walls
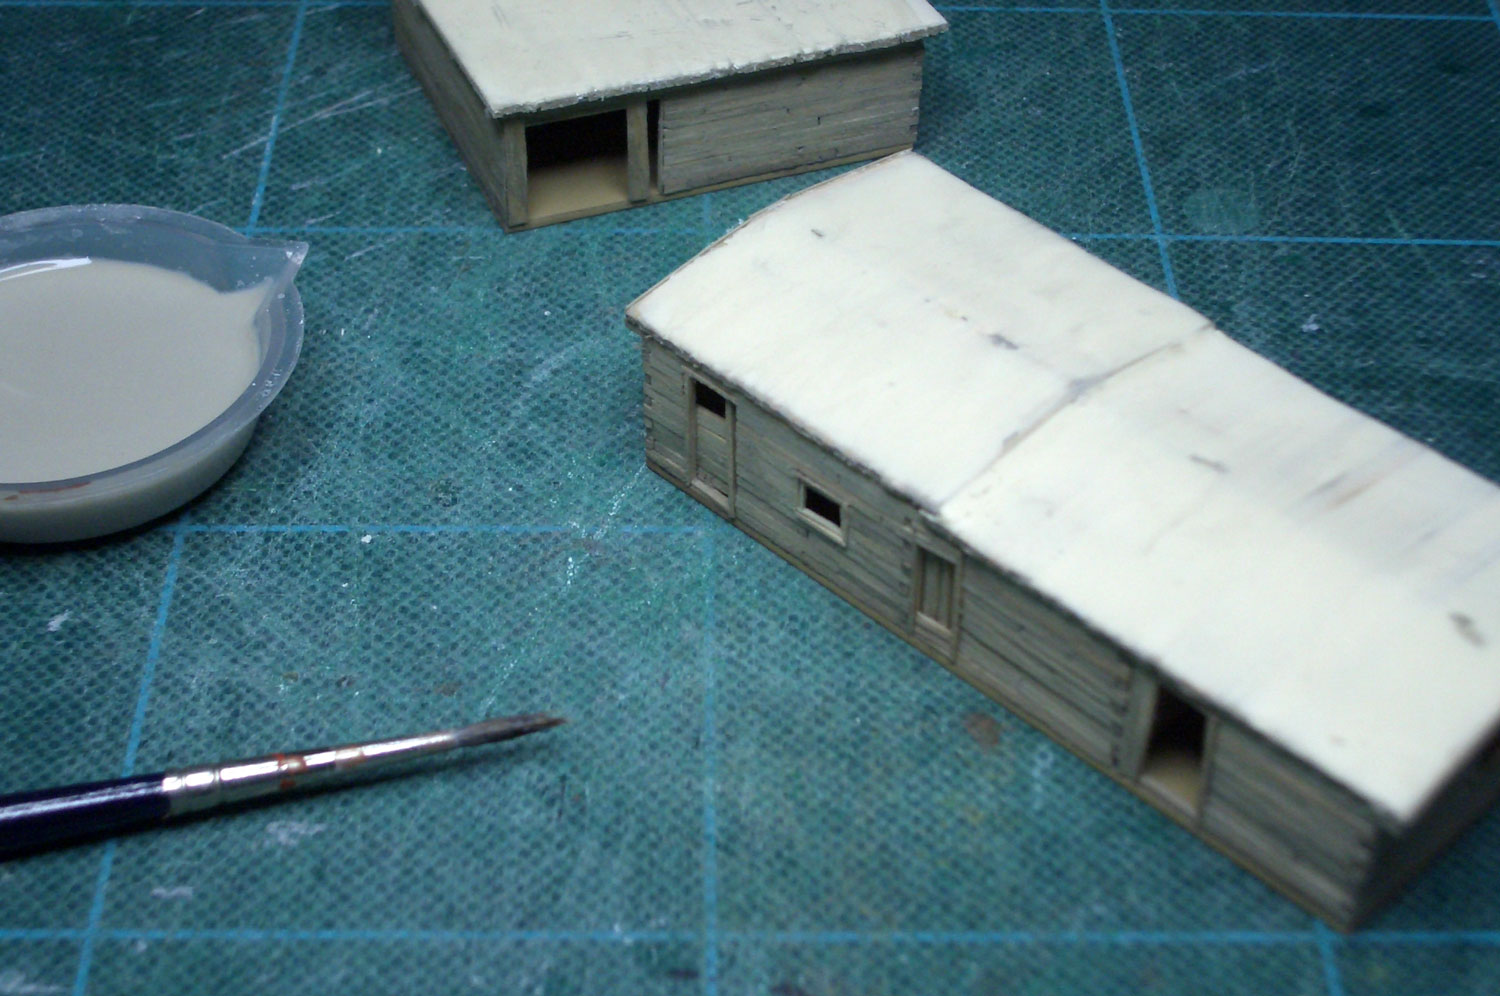 : dye/washing the roof
2014-11-28 09:00
コメント(0)
Making Capansky's Garage and Dwelling, part 2 [Works_Cisco Townsite]
 : Tie House looking from US Hwy 6
I’m trying to duplicate the whole town of Cisco in N scale. Here, I represent the making of Capansky's Garage and Dwelling.
Here are the results of my work.
 : looking from northwest
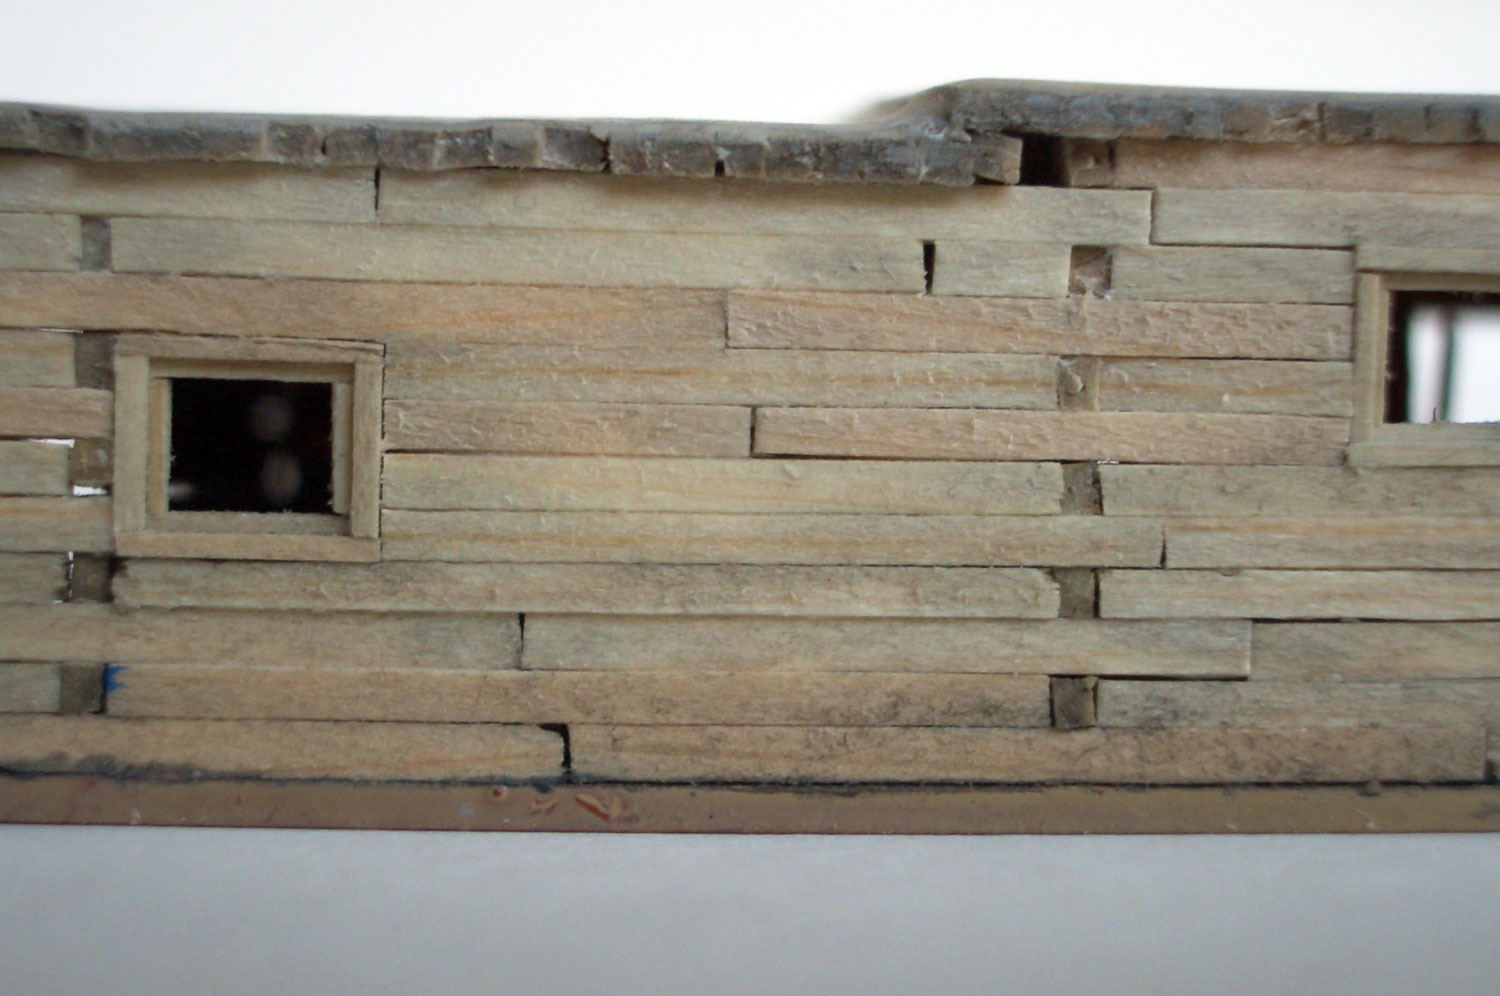 : details
 : looking through the doorway
2014-12-05 09:00
コメント(0)
Making Maynard House, part 1 [Works_Cisco Townsite]
 : model drawings of Maynard House
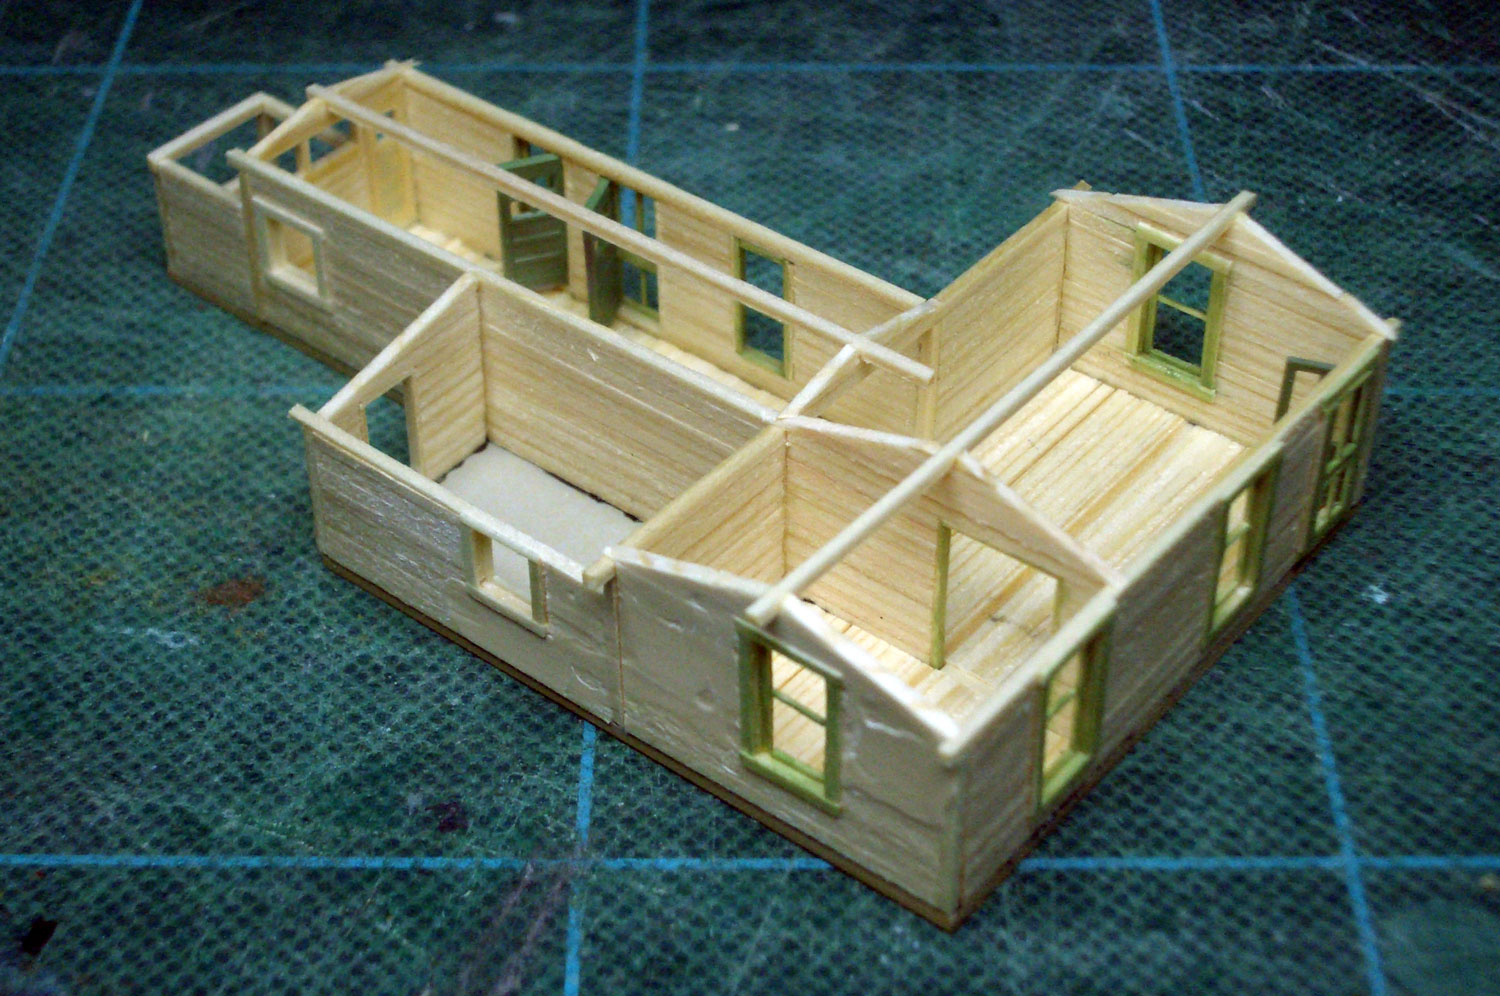
I’m trying to duplicate the whole town of Cisco, Utah in N scale. Here, I represent the making of Maynard House.
Maynard House is made of wood: stacked lumber, maybe old tie, walls with tarpaper roof. Some walls were finished with tarpaper or stucco. I first drew model plans. Results are shown above.
 : stacking the lumber
I used 1.0mm wood sheets. I cut them to stripes and stacked for the walls. Flooring, windows and mosquito screens are also made from wood stripes. Wall plaster is of putty. I missed the tarpaper wall; I couldn’t think of the material. Doors are Tichy products. Roofs are 0.3mm brass plates with 0.1mm styrene sheet for the tarpaper.
 : finished walls ready to paint
I only painted the doors, windows and mosquito screens green and roof grey. Other parts are dye/washed with thin mixture of beige and black acrylic paints.
 : painted and assembled walls
2015-03-27 09:00
コメント(0)
Making Maynard House, part 2 [Works_Cisco Townsite]
 : looking from northwest
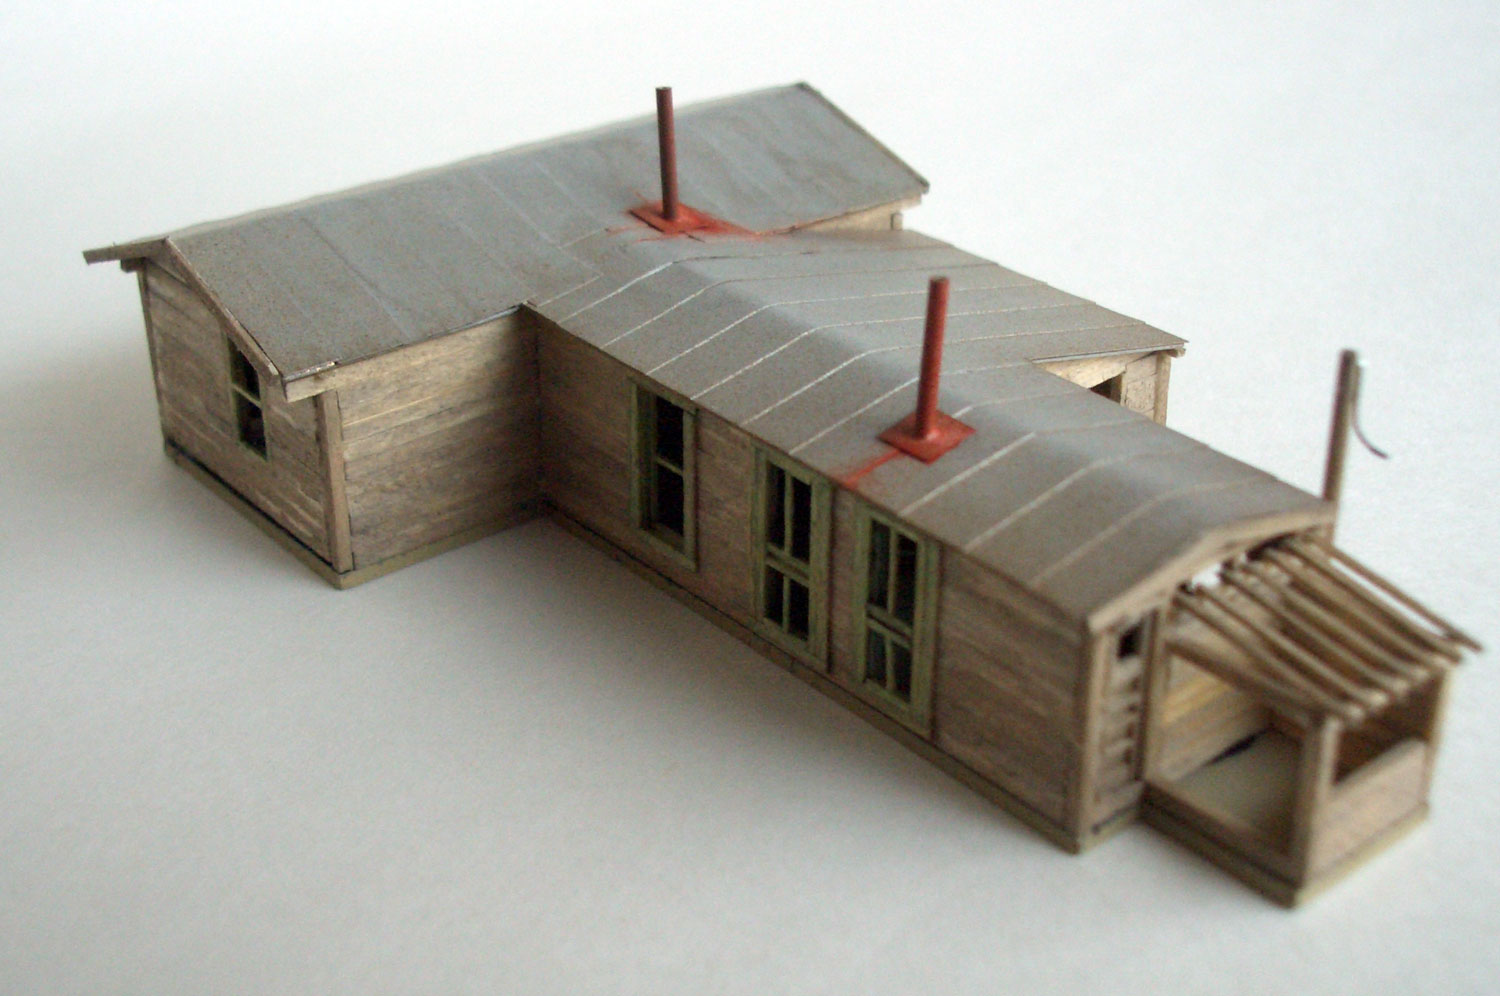 : looking from southeast
I’m trying to duplicate the whole town of Cisco, Utah in N scale. Here, I represent the making of Maynard House.
I added smokestacks and a pole with cut power line. Rusts on stacks seem too vivid though. I didn’t apply glazing, as I decided this house as vacant.
It seems that there used to be a false front or a billboard on the gable of the plaster wall. Some photos on web show the remnant on the roof, but I couldn’t find the figure of it. So I left it for the future.
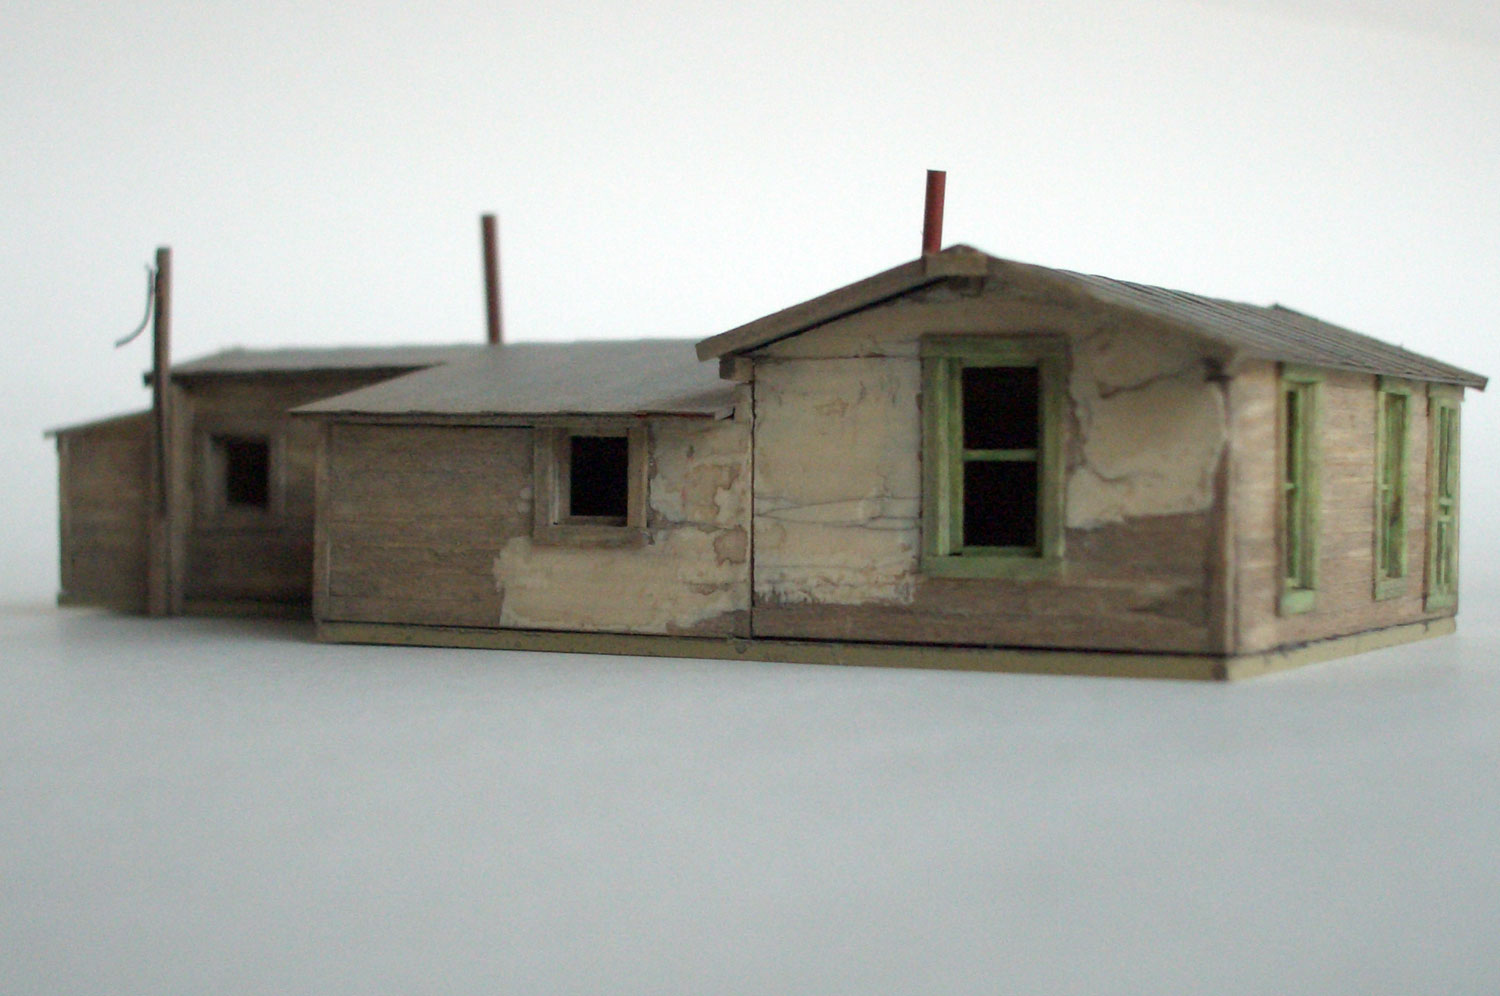 : looking from US Hwy 6
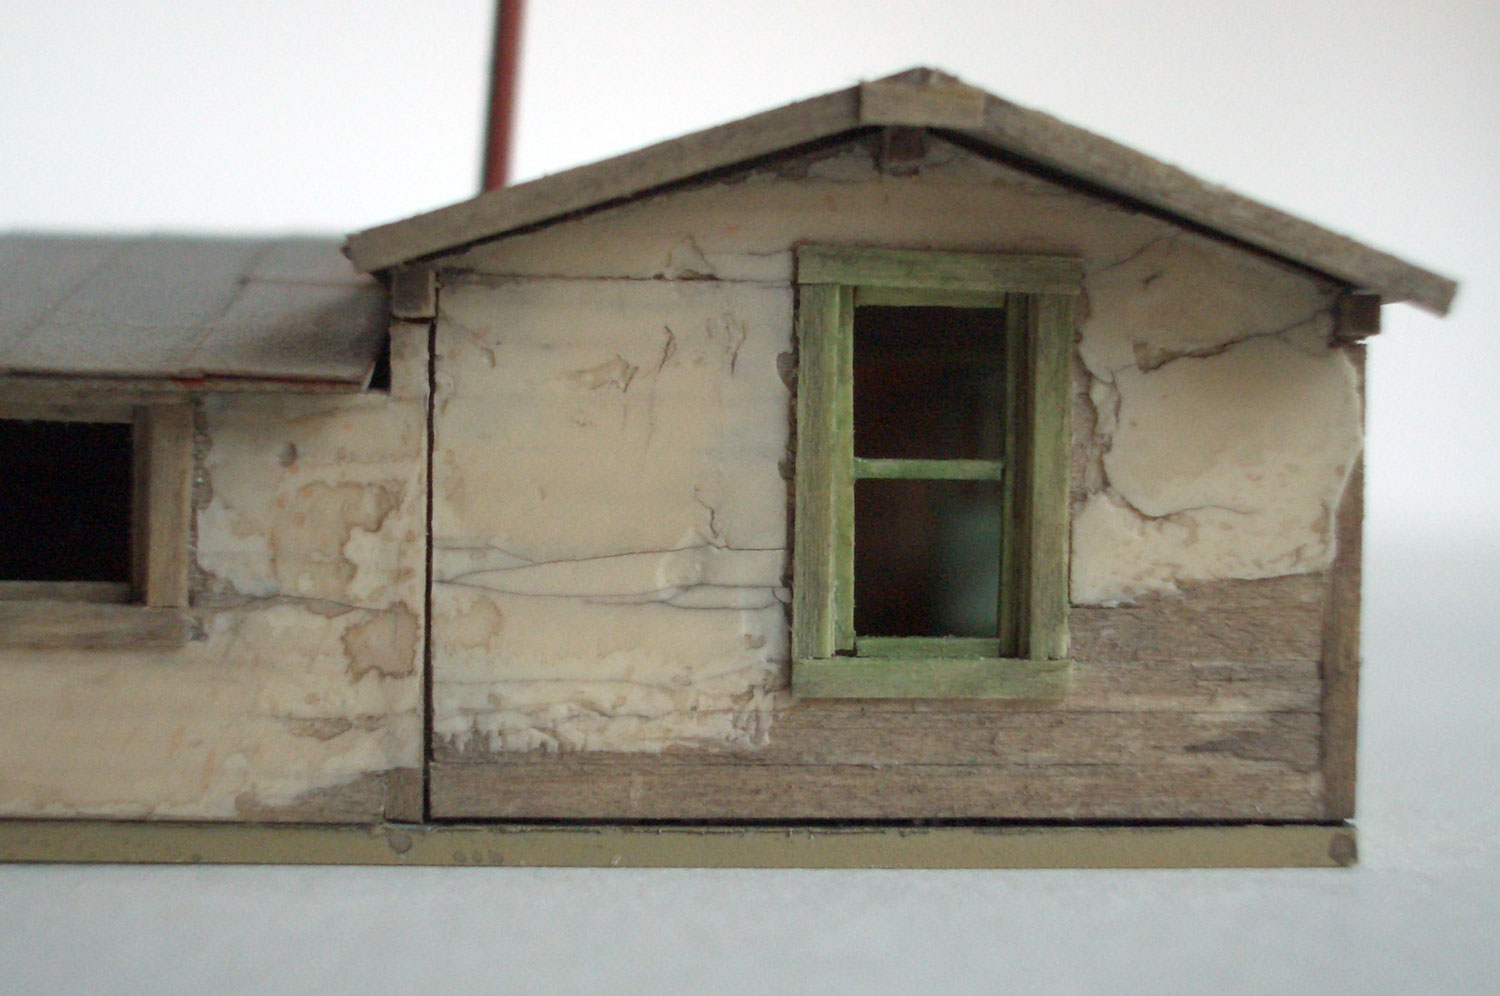 : stucco wall details
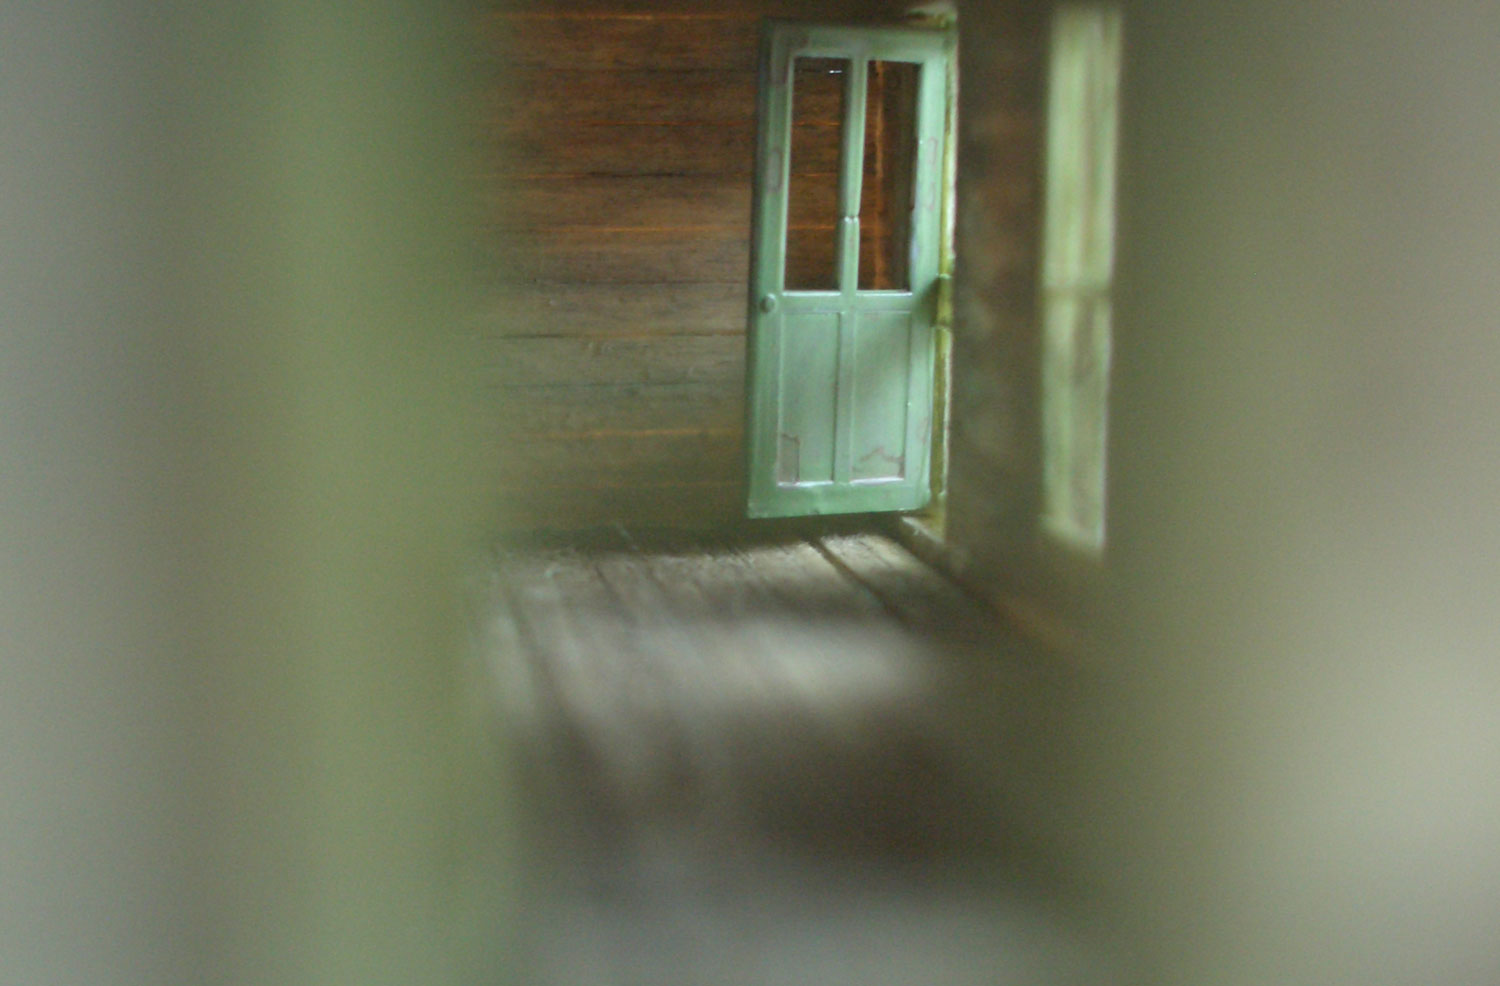 : looking inside from the window
 : light from the window lights up the rusty floor
2015-04-03 09:00
コメント(0)
Making McCoy’s Service, part 1 [Works_Cisco Townsite]
 : model drawings of McCoy’s Service
I’m trying to duplicate the whole town of Cisco, Utah in N scale. Here, I represent the making of McCoy’s Service.
McCoy’s Service is consisted of wood siding wall and sheeting (maybe) roof. I drew model plans and made the wall parts. I had no information on west and north elevation. So, I left them blank. Result is shown above.
Walls are made from 1.2mm styrene sheet. I applied 0.1mm styrene sheet level by level to represent the sidings. All the windows and doors seem boarded up; I traced the prototype with thin wood sheet after the painting.
0.3mm brass plate is used for the roof. I applied sandpaper on the brass plate to represent the roofing. Gas pumps and their base are scratchbuilt from styrene sheet.
 : finished walls ready to paint
2015-06-20 09:00
コメント(0)
Making McCoy’s Service, part 2 [Works_Cisco Townsite]
 : looking from northwest
I’m trying to duplicate the whole town of Cisco, Utah in N scale. Here, I represent the making of McCoy’s Service.
All the letterings, sign and lines are of homemade decals. I gave a little wash of dirt to boarded woods and roof.
 : looking from US Hwy 6
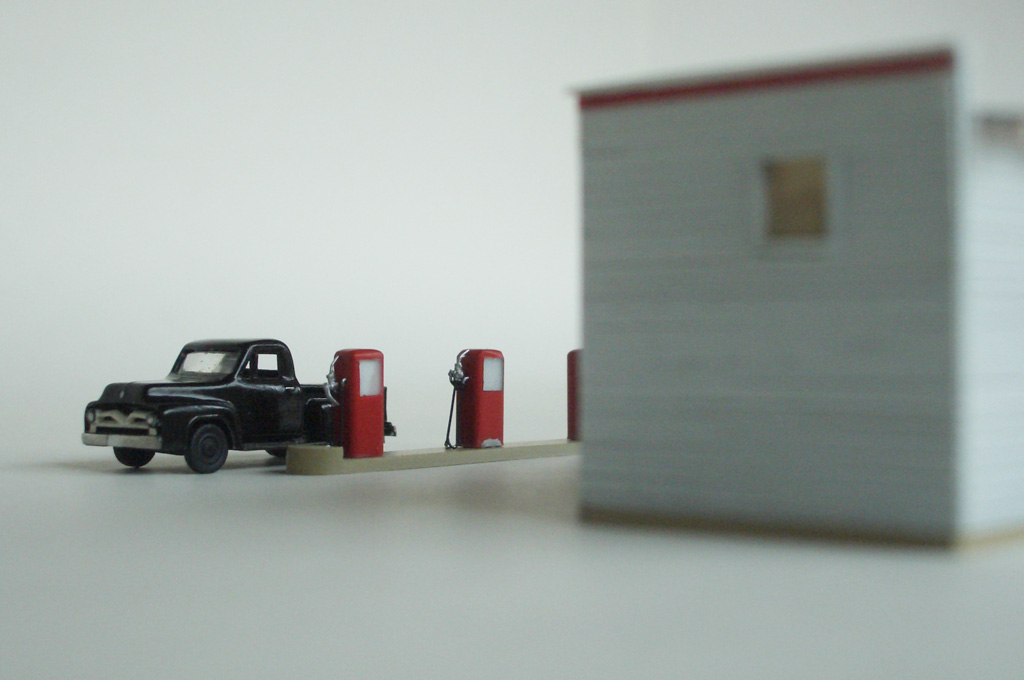 : No answer at the driveway signal bell.
2015-06-21 09:00
コメント(0)
1955 Ford F-100 for town of Cisco [Works_Cisco Townsite]
 : 1955 Ford F-100 by C in C
This is a making of a 1955 Ford F-100, 1/4 Ton Pickup made from a kit produced by C in C.
C in C kit is made of pewter and cast accurately without burr nor mold shift as you can see in the photo below. I polished the surface of the castings to represent a “not rusted” appearance. I also added a steering wheel and front windshield. After painting gloss black, I rubbed the bumper, door handle, and nose emblem to make them shine.
This body style called the second generation, was produced between 1953 and 1955. A similar 1956 body had its windshield wrapped around. In 1957, Ford abandoned its bonnet and fender design: the end of GP30-like style.
* Kit I used;
* a quick Ford Pickups identifying guide found on web;
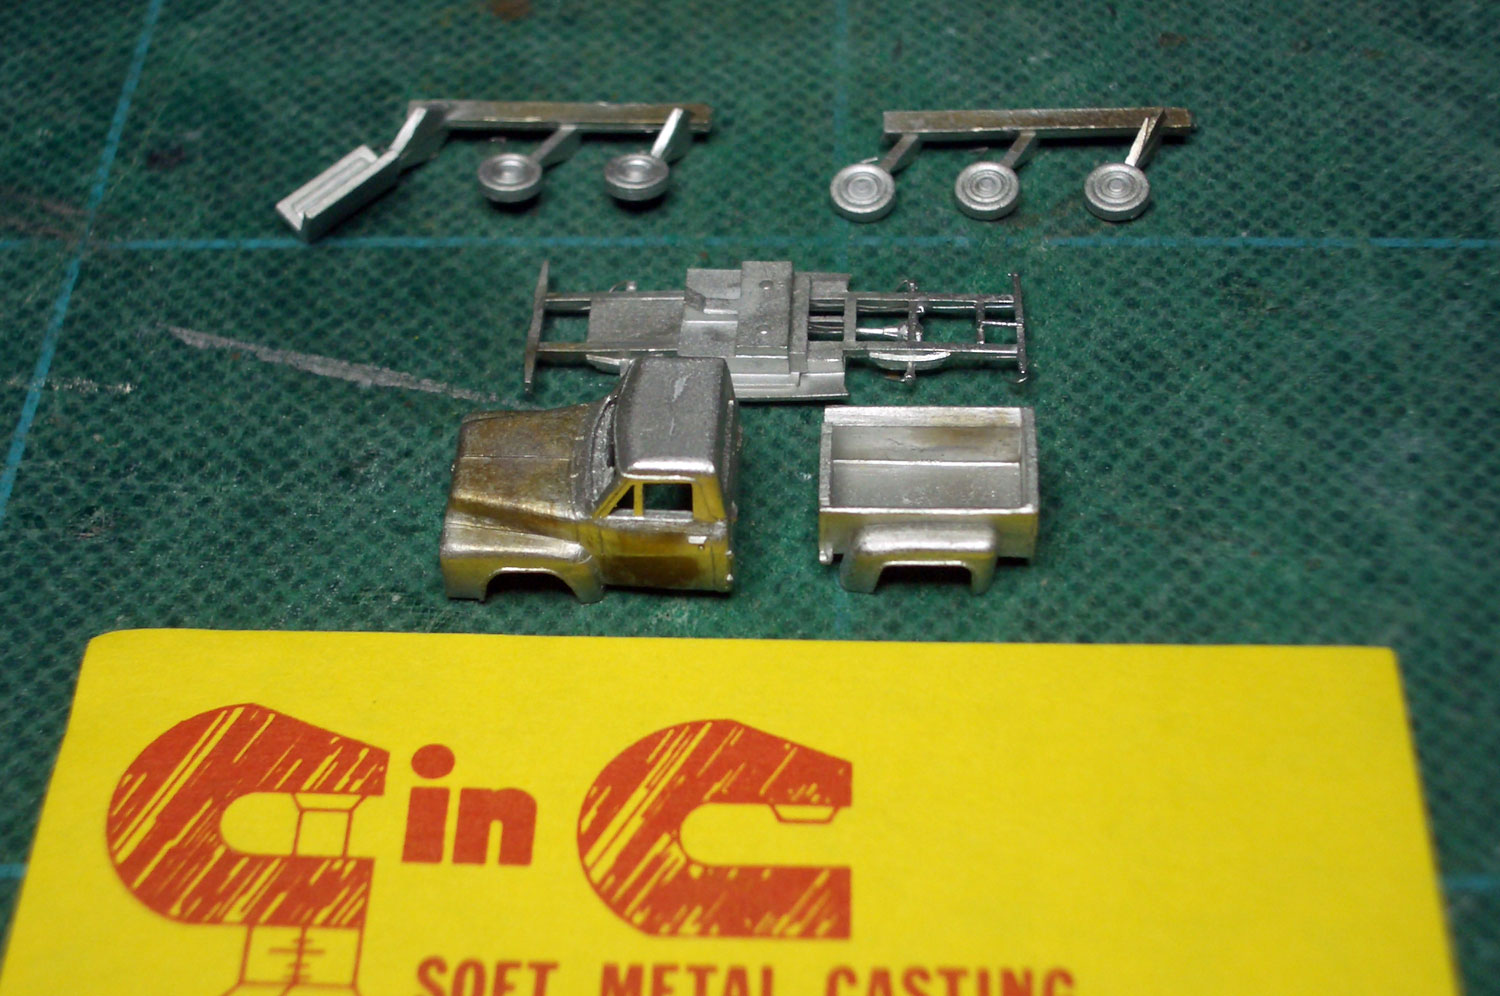 : parts out of box
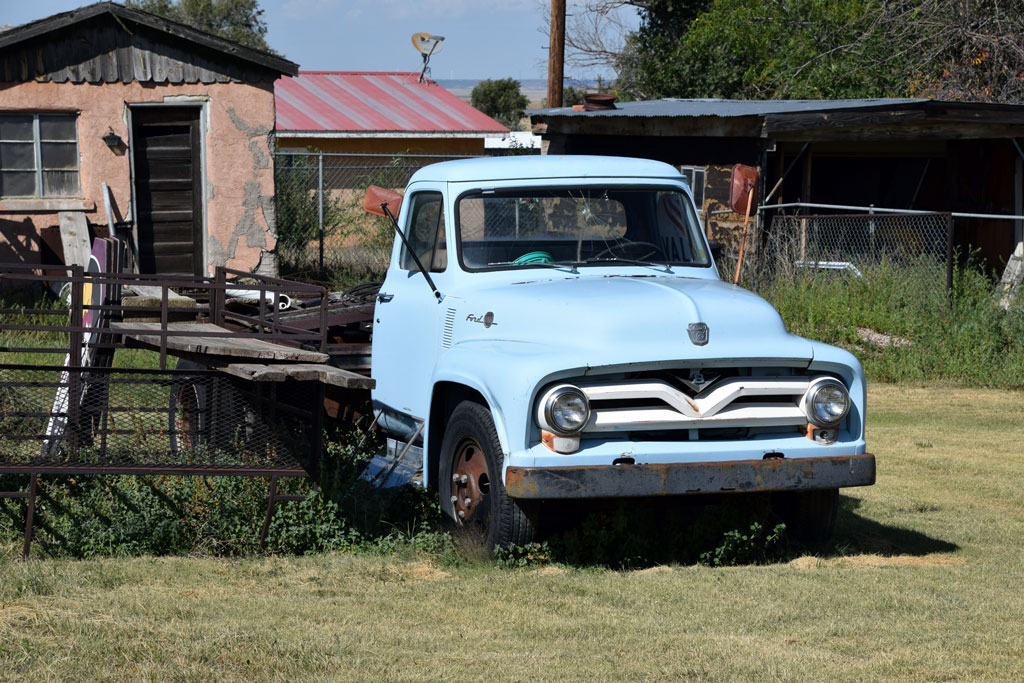 : Vaughn, NM. Sep. 12, 2015
2015-06-22 09:00
コメント(0)
Making Duke's Service, part 3 [Works_Cisco Townsite]
 : L-shaped counter
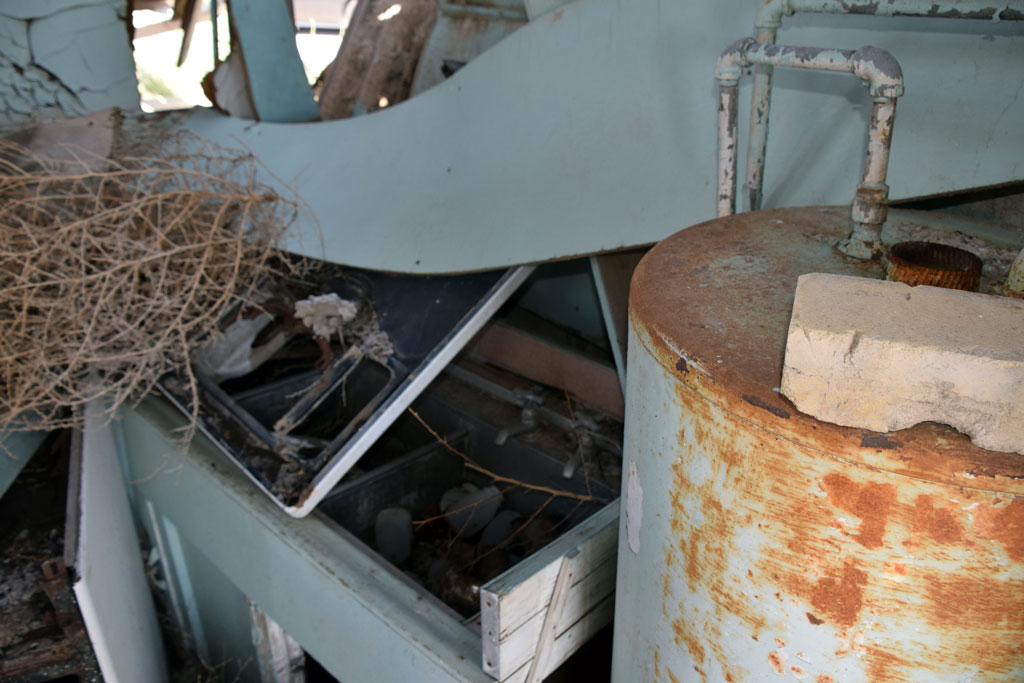 : sink and boiler in the backyard
I visited the Duke's Service in summer 2014 to survey the structure. Photos above are taken on Sep. 11, 2014.
There, I measured still remaining interior wall and counter. I also found refrigerator, sink, boiler and conduit still remaining at the Duke's Service.
I added these details to my structure. These items are made from styrene. Chairs are Gold Medal Models product. I also added boiler exhaust stack on the roof.
The space next to the cafe should have been the grocery/canteen. But I couldn’t find any evidence at the site.
 : interior walls and counter
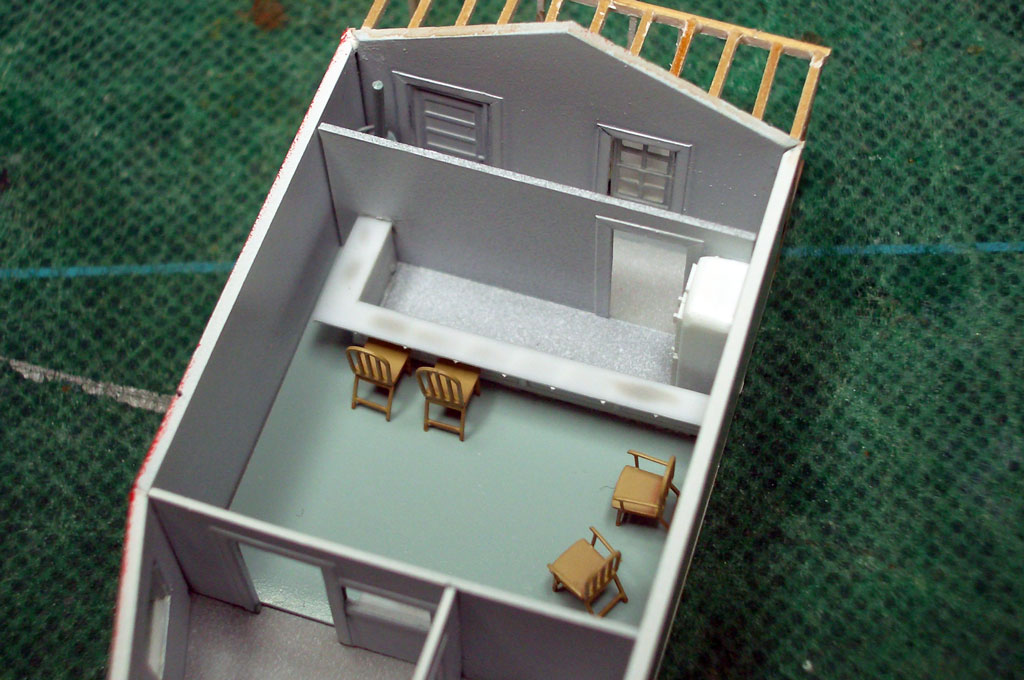 : Bar & Restaurant portion duplicated
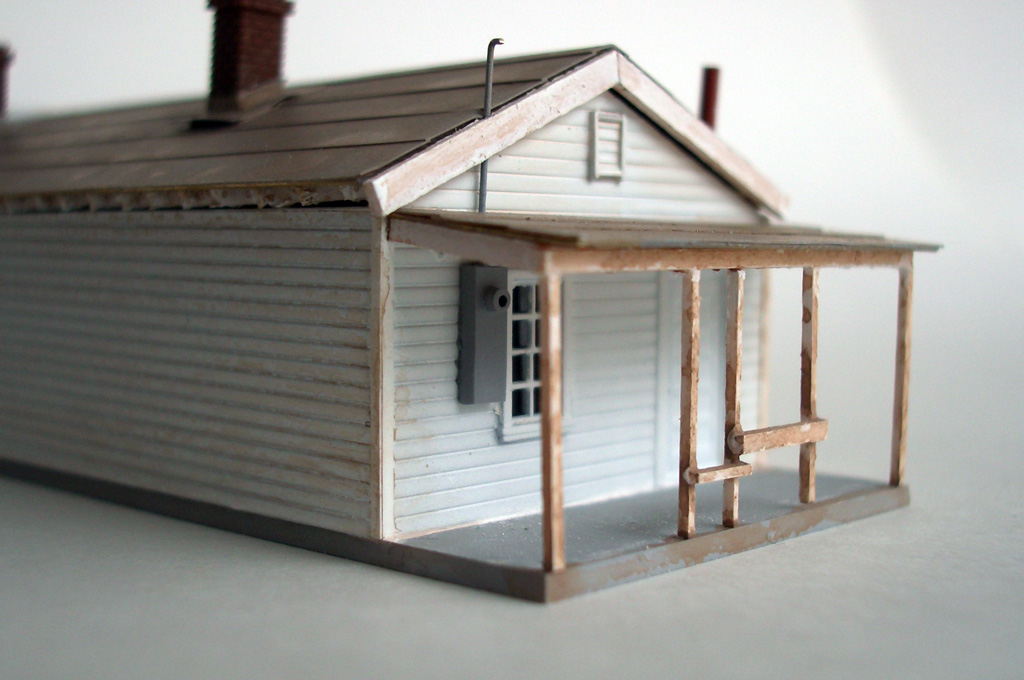 : electricity intake and stack
2015-06-26 09:00
コメント(0)
Making Cisco Automotive Service, part 3 [Works_Cisco Townsite]
 : power lines and electricity intake
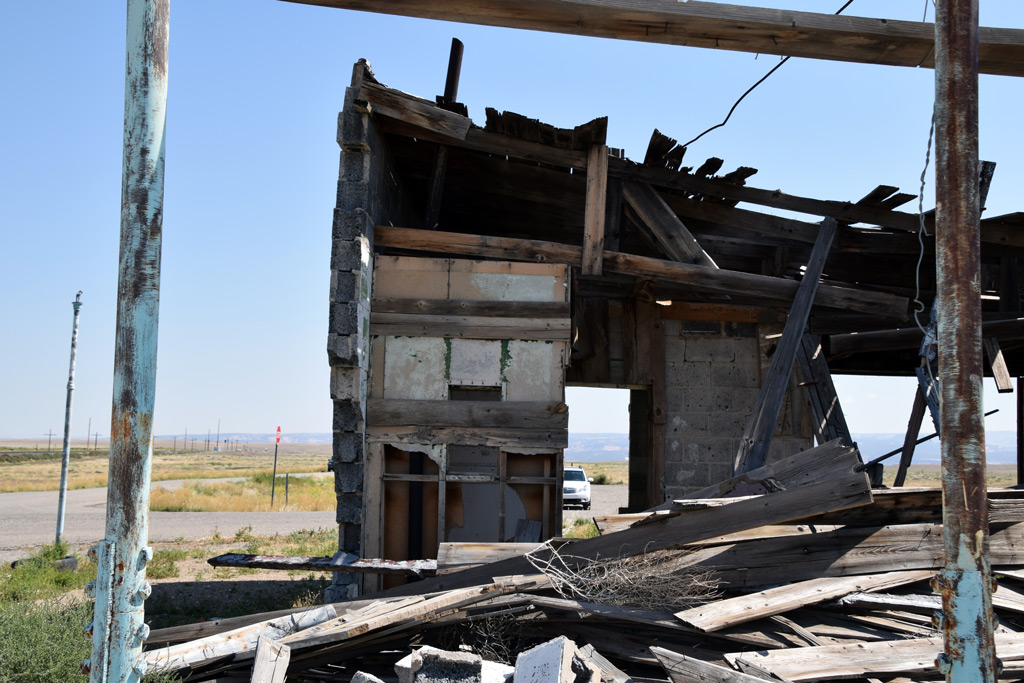 : vent pipes and a stack
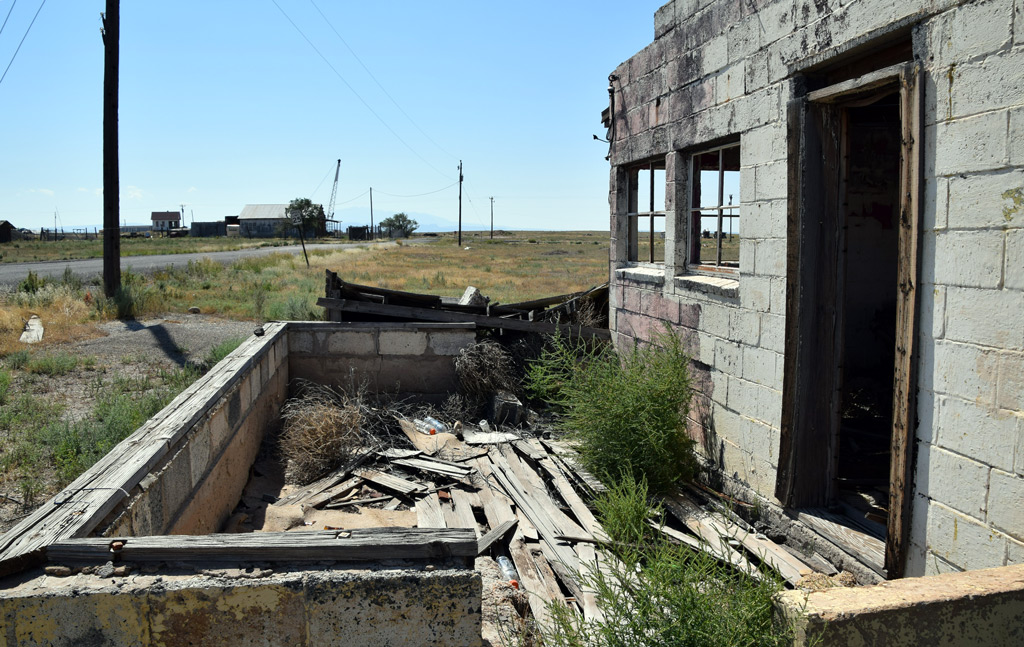
I visited the Cisco Automotive Service in summer 2014 to survey the structure. Photos above are taken on Sep. 11, 2014.
There, I found some elements I didn’t recognize before; vent pipes maybe from the underground gas tank, stacks, storage and conduit.
I added these details to my structure. I also revised some of interior walls referring to the results of my survey.
 : added exterior details
 : vent pipes
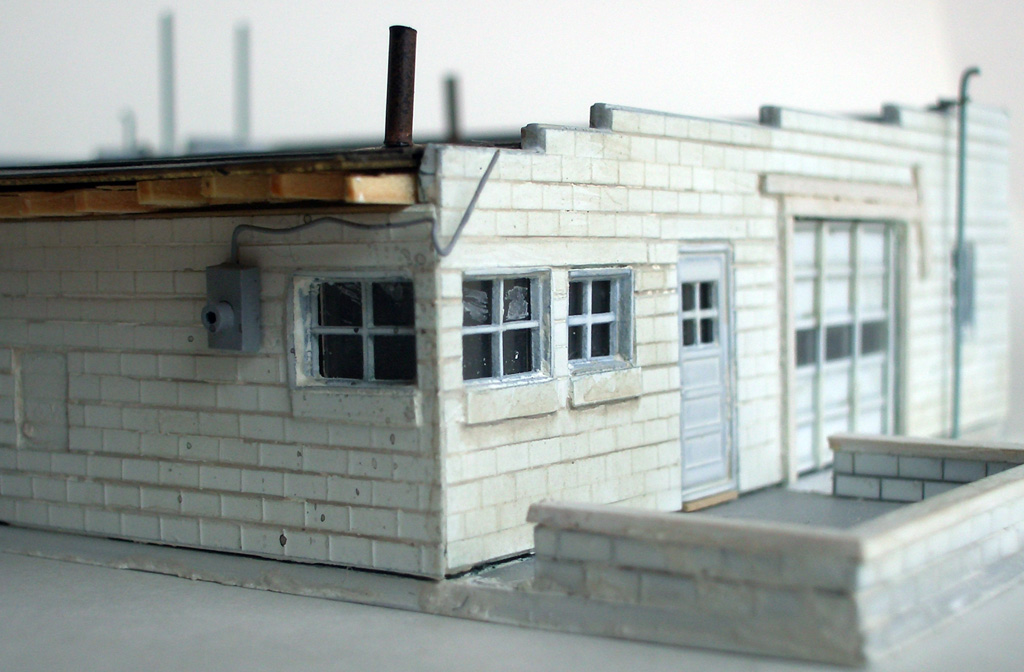 : electricity intake
2015-06-27 09:00
コメント(0)
Making Ethel’s Cafe, part 1 [Works_Cisco Townsite]
 :model drawings of Ethel’s Café
I’m trying to duplicate the whole town of Cisco, Utah in N scale. Here, I represent the making of Ethel’s Cafe.
Ethel’s Cafe is consisted of wood siding wall and sheeting roof. I used 0.5mm styrene sheet for the wall. Also used is 0.1mm Tamiya Plastic Paper for siding. Doors are Tichy products. I drew model plans to adjust some prototype openings to fit. Result is shown above. Numbers in the drawing above shows the numbers of parts I used.
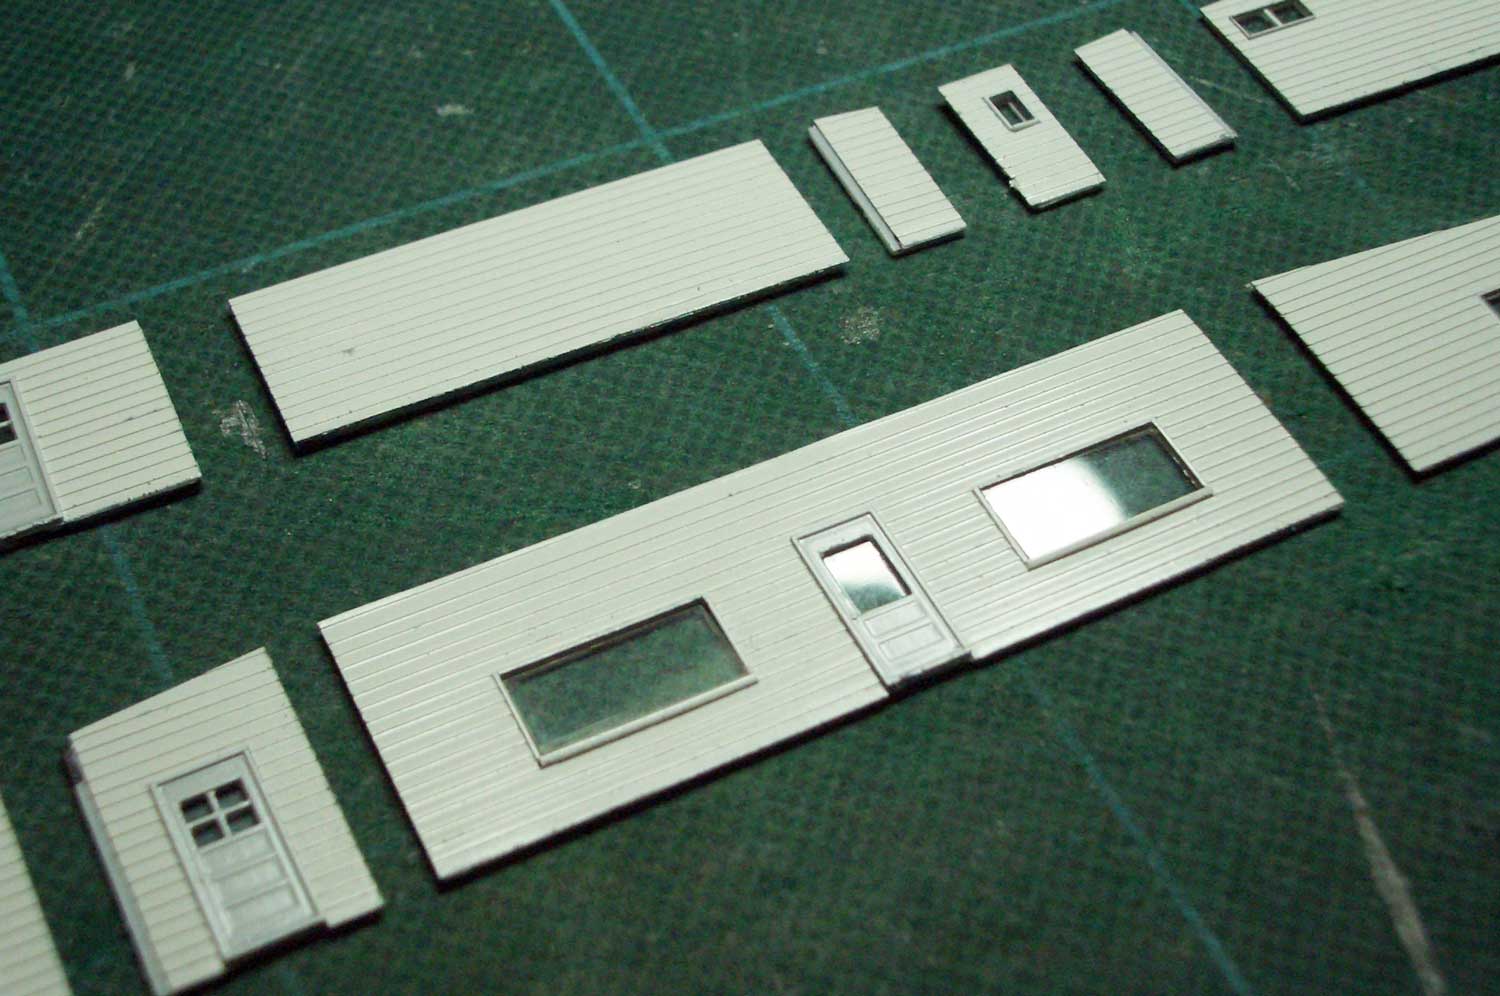 : wood siding walls
Thin wood is used for the roof trusses. The trusses are adhered to the roof as the structure has eaves; trusses fit the walls and fix the position of the roof as a lid. I used 0.3mm brass plate for the roof. I applied 0.1mm Tamiya Plastic Paper on the brass plate to represent the sheeting.
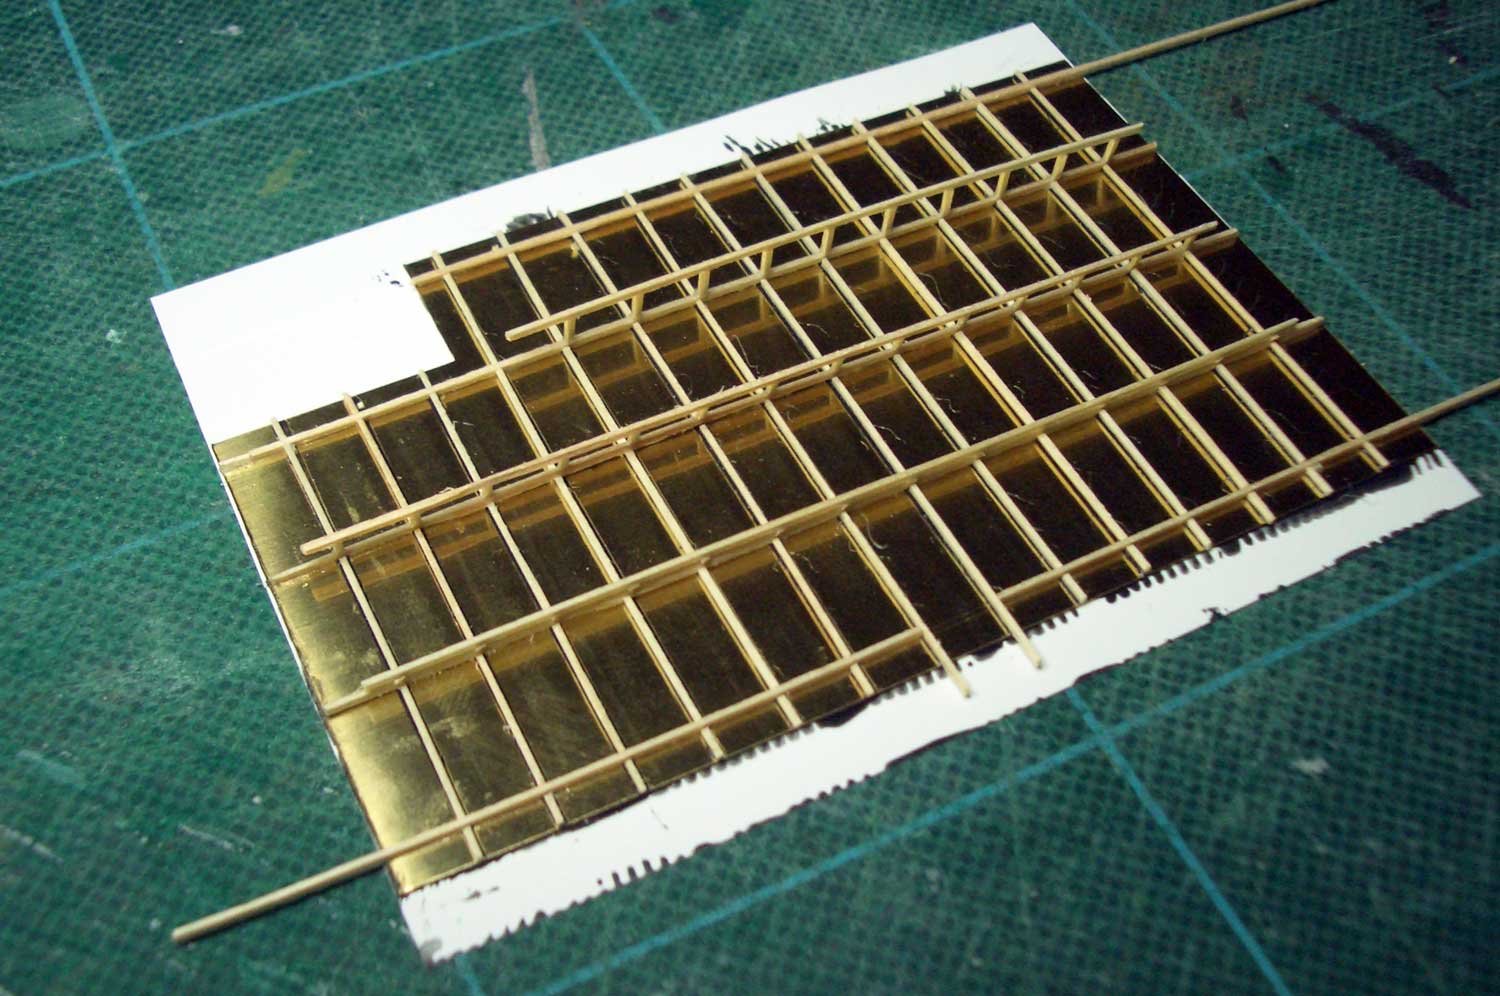 : roof trusses under construction
The floor of the café is uncertain; maybe linoleum or carpet. I thought they are not neat for my structure, so I decided to finish with vinyl tile. I engraved joints on 0.3mm styrene sheet with sharp knife and painted black and then blue. After the paint is dried, I filed the floor with sandpaper to represent the aging.
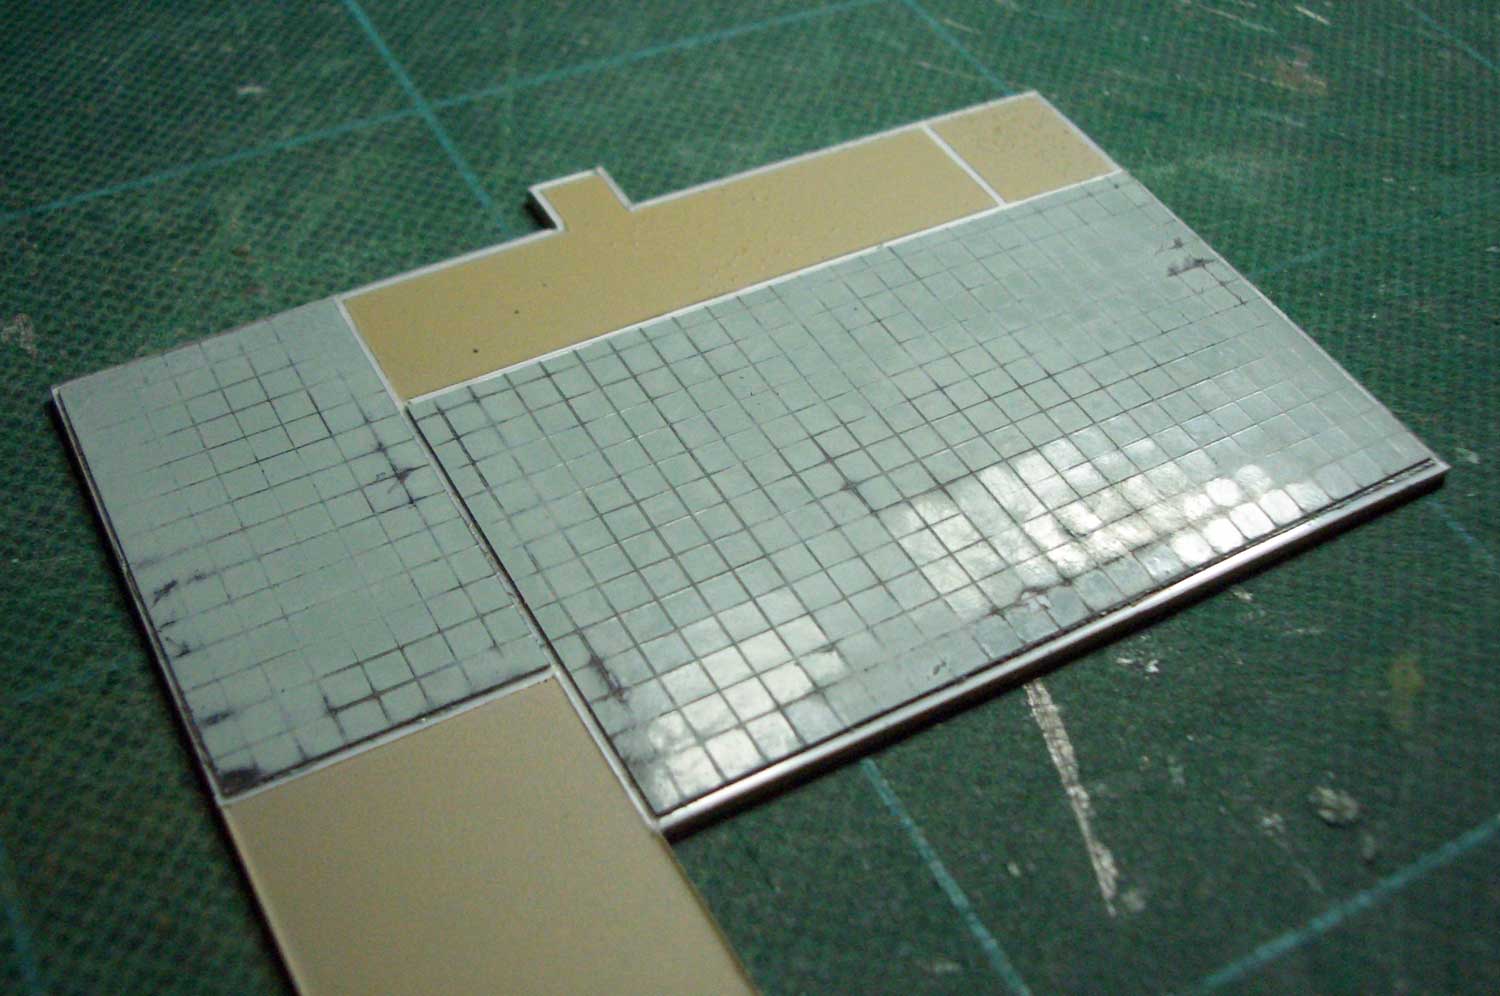 : finished vinyl tile floor
2016-01-22 09:00
コメント(0)
Making Ethel’s Cafe, part 2 [Works_Cisco Townsite]
 : illuminated CAFE sign and cutout letters
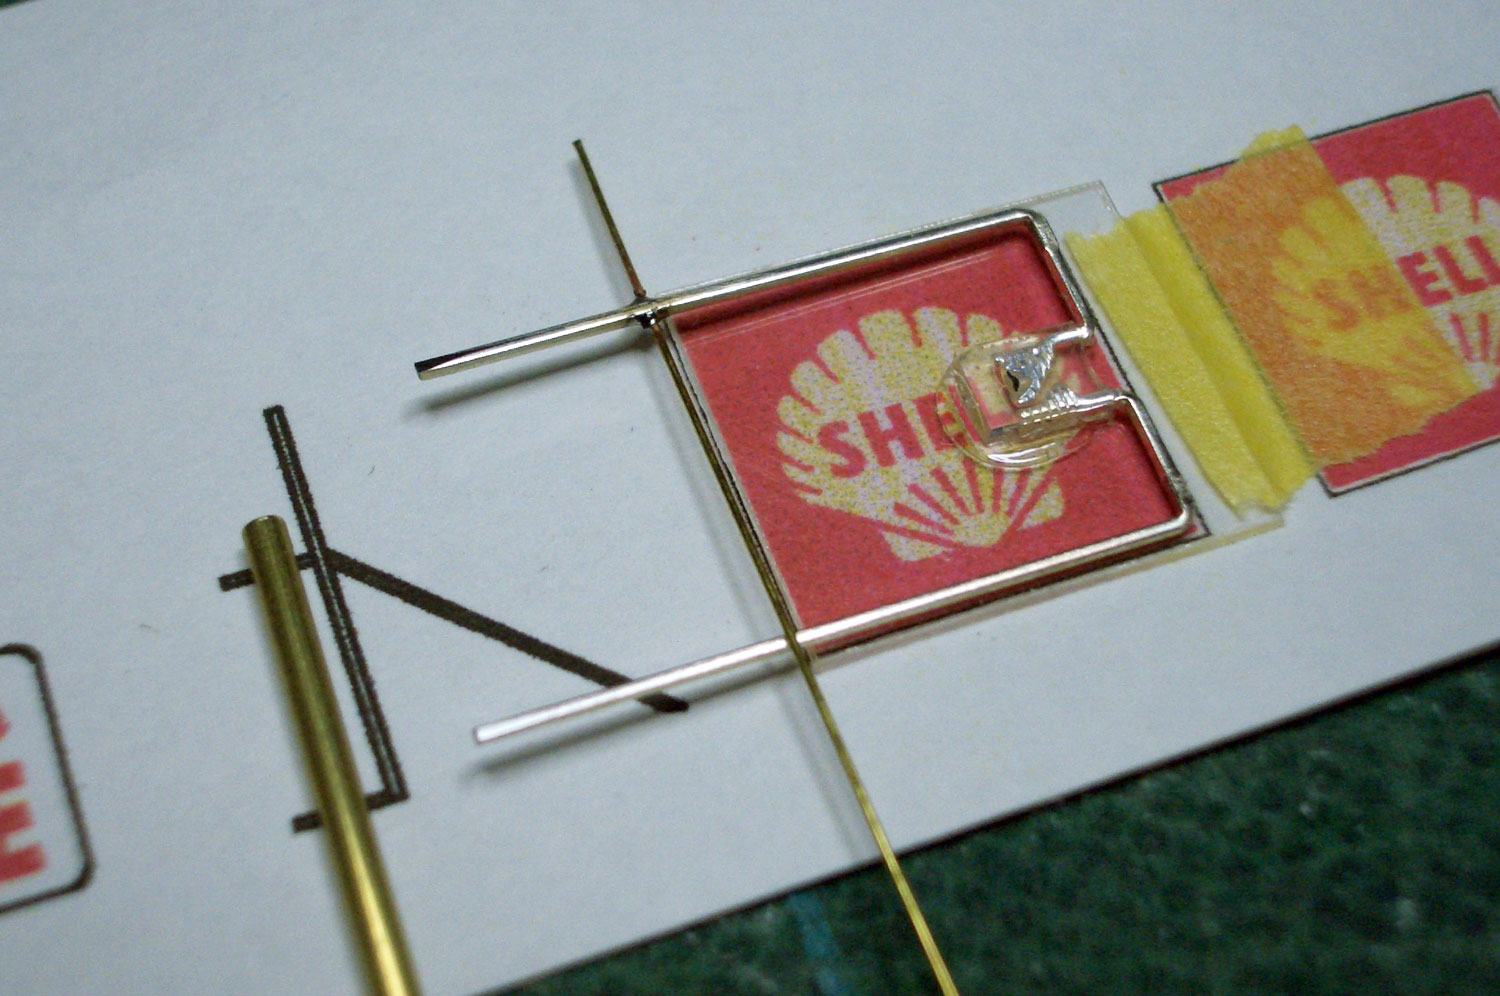 : making illuminated SHELL sign
I’m trying to duplicate the whole town of Cisco, Utah in N scale. Here, I represent the making of Ethel’s Cafe.
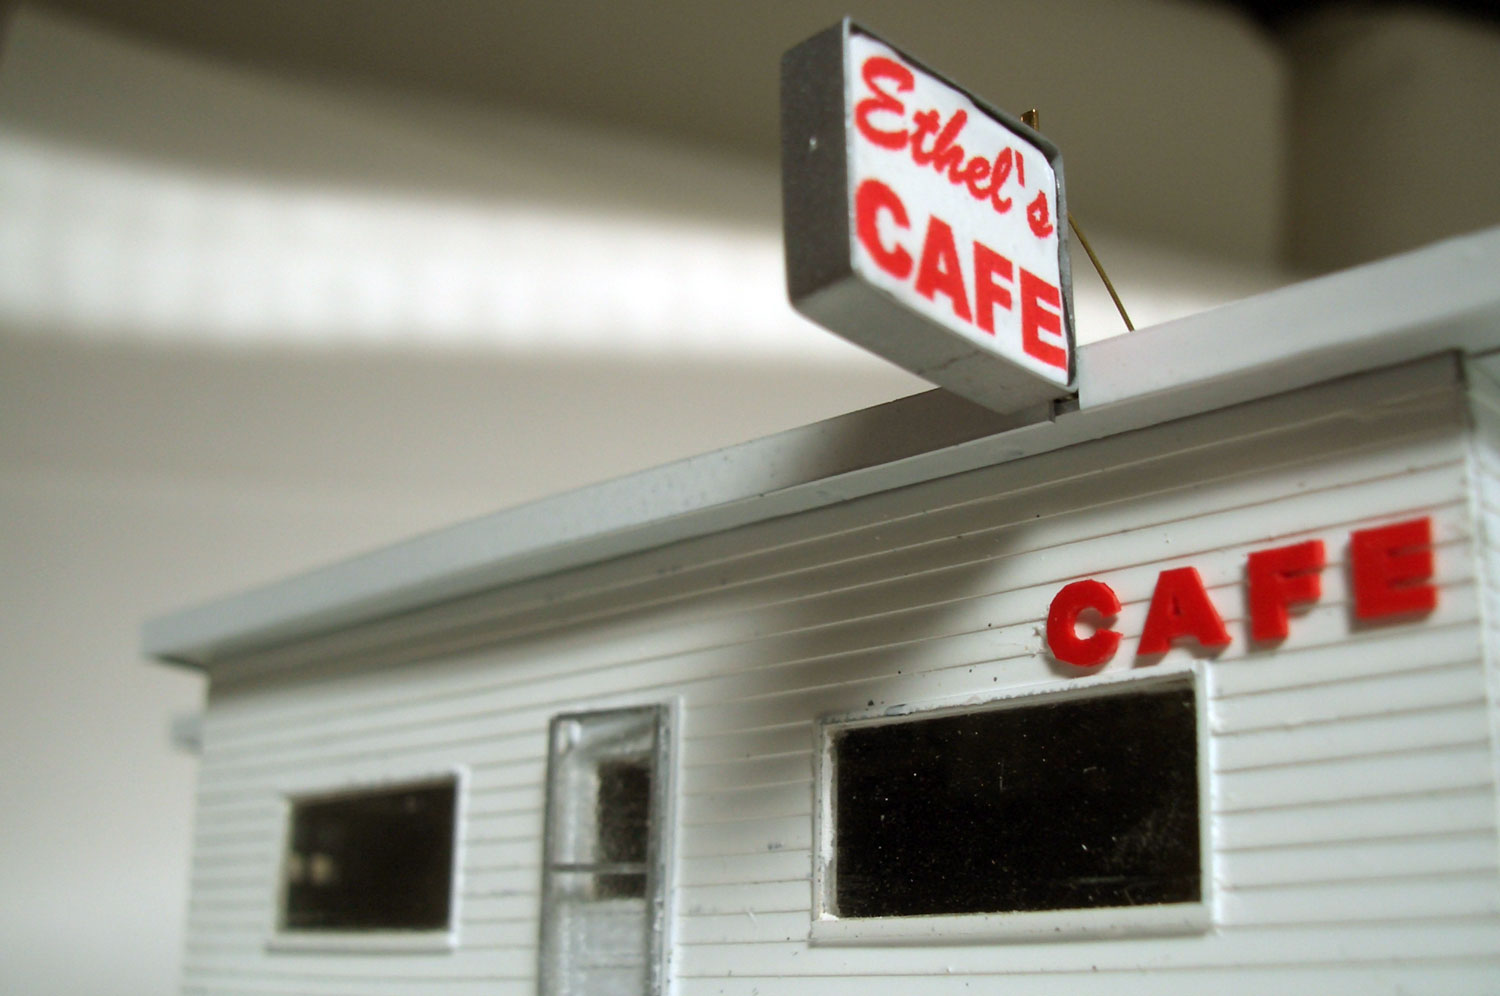
As the appearance of the cafe isn’t so decorative compared with the Cisco Mercantile, I decided to make illuminated signs using LEDs. There are two signs, Ethel’s CAFE and SHELL. I used white 3.3V 20mA square LEDs for both. I also made the cutout letters CAFE on the wall from 0.3mm styrene sheet.
Inside the cafe is lit with a 3.2V 20mA warm white LED. As the interior of the cafe is uncertain, I made the imaginary fixture. A beverage cooler and a sofa are derived from remains at the site. Ethel and her guest in the photo below are the Woodland Scenic products. Late 60’s and early 70’s Coca-Cola, Budweiser and Marlboro ads fill the wall.
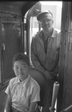
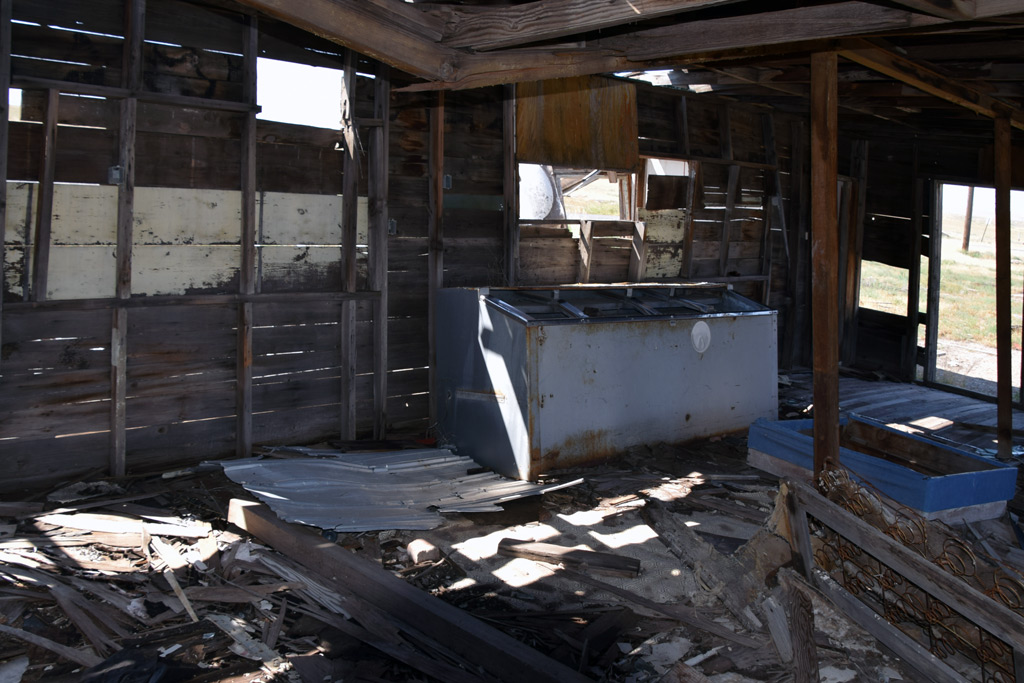 : Cisco, UT. Sep. 11, 2014
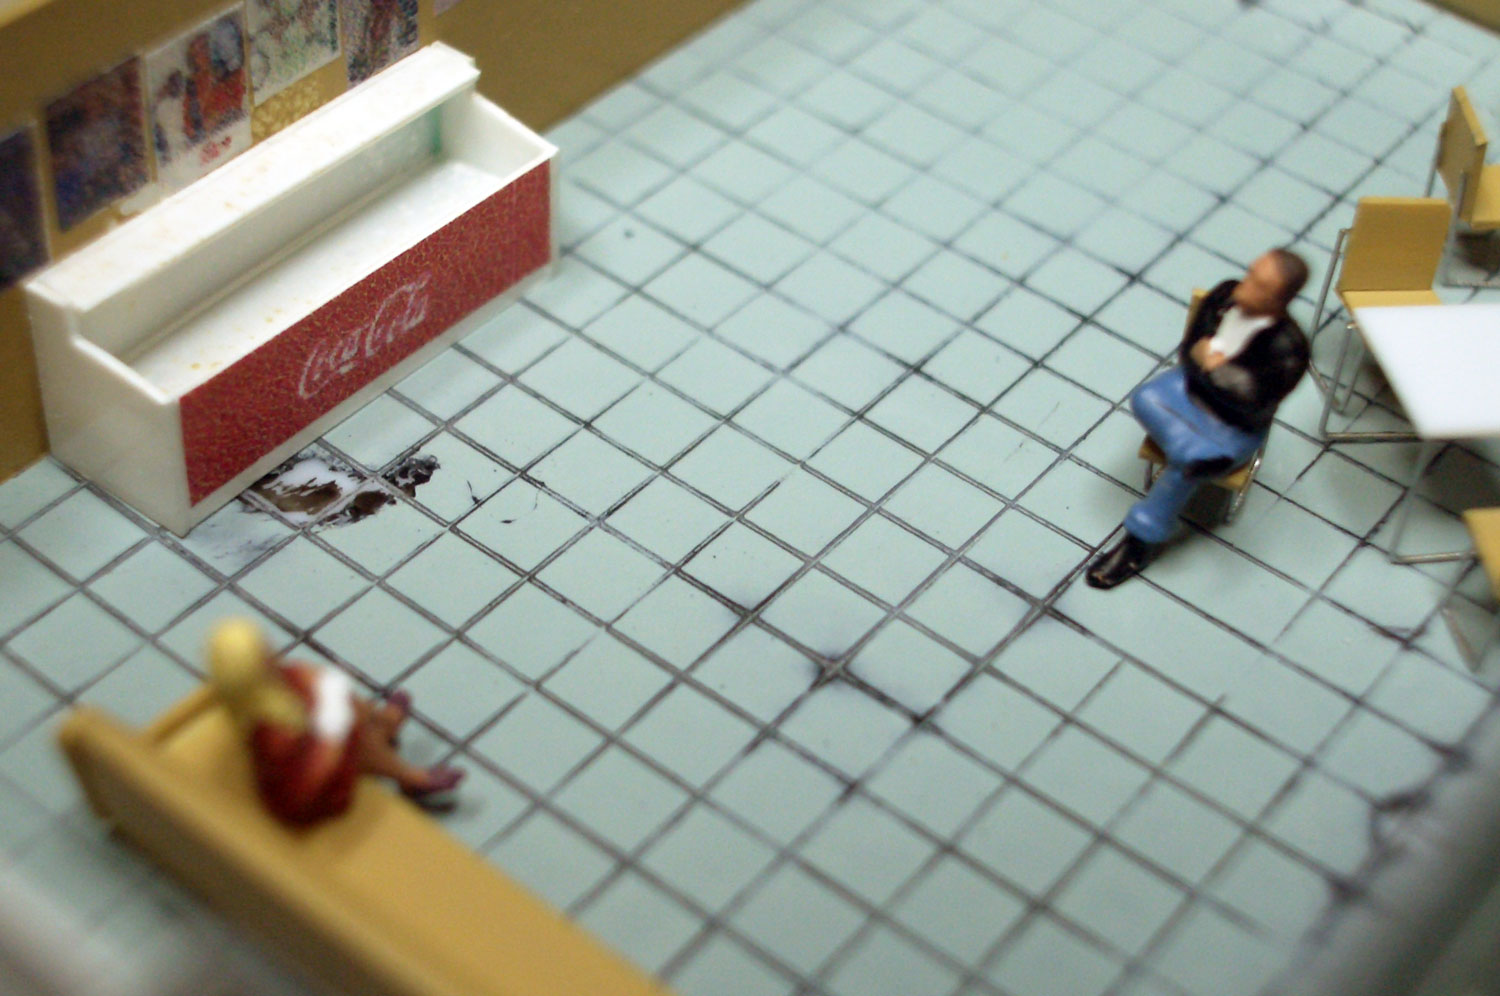 : Ethel and her guest
2016-01-29 09:00
コメント(0)
Making Ethel’s Cafe, part 3 [Works_Cisco Townsite]
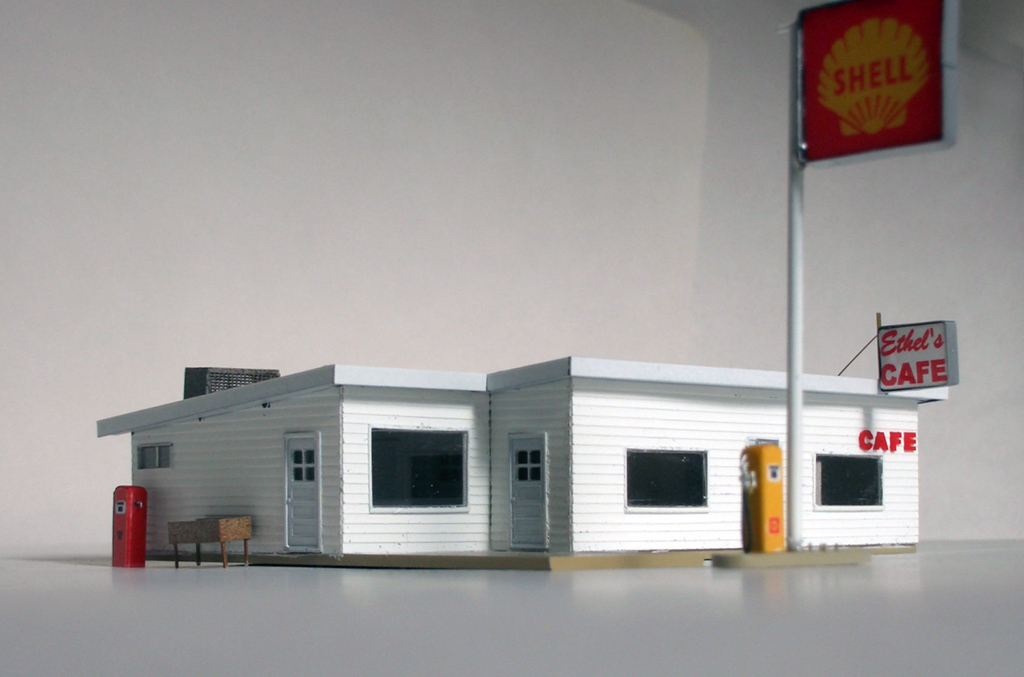 : looking from the northeast
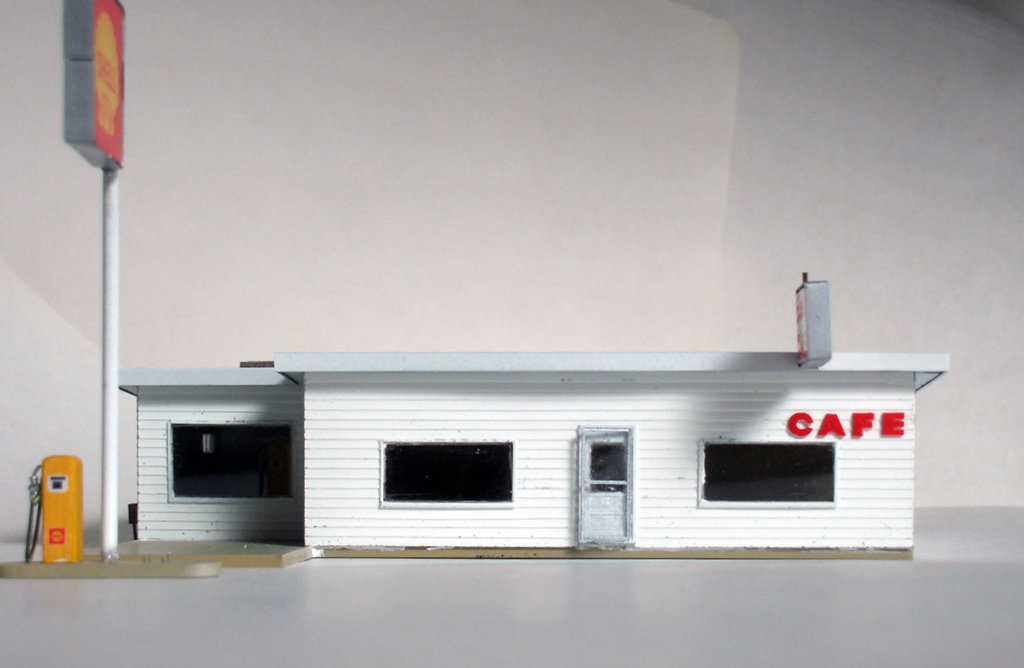 : the north elevation
I’m trying to duplicate the whole town of Cisco, Utah in N scale. Here, I represent the making of Ethel’s Cafe.
Yellow gas pump is a scratch built. Abandoned gas pump and a sink occupying the wall facing east, as is the prototype, are also scratch built. Mosquito net at the door is made of clear decal sheet. Air conditioning unit placed on the roof is also scratch built.
Maybe I need an engine oil rack next to the pump. Also is the the cafe interior: Jim Stile writes that he found Ethel in the counter[1]. I wonder how the counter was arranged.
Edward Hopper’s shadow in the paint Gas is reproduced in the nighttime photo of the structure, as you can see below[2]. Shell Service Station at Mexican Hat, UT also shows the impressive shadow in summer 2014.
[1] essay by Jim Stile;
[2] Gas by Edward Hopper;
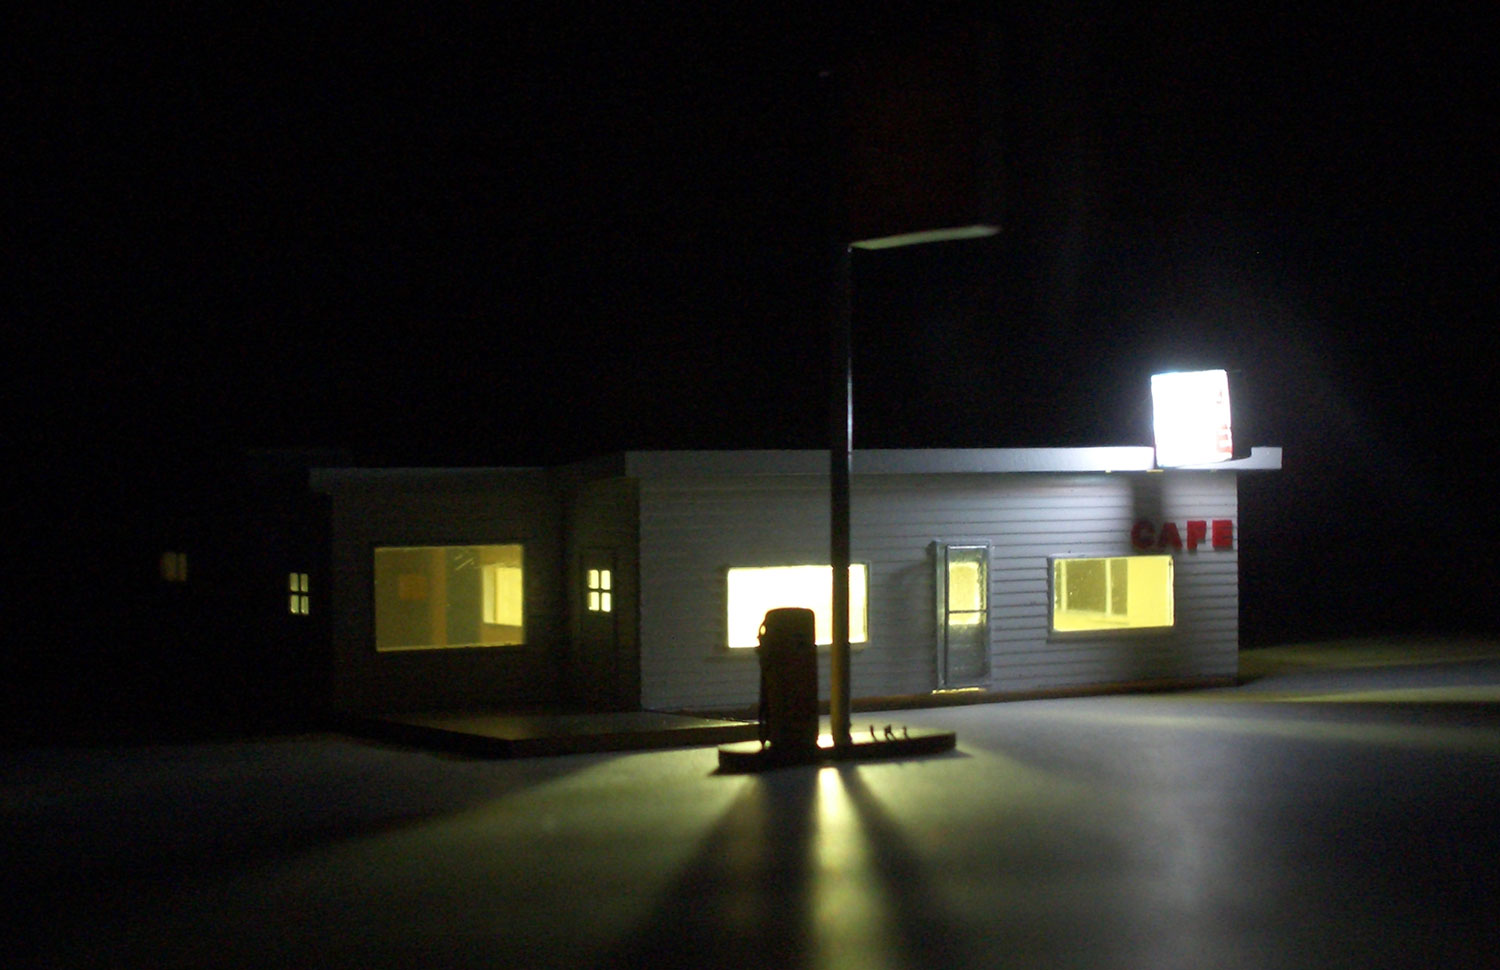 : looking from northeast at night
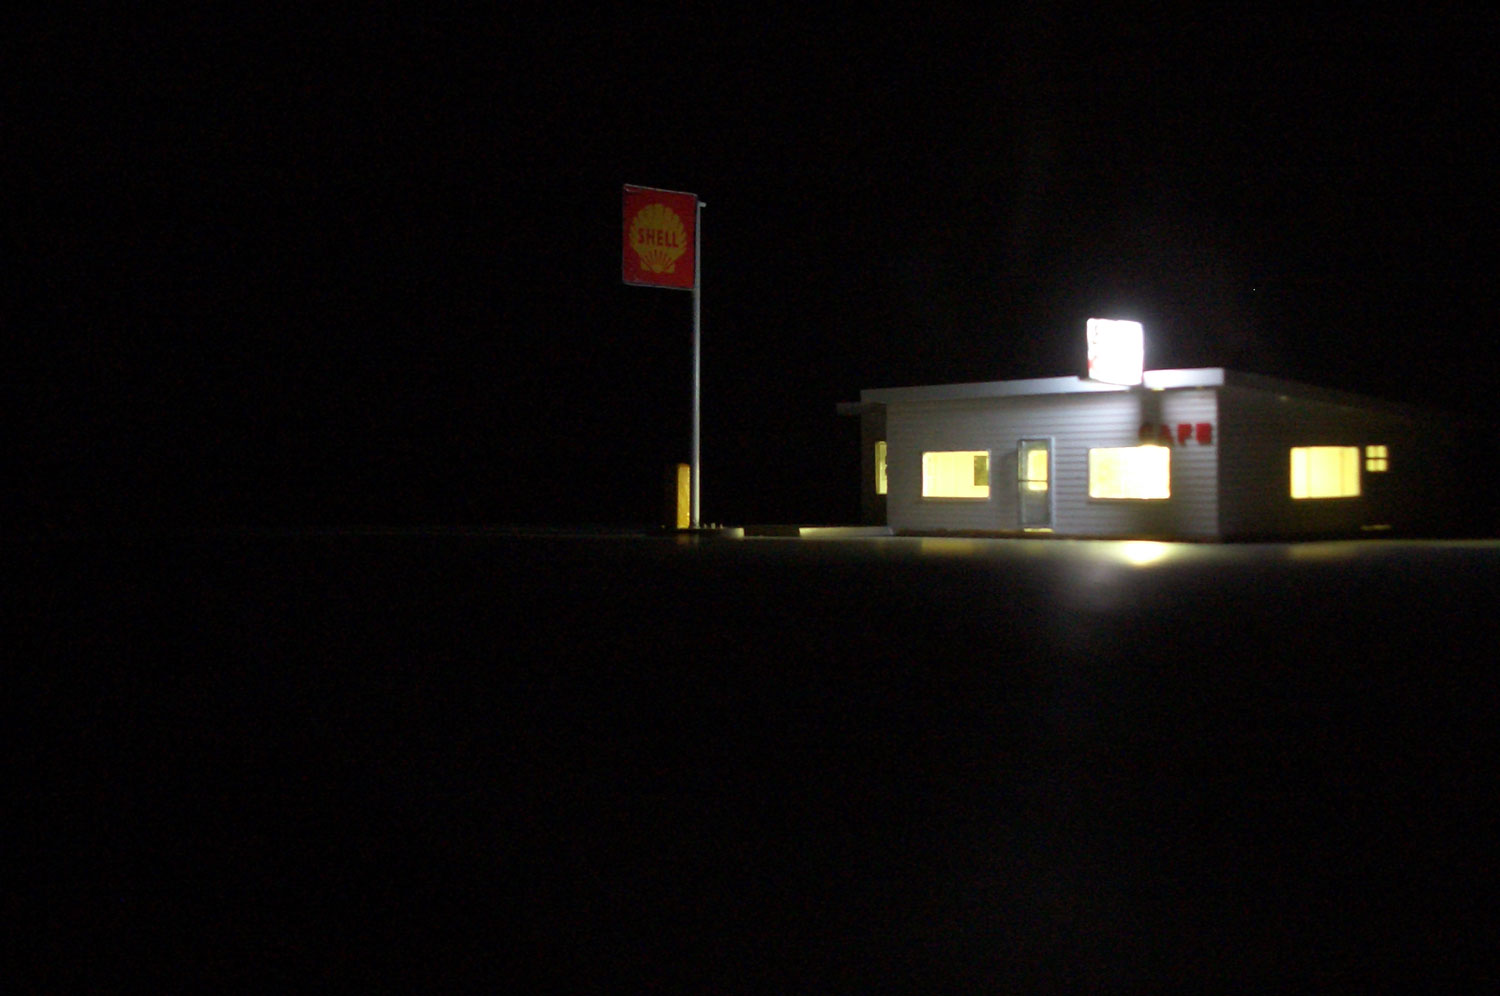 : looking from northwest at night
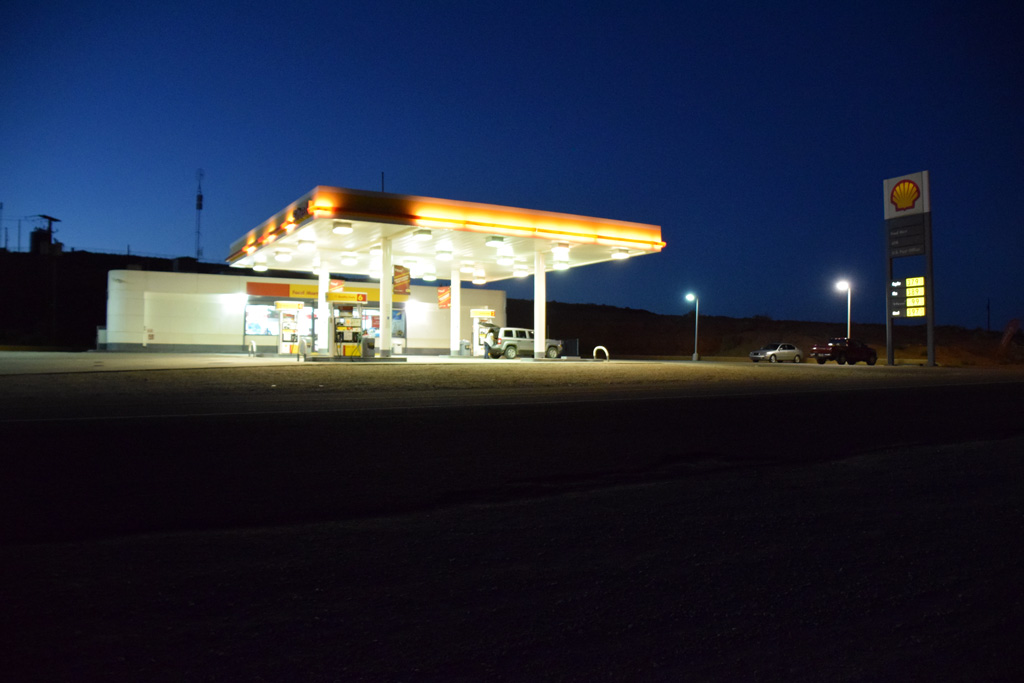 : Mexican Hat, UT. Sep. 12, 2014
2016-02-05 09:00
コメント(0)
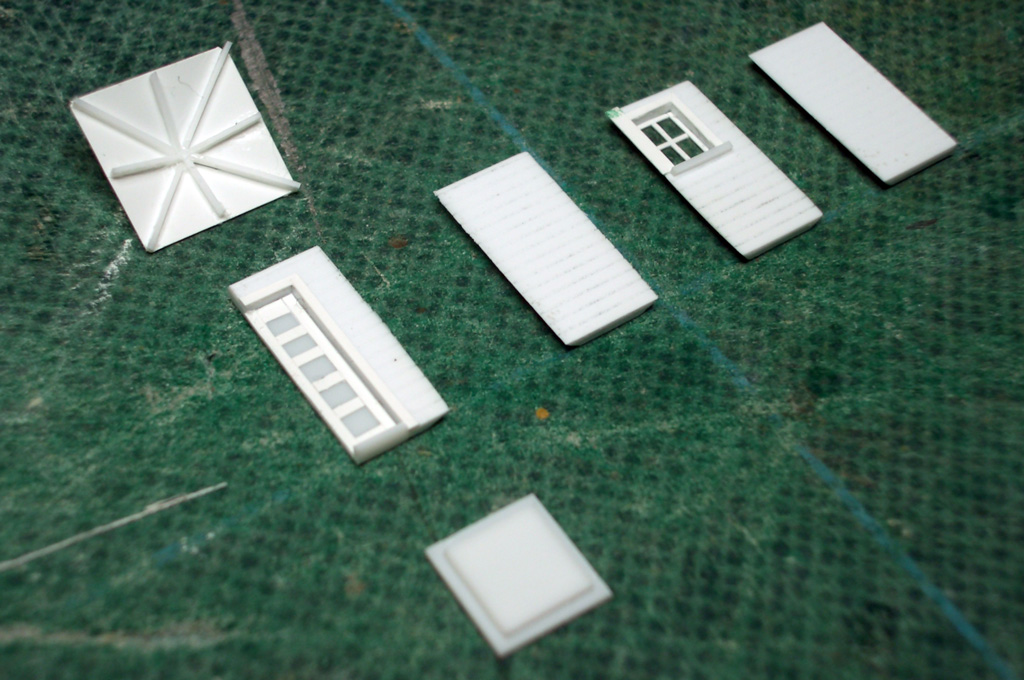
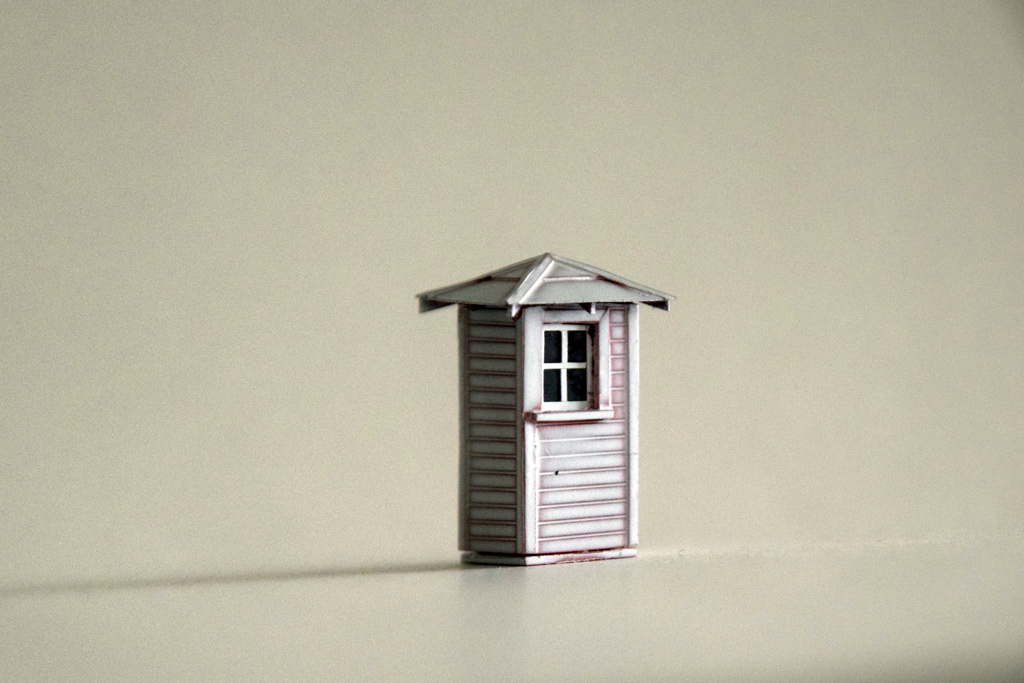
Making D&RGW Telephone Booth (Outhouse) [Works_Cisco Townsite]
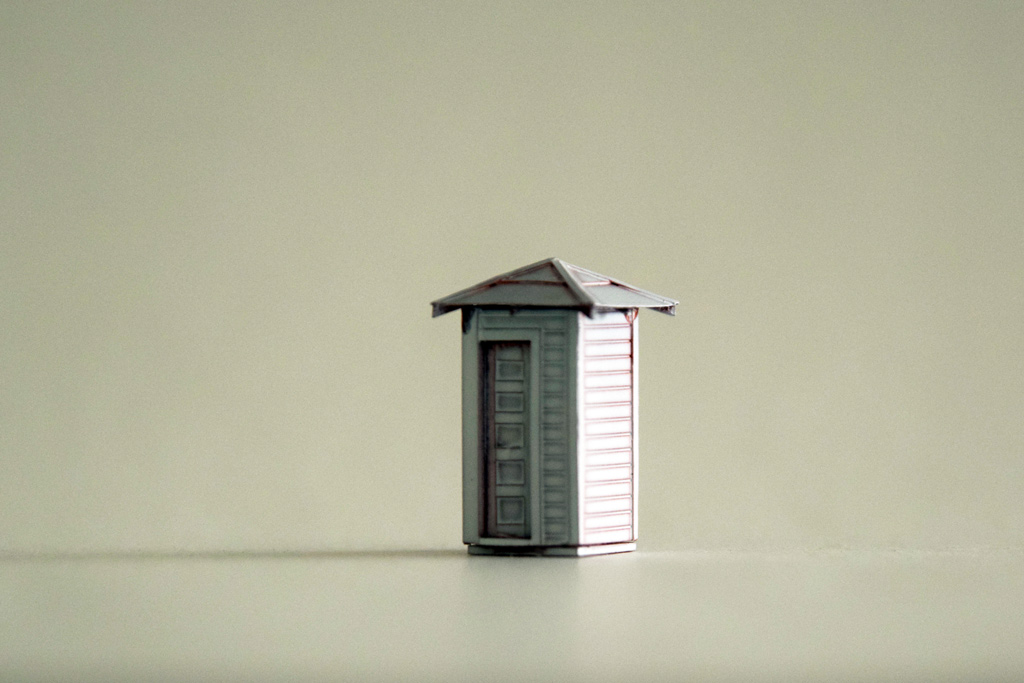
I’m trying to duplicate the whole town of Cisco, Utah in N scale. Here, I represent the making of D&RGW telephone booth/outhouse.
I think this structure is suitable for 3D printing because of its size. But I only need one. So, I chose my ordinary styrene sheet modeling. I used 1.0mm thick Evergreen #4037 for walls. Tamiya 0.1mm and 0.3mm styrene sheets are also used for doors, windows, and roof.
2017-03-17 09:00
コメント(0)
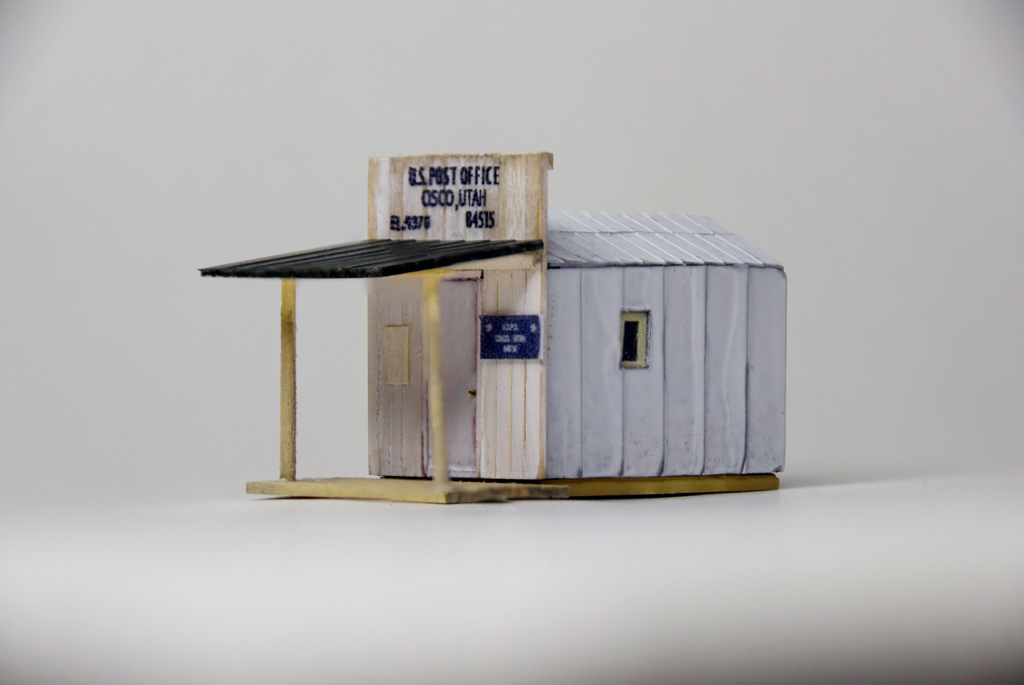
Making Post Office [Works_Cisco Townsite]
 : looking from southeast
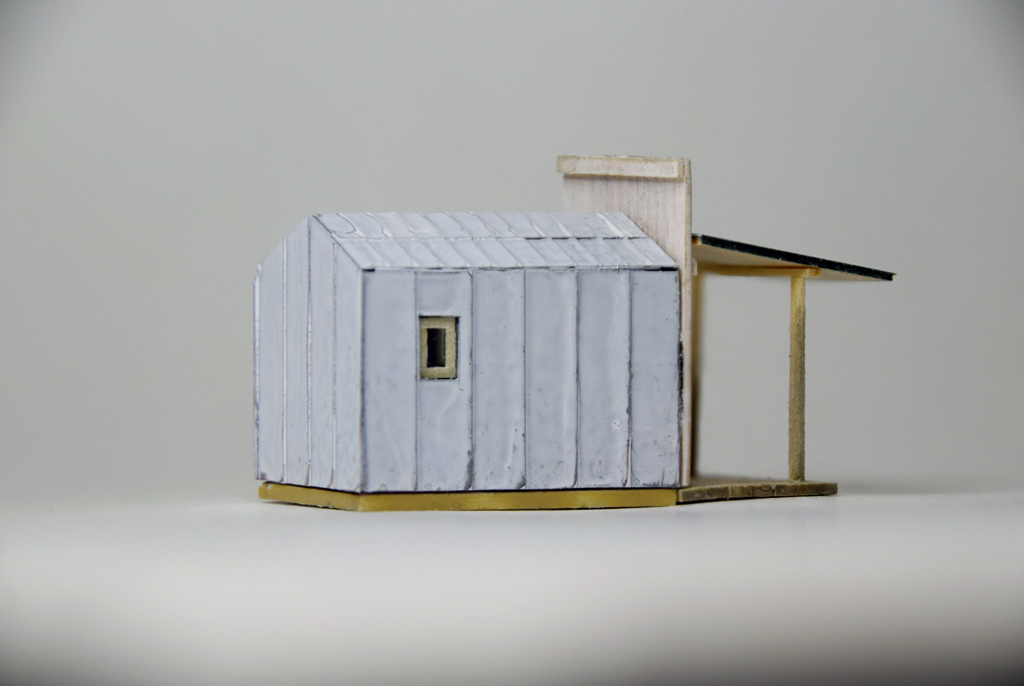 : looking from northwest
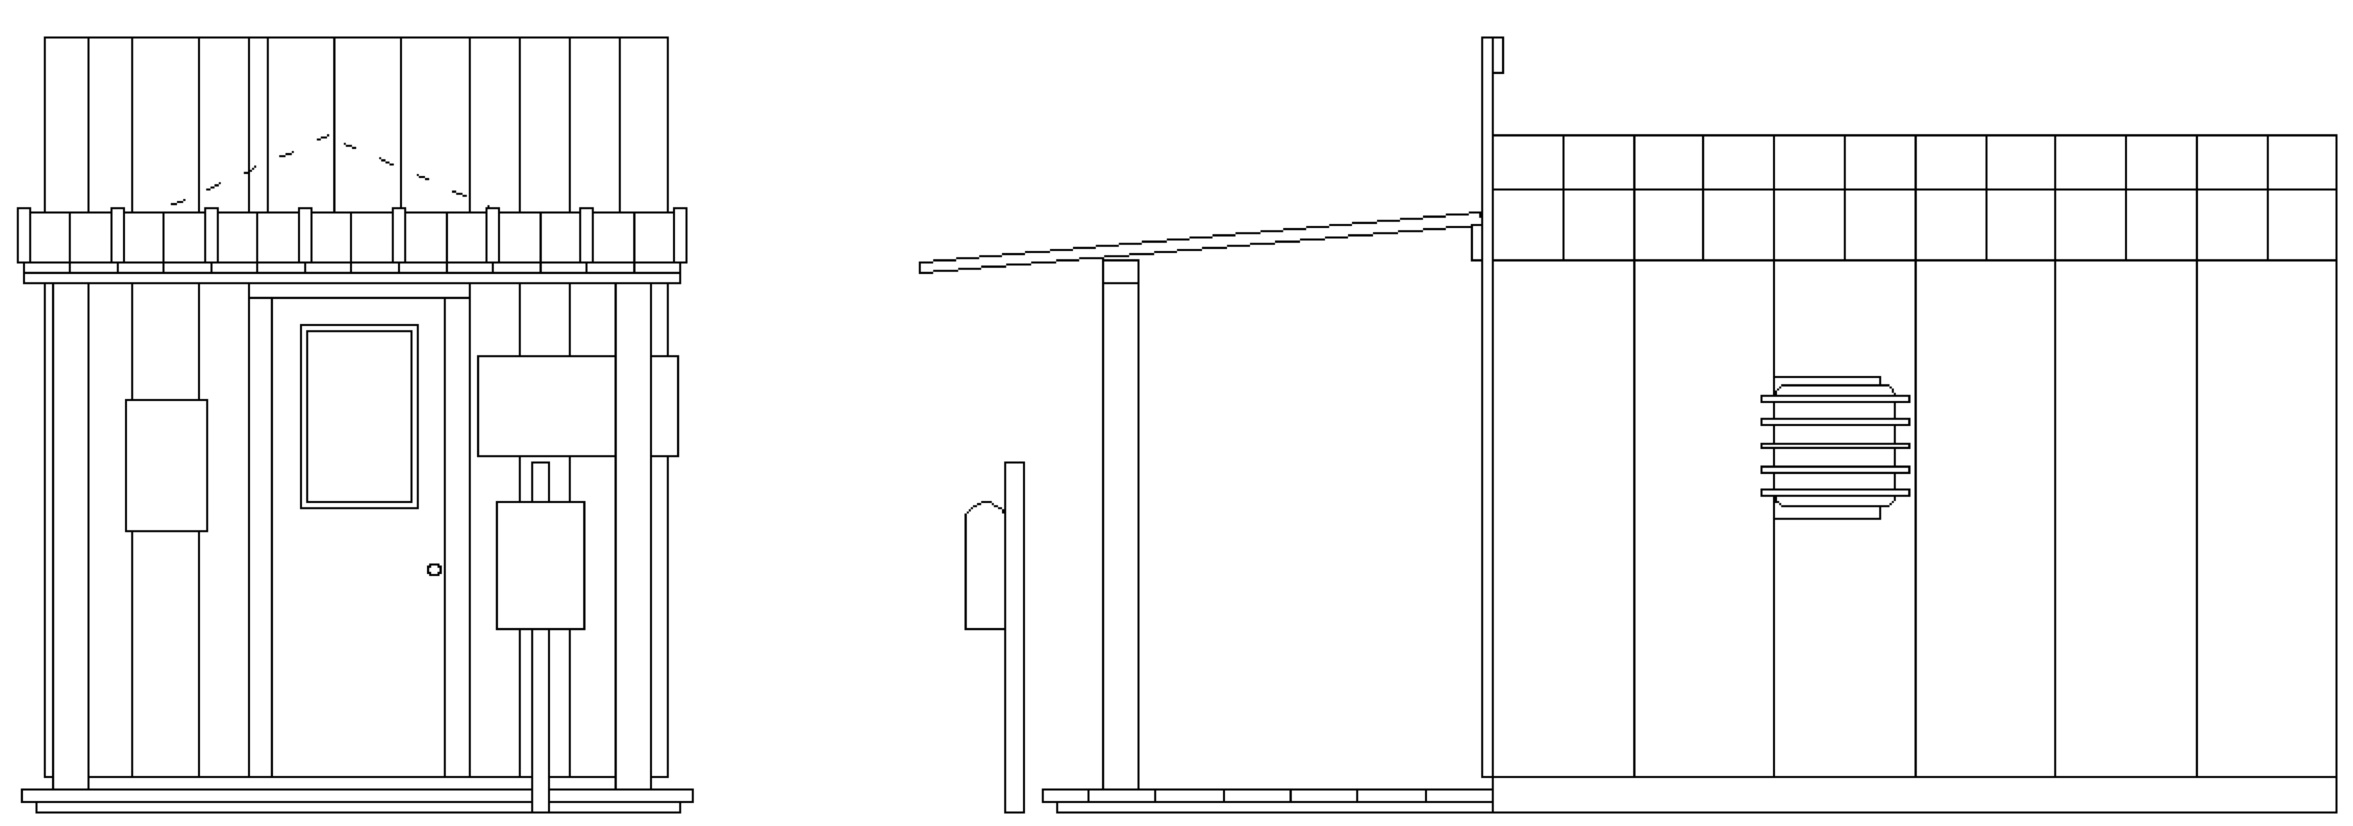 : south and east elevation
I’m trying to duplicate the whole town of Cisco, Utah in N scale. Here, I represent the making of Cisco Post Office.
There still exists the Post Office structure with roof and walls sheathed with sheet metal. As I mentioned in the previous post, this structure was installed no later than 1969. I measured and drew plans. The result is shown above.
As you can see in the prototype photos, the structure is consisted of steel shack, wood façade, deck and the lean-to. Accordingly, I used styrene sheets and wood for the model. The shack is made of 1.2mm thick styrene sheet, sheathed with 0.1mm thick styrene sheet. Others are made of wood. Shack and façade are painted white, with light weathering overall. Letterings are of self-made decals.
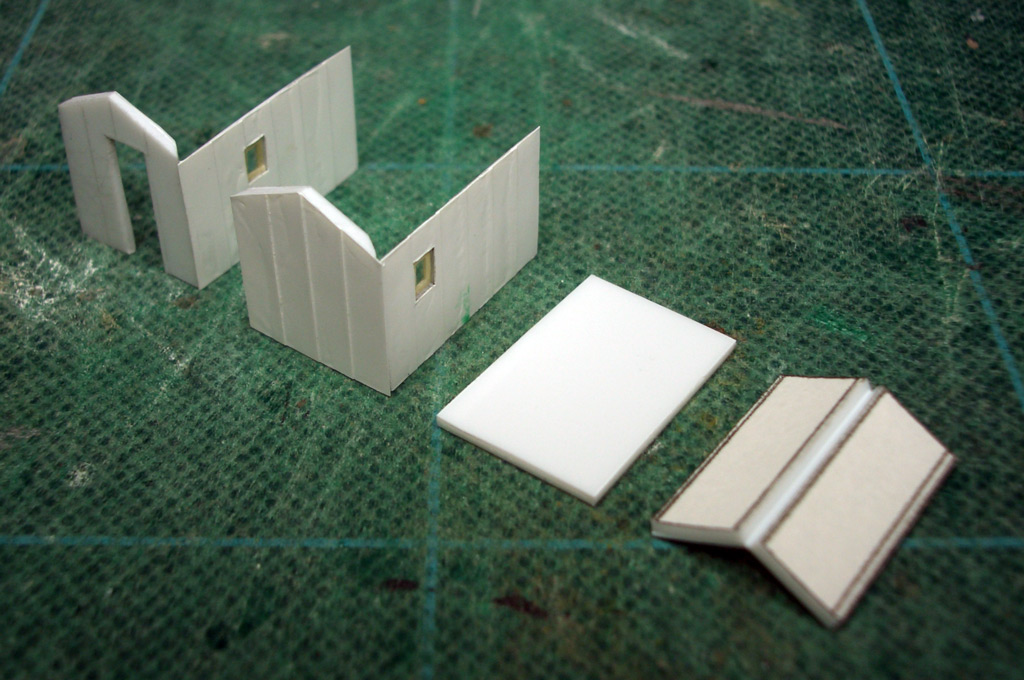 : model parts ready to assemble
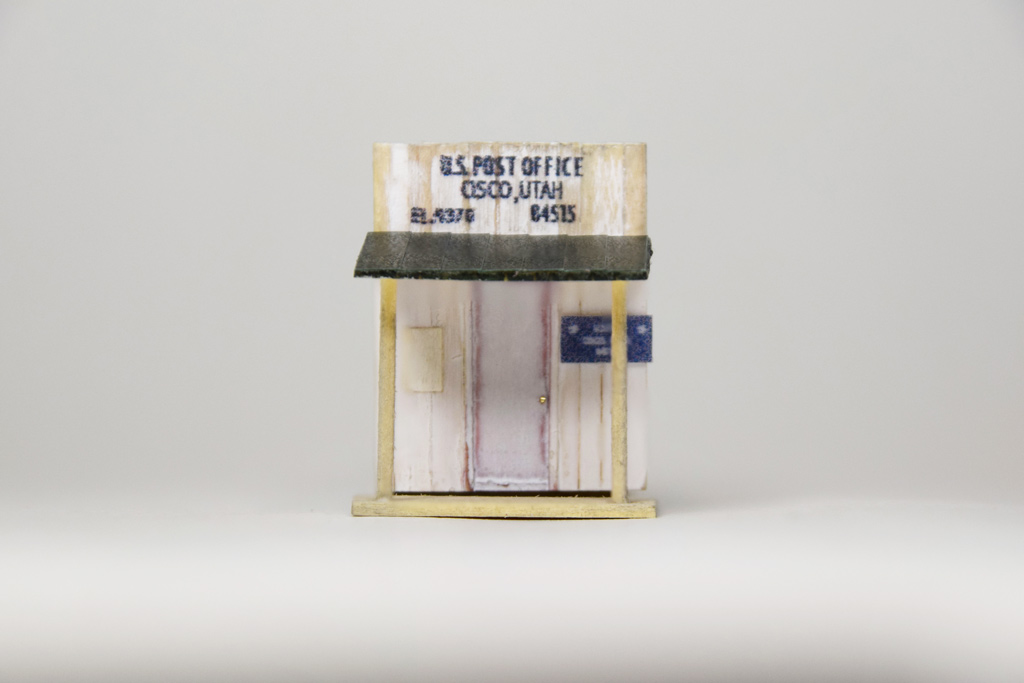 : looking from the south
2017-03-31 09:00
コメント(0)
arx_Ph.D. さん
Here represented are my model railroad enthusiasm generated from the photos I took during my childhood at Knoxville, Tennessee, or from the photos I took during my recent trips.
I'm a retired professor of design, meanwhile a part-time associate at the architectural design office in Osaka, Japan where I live with my wife.


